Anvil's HTML to PDF API feature allows you to create PDFs with your own HTML and CSS. In this post, we'll touch on a handful of advanced PDF-specific HTML & CSS features that give you full control over your PDF's output.
Generally the advanced features covered here will help you control page-level rendering on a PDF. HTML and CSS don't have the concept of a page in the same way a PDF does, so there are no mechanisms built into vanilla HTML / CSS to help with page-level rendering. Our HTML renderer has a few extensions that make working with pages a lot easier.
If you haven't already, make sure you are up to speed on our PDF generation API documentation.
In this post we'll cover:
- Repeating table headers on each page
- Forcing page breaks
- Rendering page numbers
- Rendering HTML elements in the page margins
HTML to PDF converter API capabilities
Repeating table headers on each page
Say you have an HTML table with 100 rows. When you render a long table like this in a browser, the table content can expand forever. In the browser world, you don't need to worry about pages at all—which page your table rows land on, how many can fit on a page, etc.
However, when using the HTML to PDF API to render this same table, you'll need to deal with page breaks. If a table is longer than a single page or starts halfway down a page, rows will need to be broken up and rendered across multiple pages.
Turns out a page full of table rows without header context isn't very user friendly. For example, if you printed out the following, its second page would be a little confusing without the headers. What is that 3rd column again?
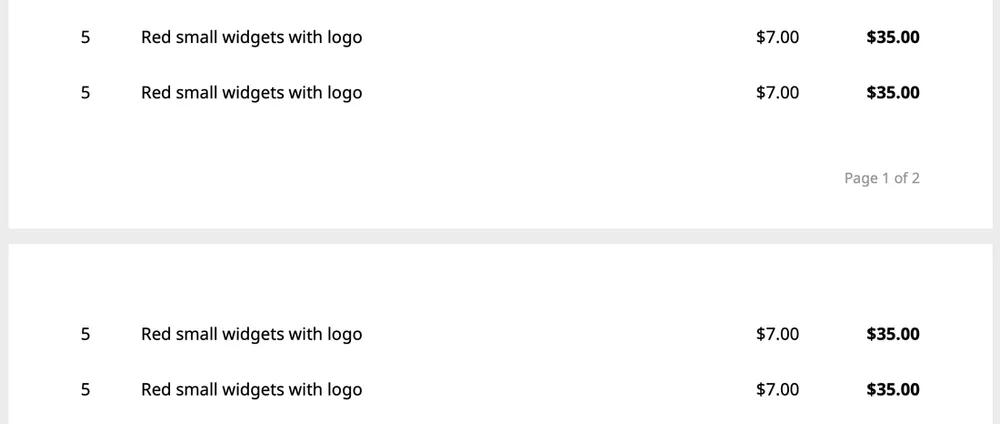
Ideally we'd render the table headers on each page that shows the table's rows, then someone doesn't need to look at a previous page to understand the headers.
Table header repeating like this is supported and is turned on by default! All you have to do is make sure you put your header th in a thead element:
<table>
  <thead>
    <tr>
      <th>Qty</th>
      <th>Description</th>
      <th>Price</th>
      <th>Subtotal</th>
    </tr>
  </thead>
  <tbody>
    <tr>
      <td>2</td>
      <td>Blue large widgets</td>
      <td>$15.00</td>
      <td>$30.00</td>
    </tr>
    <!-- ...Many more rows... -->
  </tbody>
</table>
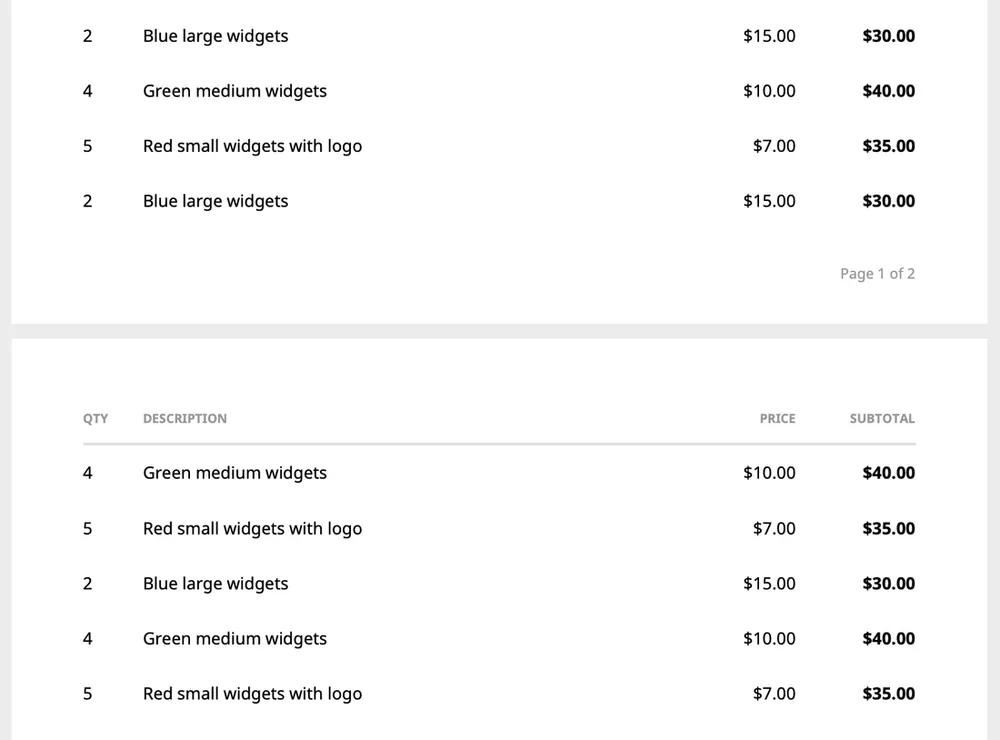
Then the headers render again on pages that get the overflow rows:
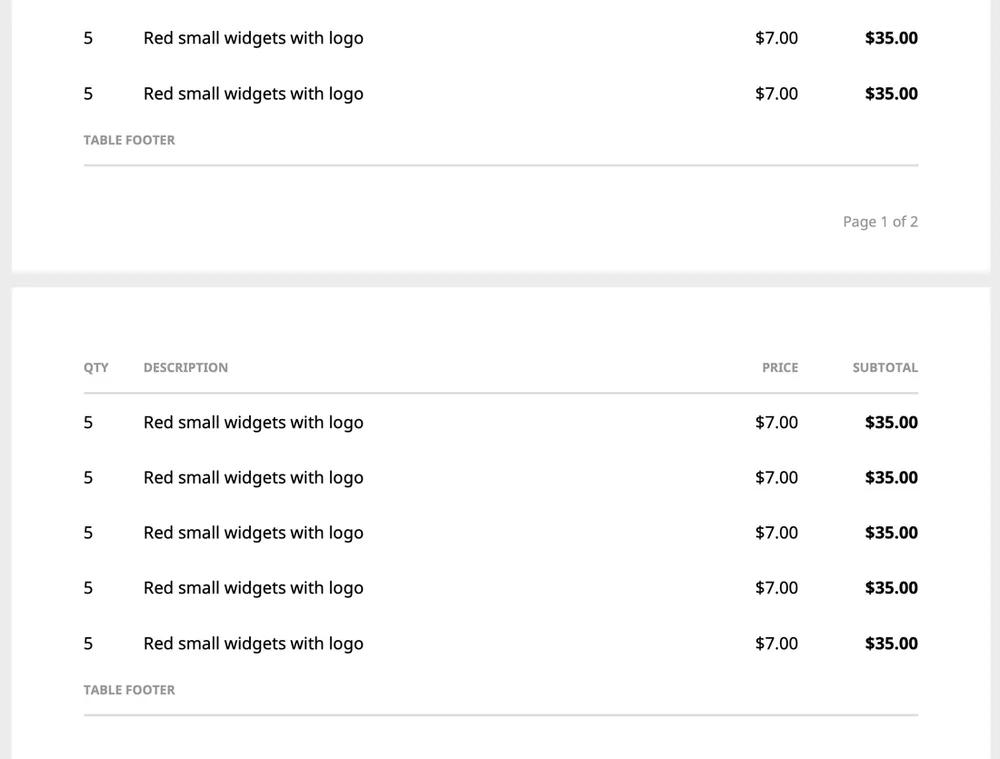
Repeating also works with table footers when a tfoot element is used:
<table>
  <thead>
    ...
  </thead>
  <tbody>
    <tr>
      <td>2</td>
      <td>Blue large widgets</td>
      <td>$15.00</td>
      <td>$30.00</td>
    </tr>
    <!-- ...Many more rows... -->
  </tbody>
  <tfoot>
    <tr>
      <th>Table Footer</th>
    </tr>
  </tfoot>
</table>
Here's the header and footer repeating:
All the table context, all the time!
Turning header repeating off
While table header repeating is on by default, you can turn it off with a custom CSS rule -fs-table-paginate:
table.no-header-repeat {
  -fs-table-paginate: none;
}
Or you can disable it by simply not using thead, tbody, and tfoot elements.
Forcing page breaks in the HTML to pdf conversion API
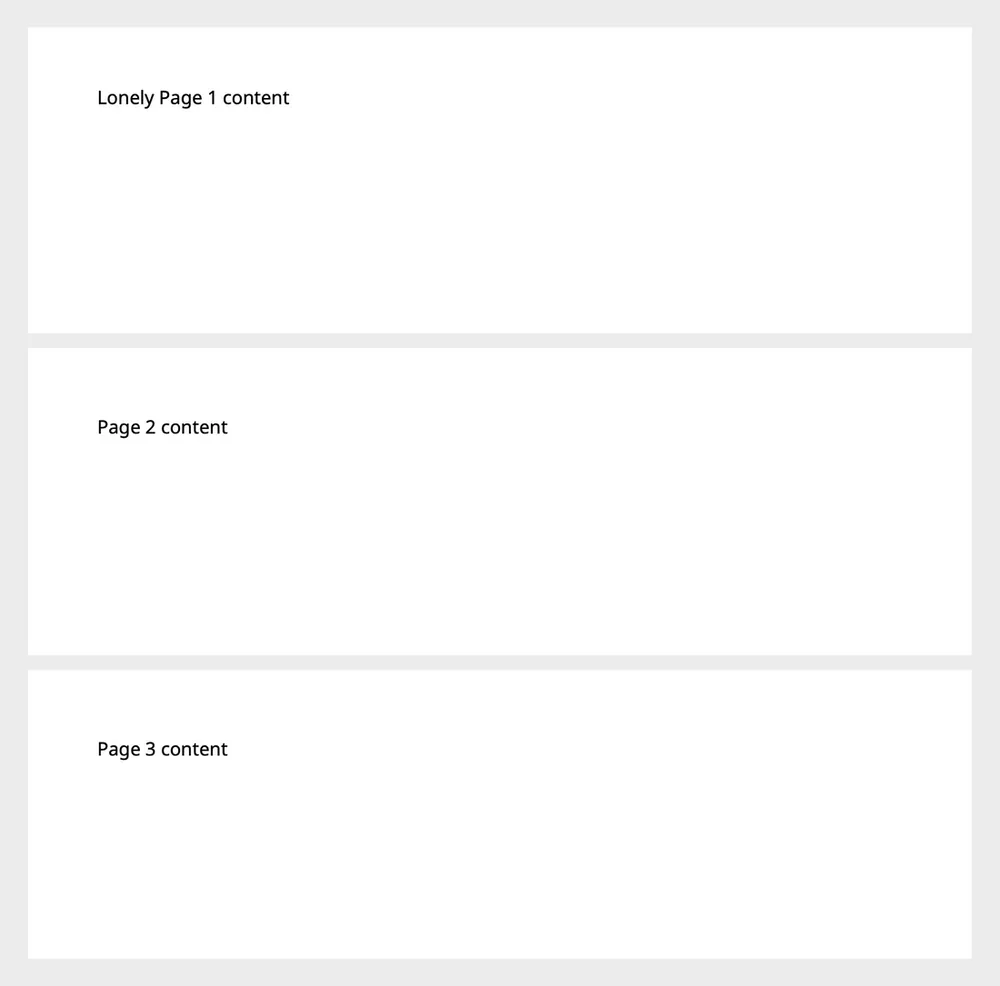
Sometimes you need a piece of content to always start on its own page, no matter the content that came before it. You can force page breaks with the page-break-before: always rule on any element. It will create a new page, then set the element with the page-break-before CSS rule as the first element of that page.
Here's a simple example with three pages:
<!-- Page 1-->
<div>Lonely Page 1 content</div>

<!-- .new-page causes a page break -->
<div class="new-page">Page 2 content</div>

<!-- .new-page causes another page break -->
<div class="new-page">Page 3 content</div>
CSS:
.new-page {
  page-break-before: always;
}
Output:
Rendering page numbers
Page numbers are a fixture in most PDFs. Often PDFs will have a Page 2 of 3 style numbering scheme on each page.
You achieve this by injecting page numbers into any element by using a bit of special CSS. You target the content of your chosen element's ::after pseudo-element with a special directive:
<div class="page-container">
  Page
  <span class="page"></span>
  of
  <span class="pages"></span>
</div>
And the CSS
.page-container .page::after {
  content: counter(page);
}

.page-container .pages::after {
  content: counter(pages);
}
The targeted elements can be on any page you'd like. But it's likely most important to render the page number information on each page, in one of the margins, which brings us to our next section...
Rendering HTML elements in the page margins
Many PDFs have content in the margins on every page. For example, page numbers, your company name, phone number, etc. The HTML renderer allows rendering anything your heart desires in the margins by way of a "running" element.
You render an element in the body like any other element, define the element as a "running" element, then tell each page to use that element in one of the defined margin areas.
Here's an example that uses the page number example above and renders it in the bottom right margin on every page.
<body>
  <!--
    We'll make this a "running" element in the css.
    This element should be the first element after the body
    to show on all pages.
  -->
  <div class="page-container">Page <span class="page"></span></div>

  <!-- other elements -->
  <div>...content...</div>
</body>
CSS:
.page-container {
  /* Define this element as a running element called "pageContainer" */
  position: running(pageContainer);
}

@page {
  /*
  Use any of these locations to place your margin elements:
  @top-left, @top-left-corner
  @top-center
  @top-right, @top-right-corner
  @bottom-left, @bottom-left-corner
  @bottom-center
  @bottom-right, @bottom-right-corner
  */
  @bottom-right {
    /*
    Reference "pageContainer" to be the content for the
    bottom right page margin area
    */
    content: element(pageContainer);
  }
}
The output using the page breaks and applying a little styling to the page numbers:
Element location
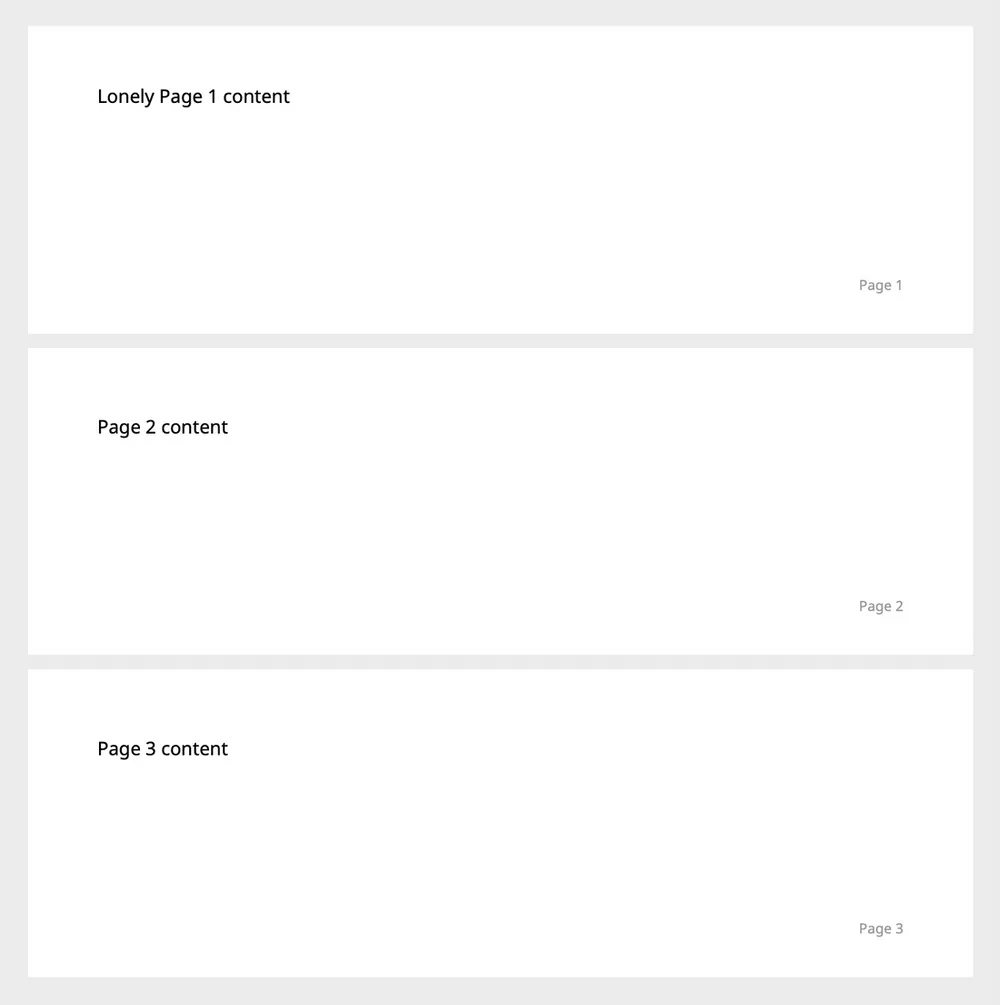
A "running" element's location in the HTML determines which pages it shows on. If you want it in a margin element on all pages, just make sure to place the "running" element before all non-running HTML elements in the HTML code. For example, place all your margin elements that show on all pages right after the <body> element.
To see this behavior in action, using the page number and page break examples above, we can start the page numbering on the 2nd page by placing the running pageContainer element on the second page.
<div>Lonely Page 1 content</div>
<div class="new-page">Page 2 content</div>

<!--
  The page numbering will start on the 2nd page because
  we're rendering it after page 2's pagebreak
-->
<div class="page-container">Page <span class="page"></span></div>

<!-- Page 3 will also have the page number in the margin -->
<div class="new-page">Page 3 content</div>
CSS:
.page-container {
  /* Define the this element as a running element called "pageContainer" */
  position: running(pageContainer);
}

.new-page {
  page-break-before: always;
}

@page {
  @bottom-right {
    /* Reference "pageContainer" to be the content for the bottom right page margin area */
    content: element(pageContainer);
  }
}
Here's the output. Notice there is no Page 1 on the first page:

Positioning margin elements
Margin elements may not render exactly where you want them to. It's possible to place them exactly where you want with margin-top.
<div class="margin-content">Margin Content</div>
CSS:
.margin-content {
  position: running(marginContent);

  /* Position the element with margins */
  margin-top: 10px;

  /* Style margin element like any other */
  font-size: 12px;
  color: #c00;
}

@page {
  @top-left {
    content: element(marginContent);
  }
}
margin-top: 0:

margin-top: -25px:

margin-top: 25px:

Next steps for PDF optimization
You’ve explored the advanced features of our HTML to PDF API, equipping you to create customized PDF documents effectively.
To further enhance your workflow, consider exploring Anvil’s Document AI. Our AI technology now allows you to transform your PDFs into fillable templates, streamlining data collection and user interaction. For additional assistance or to discuss specific use cases, we encourage you to get in touch.