
Cloud-hosted Kubernetes deployments offer a lot of power with significantly less configuration than self-hosted Kubernetes deployments. Cloud providers like Google Cloud Platform and AWS are able to offer this service by deploying the Kubernetes servers with some pre-configurations. These pre-configurations work well for most situations, but can fall short with a deployment outside the norm.
In our case, we are specifically interested in load balancing gRPC deployments. Unfortunately the out-of-the-box configurations leave a lot of performance on the table with gRPC due to multiplexed requests over HTTP/2.
Fear not! With the use of open source service mesh tools, intelligent load balancing can be configured quickly and effortlessly and provide a HUGE improvement in performance.
The Load Balancing Challenge: An Overview of a Sample Kubernetes Deployment
Before we dive into the details, let’s look at the issue. Below we have a very simple application based on the gRPC quickstart guide. This application consists of a server and client gRPC setup. It is deployed as containers in a hosted Google Kubernetes Engine cluster which consists of:
- 4 gRPC server pods
- 1 service to load balance the server pods
- 1 client pod which will act as a proxy into the cluster for us to be able to run a test script
kubectl create namespace grpcdemo
kubectl config set-context --current --namespace=grpcdemo

kubectl apply -f k8s.yaml # Create the resources
kubectl get pods | grep greeter-client # The proxy pod
kubectl exec -it <pod name from above> -- bin/sh # Create a shell sessions to this pod

# Once in the proxy pod, we can run our node script which will hit the gRPC servers and return a message along with the hostname of the server.

node greeter_client
## response…
#2 - Greeting: Hello from greeter-server-b8fb8c4b4-qjpjx, Anvil User!
#6 - Greeting: Hello from greeter-server-b8fb8c4b4-qjpjx, Anvil User!
#10 - Greeting: Hello from greeter-server-b8fb8c4b4-qjpjx, Anvil User!
#14 - Greeting: Hello from greeter-server-b8fb8c4b4-qjpjx, Anvil User!
#18 - Greeting: Hello from greeter-server-b8fb8c4b4-qjpjx, Anvil User!
#22 - Greeting: Hello from greeter-server-b8fb8c4b4-qjpjx, Anvil User!
#…
Source code can be found here.
Now this is problematic! Although we have 4 gRPC servers, only one is returning all of these responses. Why?
Native Kubernetes Service Load Balancing
Kubernetes uses Service Objects to route traffic to application pods. These services act as load balancers in a way by allowing one entry point to serve multiple backends. However, Services fall short when it comes to doing this intelligently. Kubernetes does allow some configuration around how Services distribute traffic, but in order to remove complexity GKE does not allow the user to change this setting.
The second, and much larger problem, is specific to gRPC. gRPC leverages HTTP/2 which sends multiple packets over one connection. Diagram 1 below illustrates the difference between classic HTTP connections and HTTP/2.
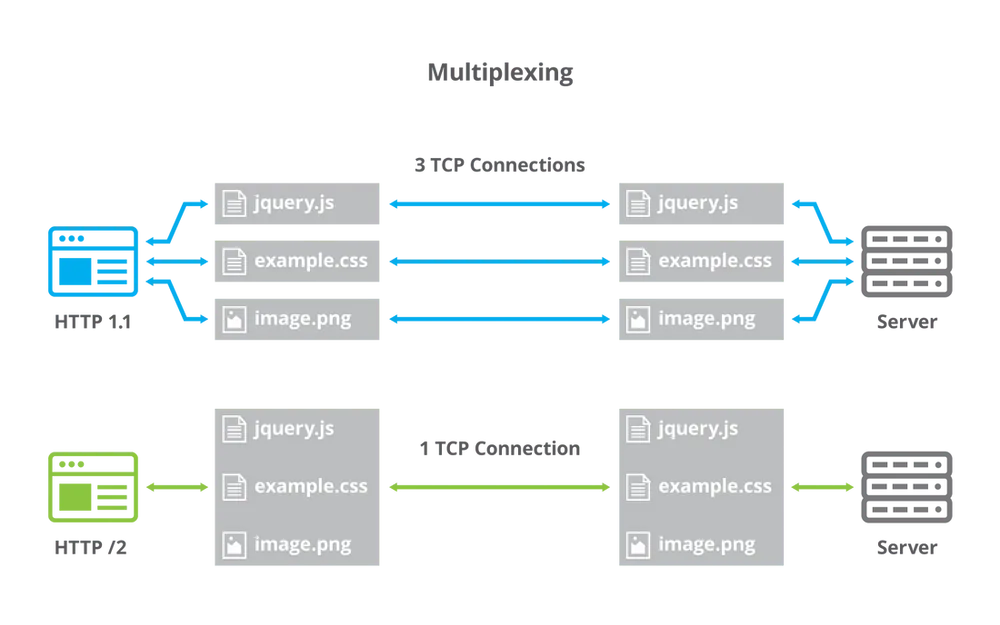 Diagram 1: HTTP 1.1 vs HTTP/2
Kubernetes Services only split requests by connection, but if multiple packets are being passed in a single request, there will be no benefit of load balancing. In our example above, we could run the script again to open a new connection which would be served by a different pod. However, this is not very practical given that some requests will be much larger than others. We end up with something like this.
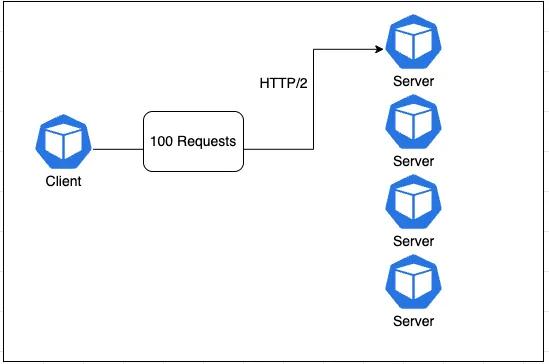 Diagram 2: Native Kubernetes Load Balancing
This kind of load balancing is very standard and known as Layer 3 (L3) load balancing. The load balancer is reading TCP/UDP connections and using an algorithm to distribute the connections out evenly across servers. But in today's day and age a new standard has arisen, L7 load balancing, which operates at the application layer. The application layer provides a lot more data around the requests and grants much more flexibility in how to balance them . But how do we add L7 load balancing to a Kubernetes Cluster? By adding a Service mesh!
What is a service mesh?
A service mesh’s main job is to manage traffic between pods within a Kubernetes cluster. It does this by using L7 data to route and monitor based on user configurations set somewhere. In Istio, these user configurations are set in the profile at installation. The scope of the service mesh is usually limited to only within a cluster, so everything before the Ingress is not managed.
Our service mesh of choice is Istio, but there are many alternatives, the most common being Linkerd and Consul. Istio stood out to us due to its extreme extensibility (tracing with Jaeger, rate limiting, etc.) as well as its built-in dashboard (Kiali). For us, Istio seemed like the long term solution for many problems we were trying to solve. To decide which service mesh could suit your needs, give this article by Guillaume Dury a read.
How does a service mesh actually work?
All service meshes add an extra layer to a cluster to monitor L7 data at the pod level. There are multiple ways to do this, like installing a client into the application’s docker image, or adding a proxy container into each pod that handles all requests.
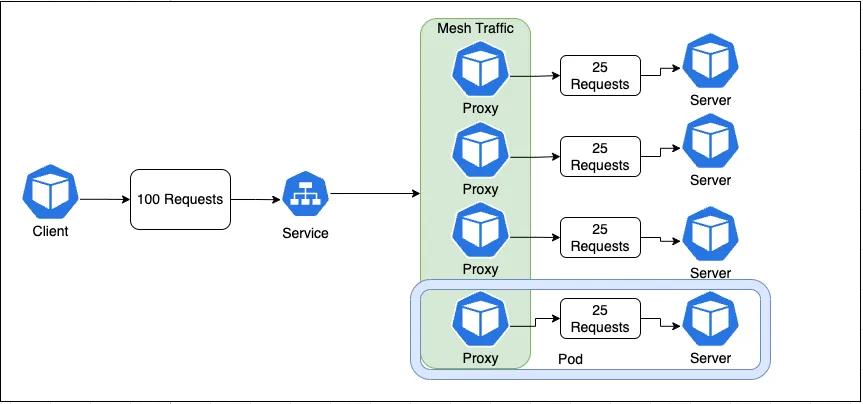 Diagram 3: Kubernetes Load balancing with Service Mesh
Istio opts for the latter and leverages Envoy as its proxy service. As seen in Diagram 3, all the proxies are deployed as sidecar containers alongside the application pods. These proxies automatically discover and communicate with each other on the mesh network and handle routing and other things after receiving data from the Service. Once a request has been handled, it is then forwarded to the application container. The configuration of these proxy containers is managed by the Istio admin service.
 Diagram 4: Istio Architecture
The Load Balancing Solution: Installing Istio
Installing Istio is very straightforward and it is one of the reasons we chose it.
## Visit the official Istio installation page (https://istio.io/latest/docs/setup/getting-started/#download) for more options and details.
# Downlaod the latest release of istioctl
curl -L https://istio.io/downloadIstio | sh -
# Move to the Istio package directory. For example, if the package is istio-1.13.4
cd istio-1.13.4
# Add the istioctl client to your path (Linux or macOS):
export PATH=$PWD/bin:$PATH

# Log in to GKE (or your Kubernetes provider)
gcloud container clusters get-credentials cluster-1 --zone us-central1-c --project project-name

istioctl install --set profile=minimal
This will install the bare minimum for Istio to run, but that’s all you will need for load balancing gRPC. Read more on the difference between profiles if you would like to tinker with these settings.
Congratulations! Istio is now installed on your cluster! However, it won't do anything until you tell your pods to inject the proxy containers. To enable sidecar injection by default, just add a label to your namespace.
kubectl label namespace grpcdemo istio-injection=enabled # Label namespace
# namespace/grpcdemo labeled
Other Sidecar Injection options can be found here.
Let's redeploy our application so we can see our pods start two containers - the Envoy proxy and the gRPC application. The Envoy containers will discover each other automatically so there’s no need for further configuration.
# Cleanup old deployment
kubectl delete -f k8s.yaml
# Recreate the resources
kubectl apply -f k8s.yaml

kubectl get pods
#NAME                              READY   STATUS            RESTARTS   AGE
#greeter-client-7c7cf9bc86-7zbx6   0/2     PodInitializing   0          3s
#greeter-server-7b8f684849-kx9pt   0/2     PodInitializing   0          3s
#greeter-server-7b8f684849-lpdqh   0/2     Pending           0          3s
#greeter-server-7b8f684849-nh8mr   0/2     PodInitializing   0          3s
#greeter-server-7b8f684849-rbdgw   0/2     PodInitializing   0          3s
Once everything is running, let’s execute our test again.
kubectl get pods | grep greeter-client
kubectl exec -it <pod name from above>-- bin/sh

# From within the shell session
node greeter_client
# response…
##2 - Greeting: Hello from greeter-server-7b8f684849-nh8mr, Anvil User!
#6 - Greeting: Hello from greeter-server-7b8f684849-nh8mr, Anvil User!
#10 - Greeting: Hello from greeter-server-7b8f684849-kx9pt, Anvil User!
#14 - Greeting: Hello from greeter-server-7b8f684849-kx9pt, Anvil User!
#18 - Greeting: Hello from greeter-server-7b8f684849-lpdqh, Anvil User!
#22 - Greeting: Hello from greeter-server-7b8f684849-lpdqh, Anvil User!
#…
Wrap up: Achieve Better gRPC Load Balancing
And that’s all there is to it! Now you can see that the load is being split up between all the pods so you aren’t just overloading one. Istio is installed and running and the Envoy proxy pods are all talking to each other to route traffic evenly.
Due to the nature of HTTP/2 multiplexing, Kubernetes does not load balance gRPC applications properly out of the box. By adding a service mesh which uses L7 load balancing, it is very straightforward to address this issue and see a major impact in your application's performance with very little effort!
Be sure to destroy all the resources you created to avoid unnecessary costs. Uninstall Istio from your cluster as well if desired.
# Swtich to default namespace
kubectl config set-context --current --namespace=default

# Cleanup namespace and all pods in it
kubectl delete namespace grpcdemo

# Completely uninstall Istio from your cluster
istioctl x uninstall --purge

# Delete Istio namespace
kubectl delete namespace istio-system
For any questions or if you want to share your experiences with Istio or other service meshes, feel free to reach out to us at developers@useanvil.com.