
Filling PDFs
Before you get into PDF filling, make sure you check out our getting started guide.
Anvil allows you to fill templatized PDFs using JSON data you provide. You can fill them in three ways:
- With the
/api/v1/fillREST endpoint. The endpoint will allow you to fill PDFs that do not require e-signatures. - When creating signature packets in the Etch E-sign API. PDF filling is baked into the E-sign API calls.
- With a Workflow. Workflows will present a Webform to your users, then fill PDFs with data from the Webform's fields.
This article will help you get set up with the first option: filling PDFs through the /api/v1/fill REST endpoint.
Authentication
First you will need an API key. You can find your API key on the Organization Settings -> API Settings page. We provide language-specific API clients that wrap authentication and make using our API easier.
For more information on generating an API key and handling API authentication, check out the API getting started article.
Postman collection
Quickly see the PDF Filling endpoint in action with our PDF API Postman collection:

For more information on using the Postman workspace, see our Postman workspace guide.
Creating a PDF template
Next you will need a PDF Template. A PDF template holds the configuration for a single PDF file. It defines the location of fields on PDF pages, and the type of each field (e.g. date, phone number, etc.). The API allows you to fill the template as many times as you need with different data each time.
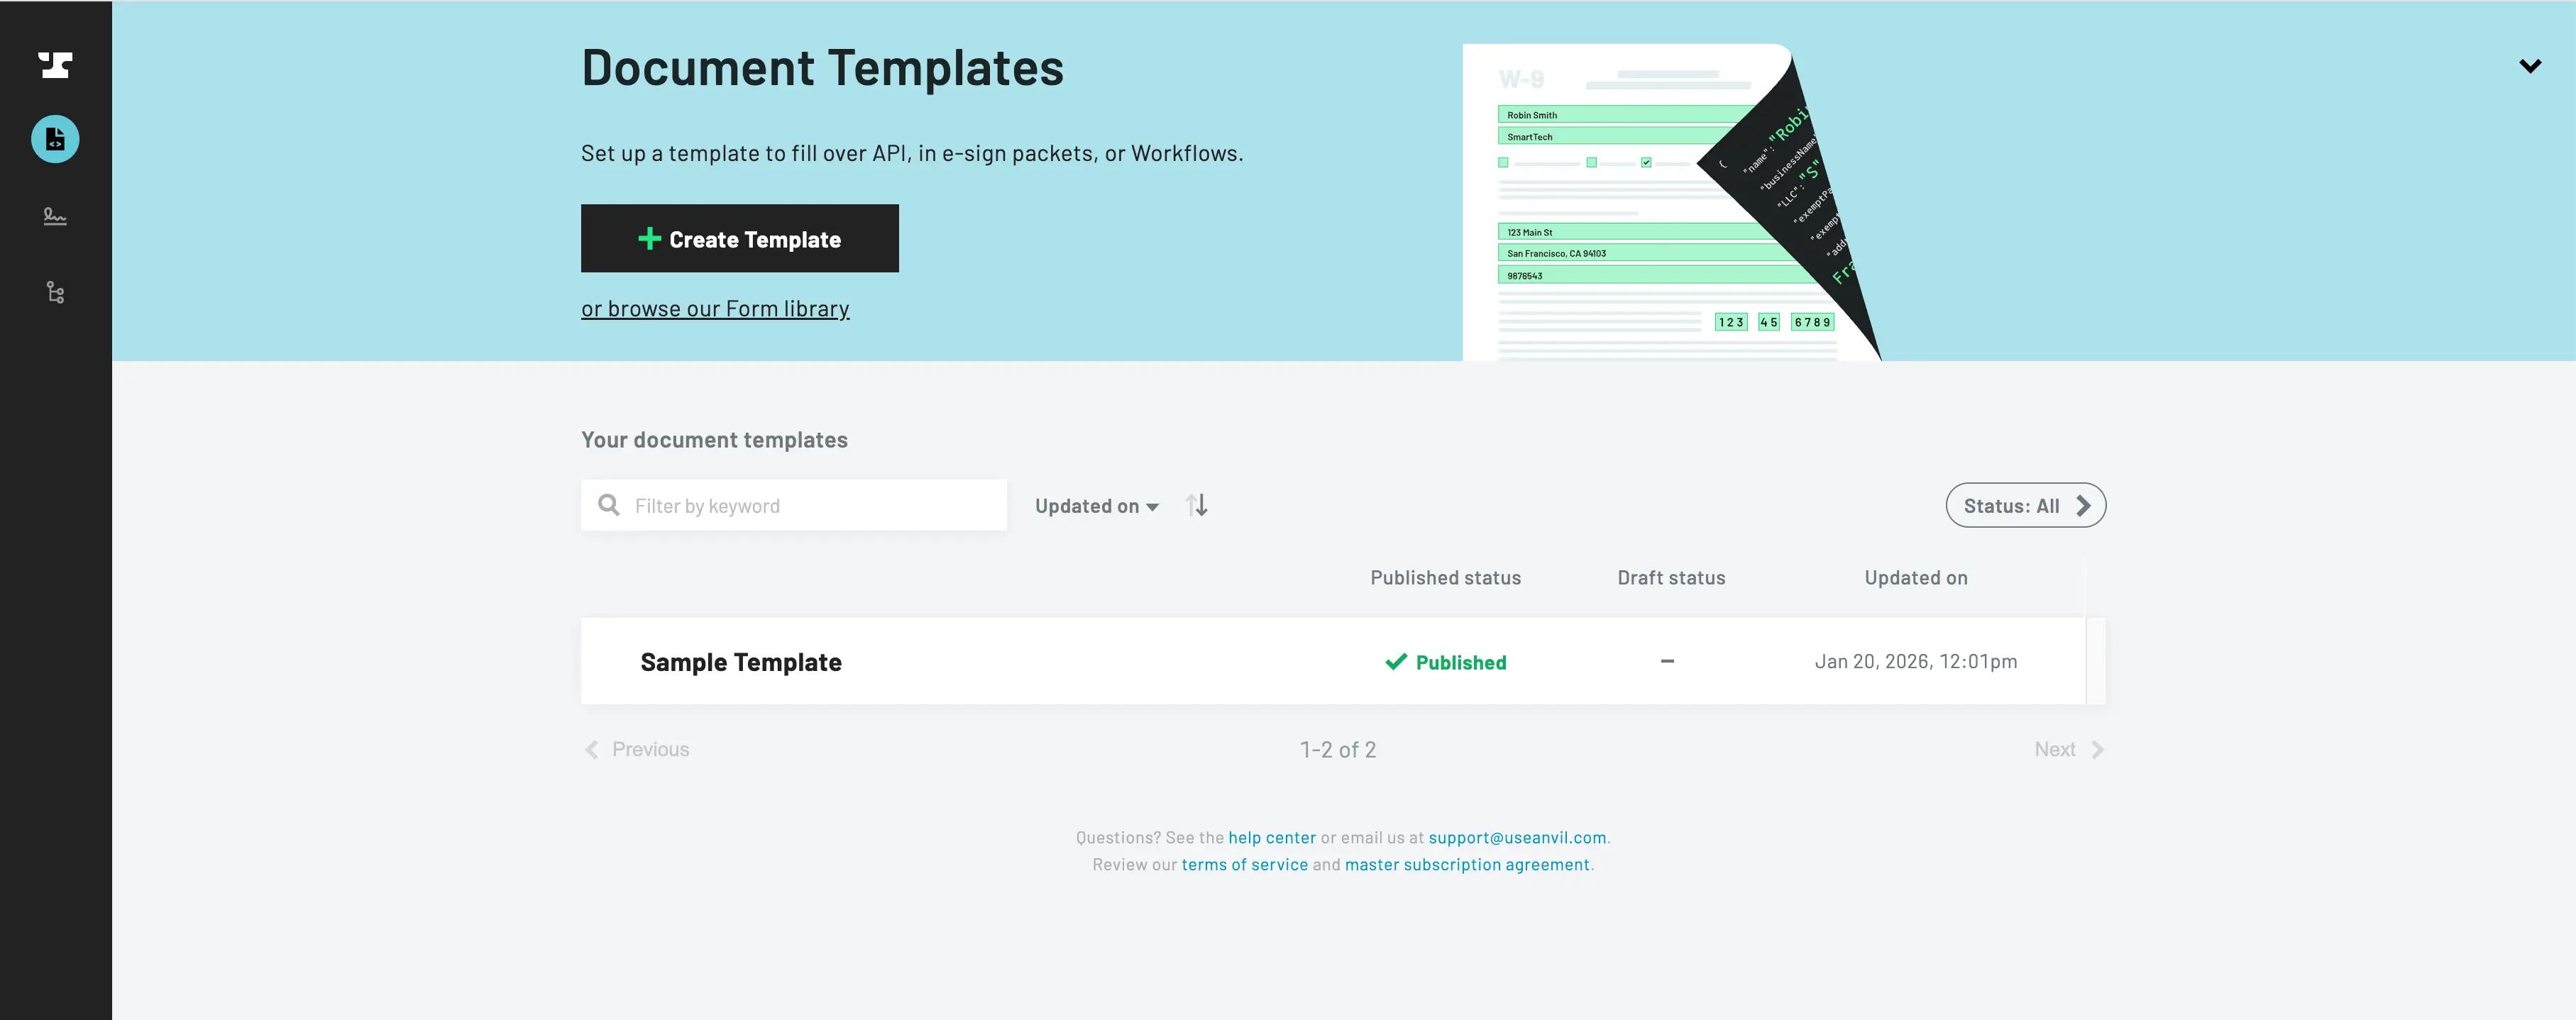
On your dashboard, click the + Create template item to upload a new PDF Template and on the next screen click "Standardized Template".
 Uploading a PDF Form
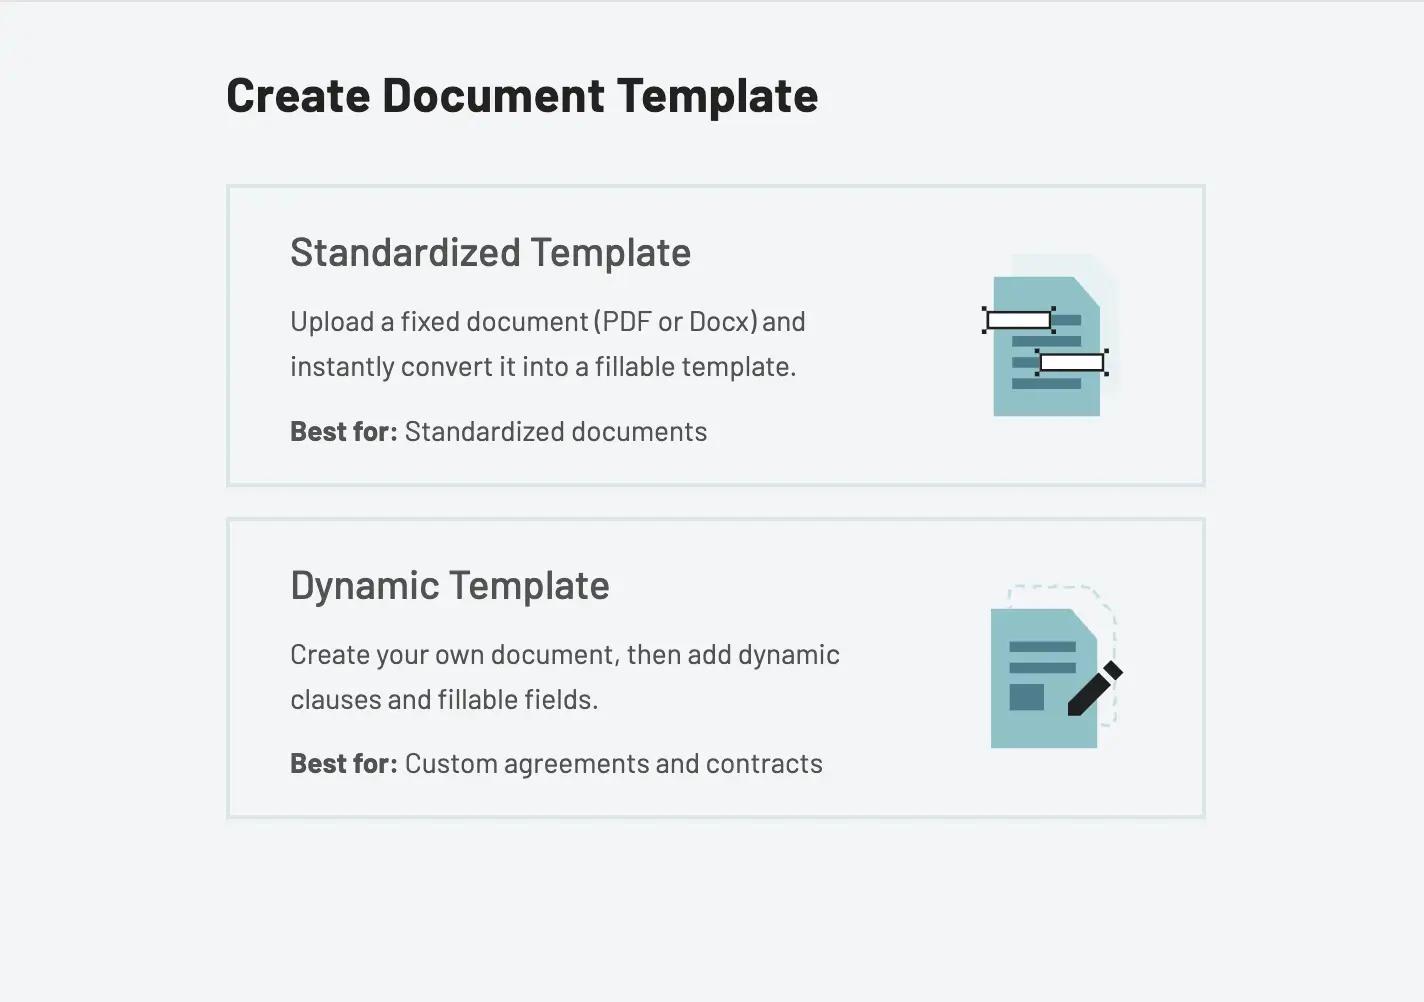 Creating a Standardized Template
On this page, upload a template, such as a W4.
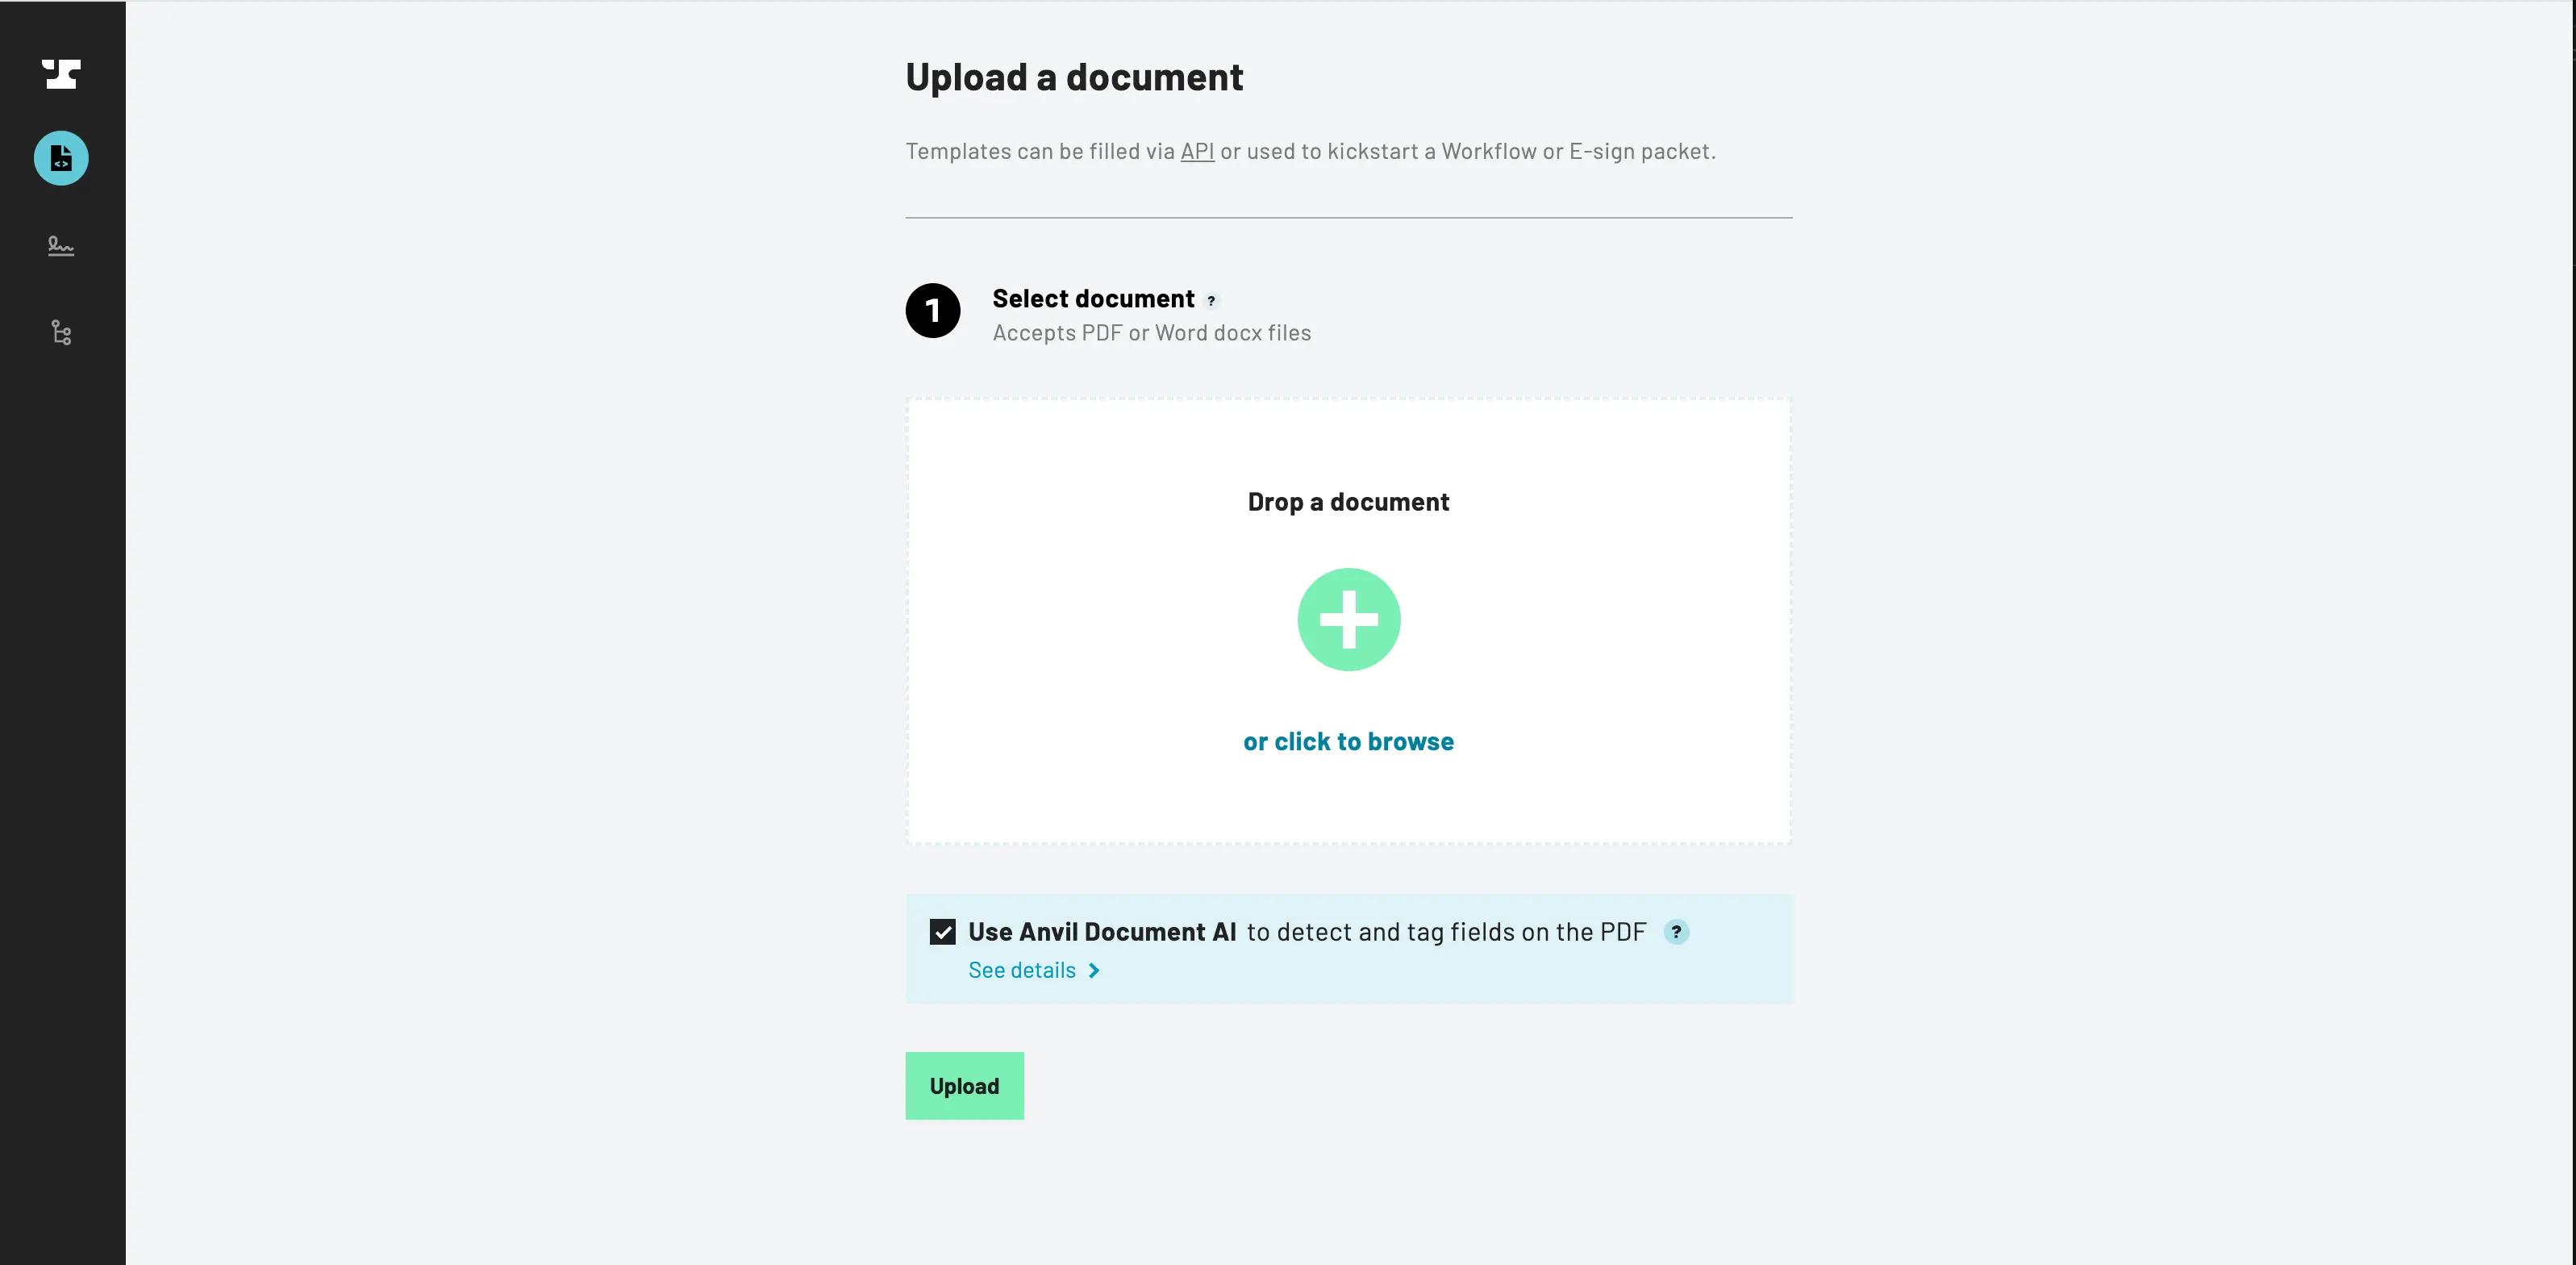 Upload PDF Form Page
Once uploaded, Anvil attempts to find the fields for you. Use the field editor to draw new fields, change field types and names, or modify field locations. Picking the correct types makes filling the PDF easier; compound types (e.g. addresses, names, multiline fields) allow you to fill multiple fields with a single value, and many types (e.g. phone number, date, dollar, SSN) provide formatting for you.
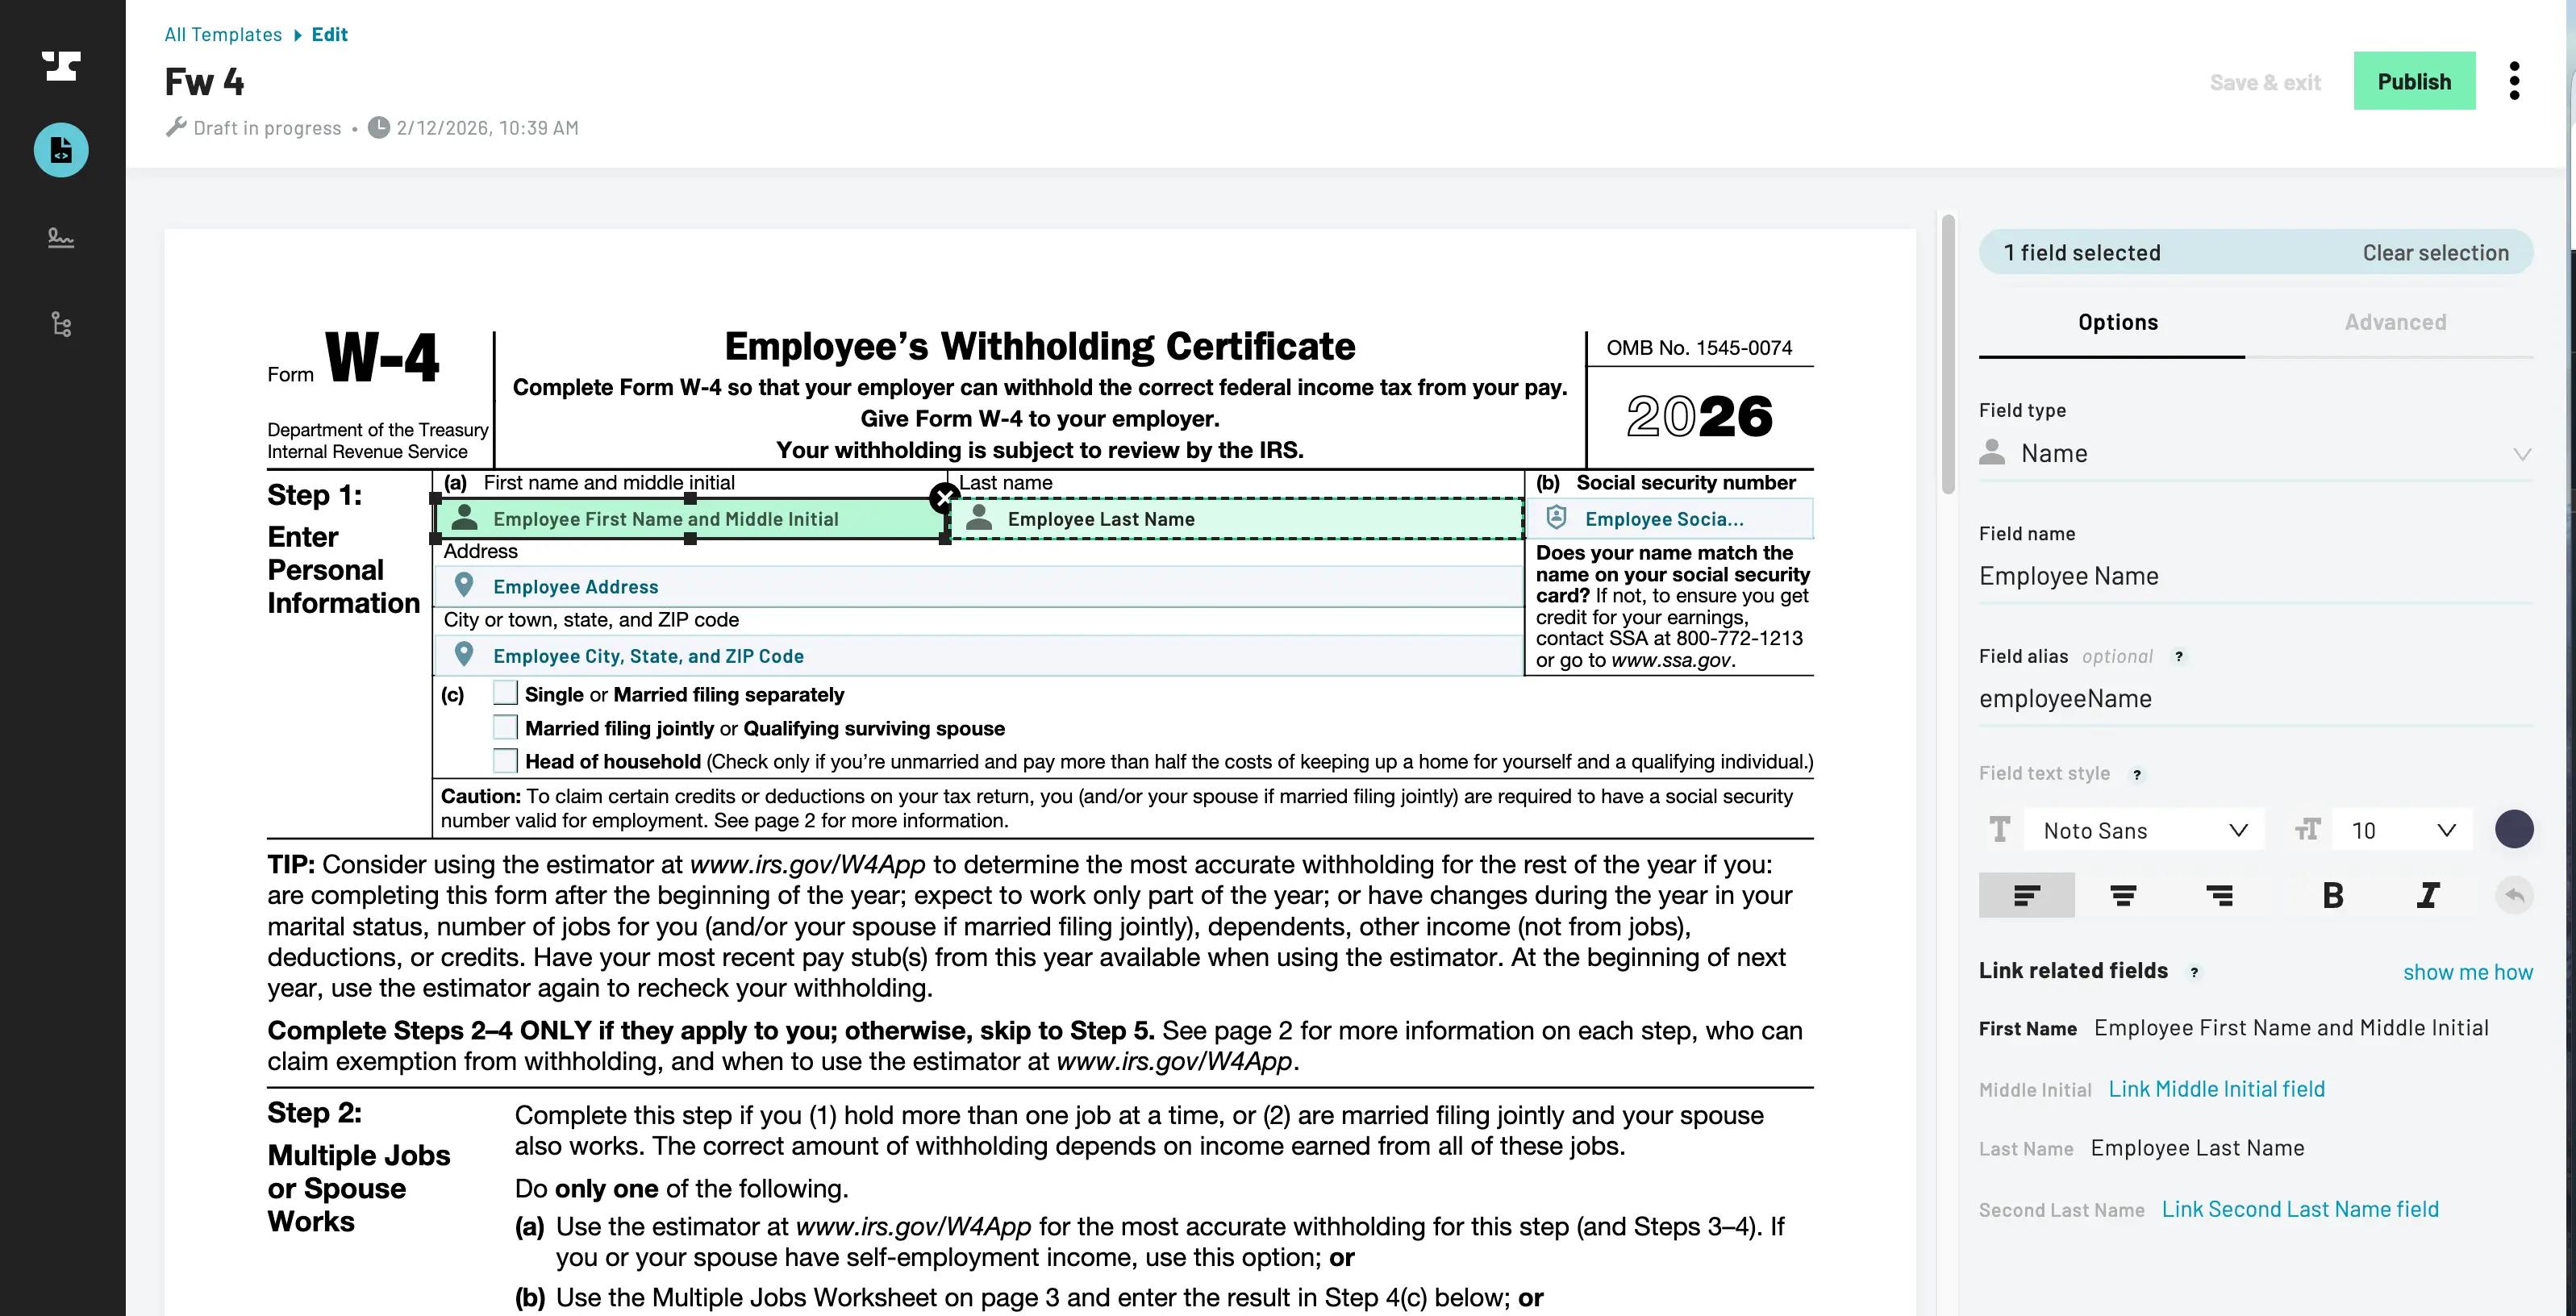 Editing a PDF Template
When you finish editing fields and publish the PDF, you are taken to the Document Template dashboard. From there, click on the template that you want to add data to. It shows everything you need to fill the template with the API, including an example payload to quickly get started.
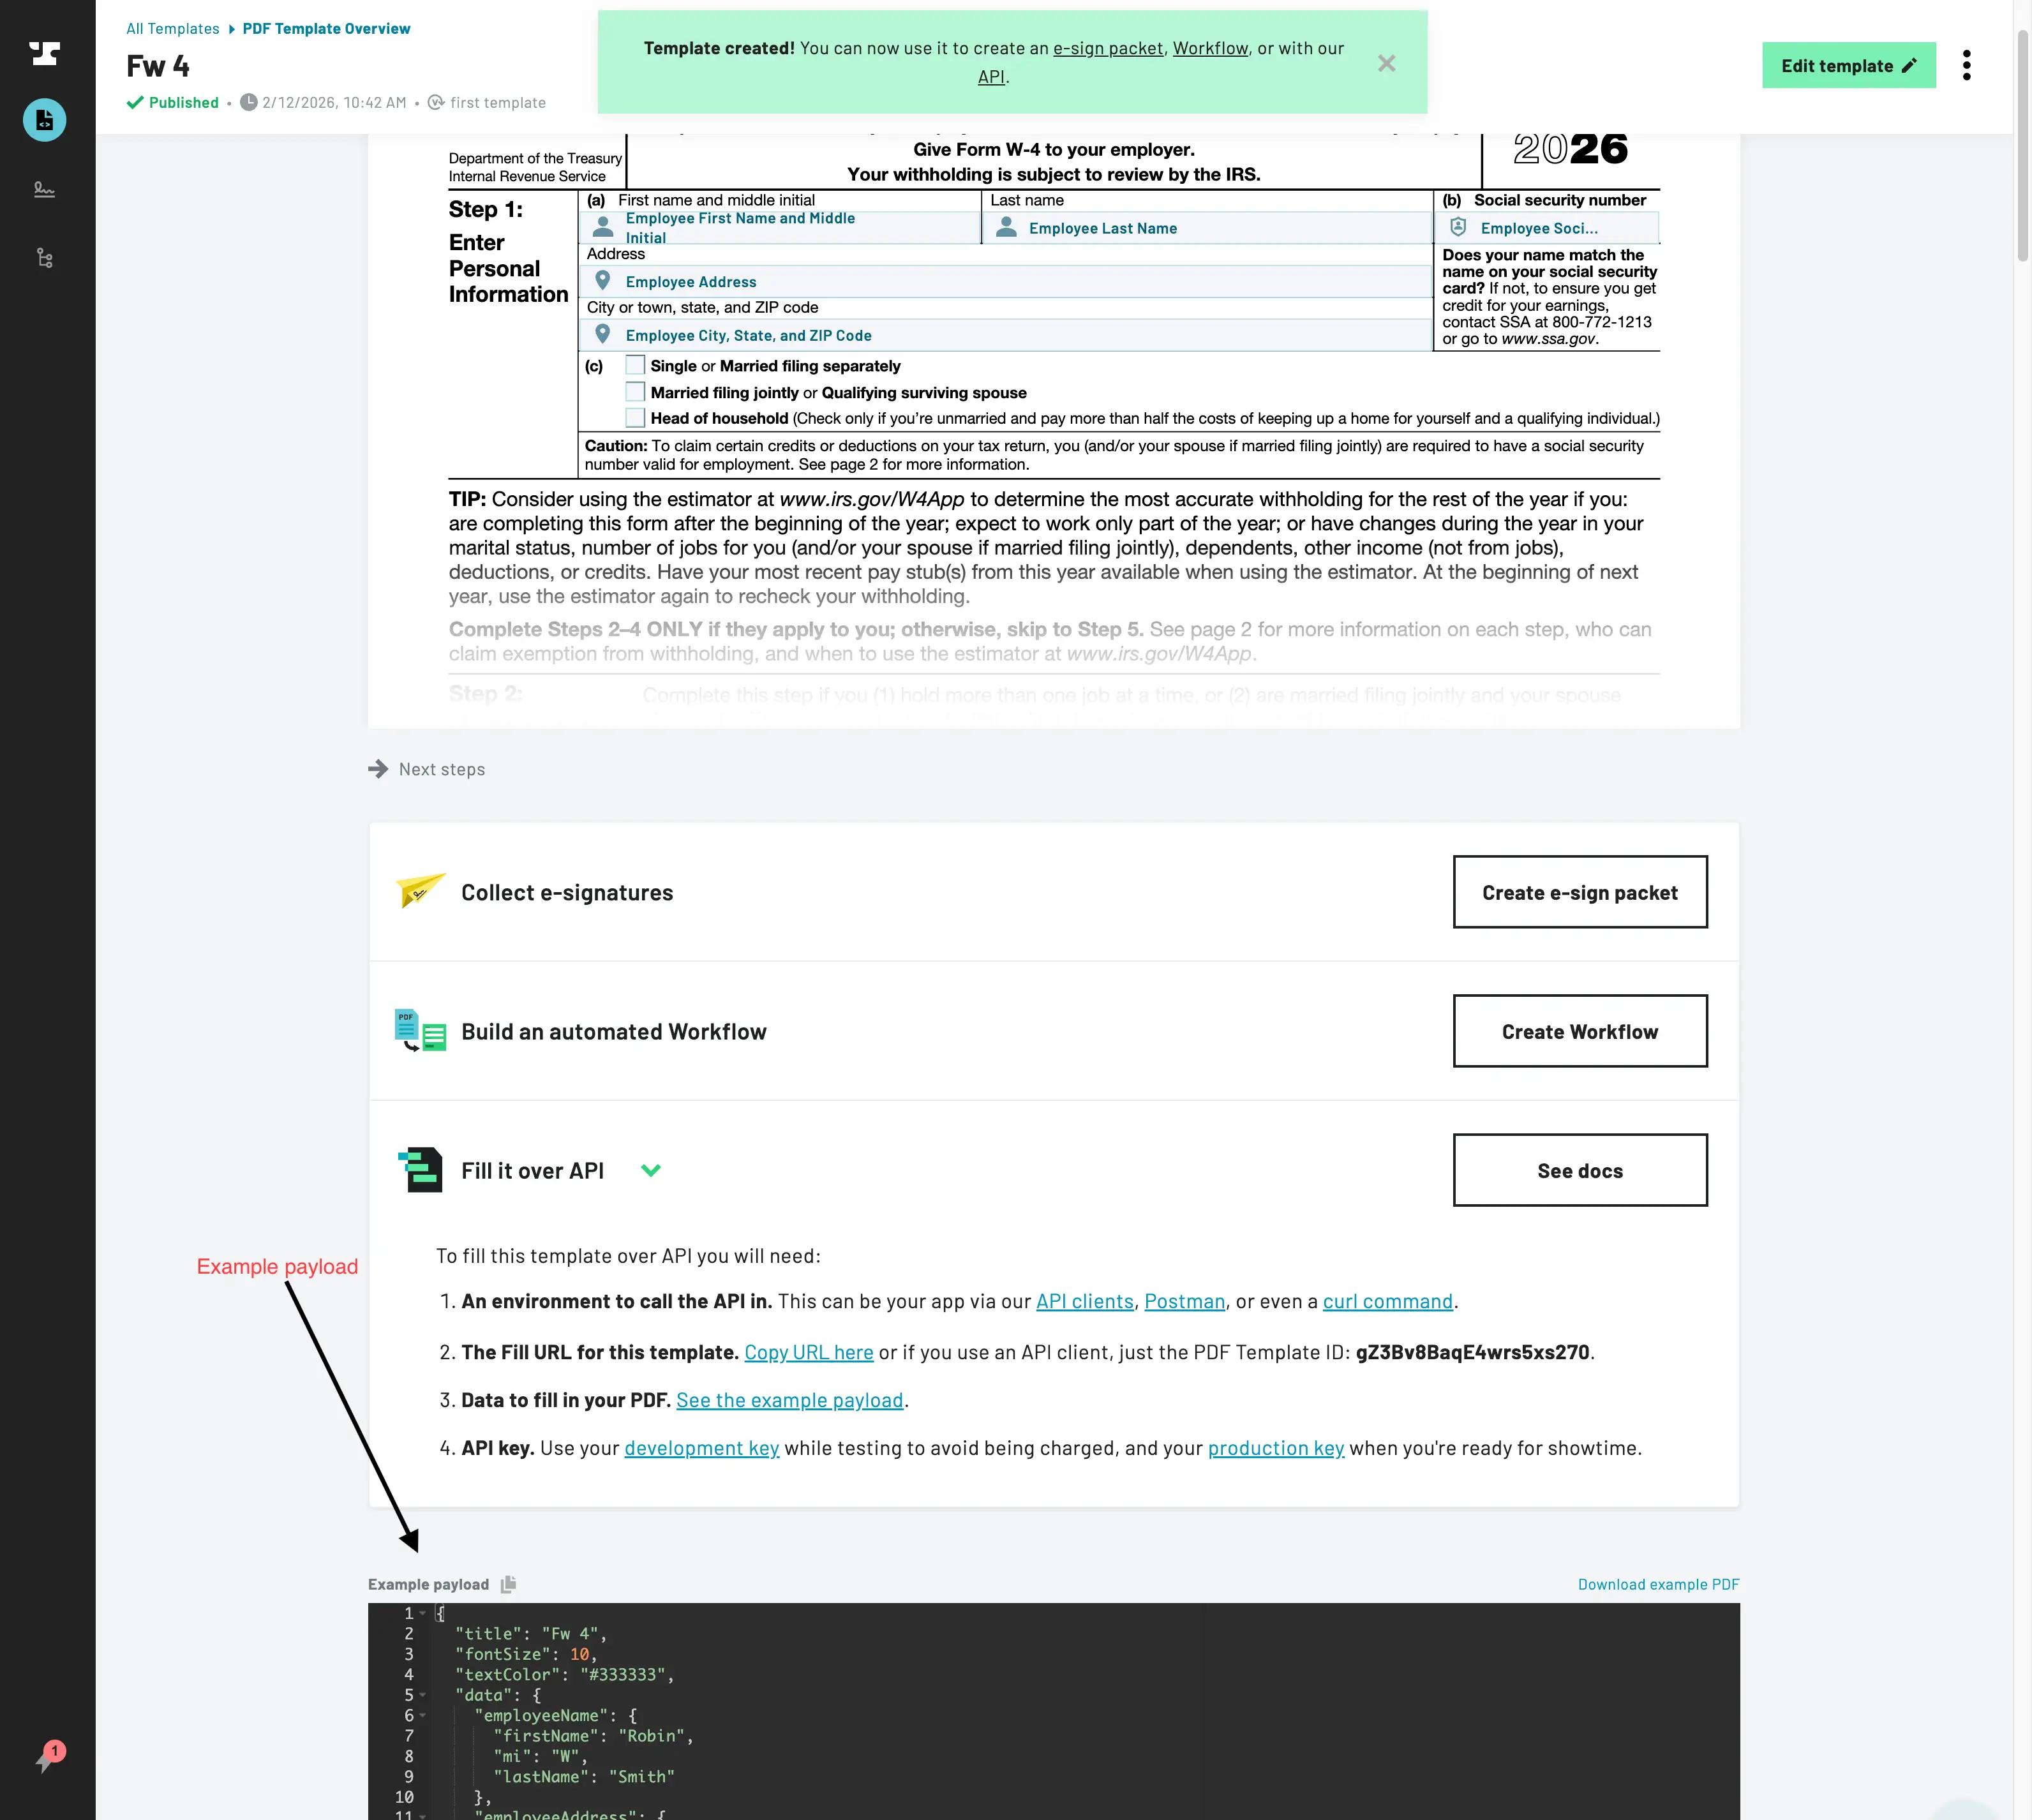 Viewing PDF Template API Info
Filling a PDF template
POST to your new PDF template's URL with the data you want to embed in the PDF. Anvil will respond with the raw binary data for the filled PDF.
POST https://app.useanvil.com/api/v1/fill/{pdfTemplateID}.pdf
{
  // Optional - set the title encoded into the PDF document
  "title": "Some Title",

  // Optional - default is `Noto Sans`
  "fontFamily": "Roboto",

  // Optional - default is `10`
  "fontSize": 8,

  // Optional - default is dark blue
  "textColor": "#333333",

  // Optional - When true, the PDF will be filled with interactive fields
  // See the Interactive Fields section below for more info.
  // Default is `false`
  "useInteractiveFields": false,

  // Required - the data to actually fill the PDF
  // `data` can be an object or an array. An array will fill the
  // template multiple times.
  "data": {
    "aTextField": "Lorem ipsum",
    "aDate": "2018-10-31",
    "anAddress": {
      "street1": "123 Main St",
      "city": "San Francisco",
      "state": "CA",
      "zip": "94106"
    }
  }
}
// => response body will be binary PDF bytes
To find your PDF template's POST URL, go to the PDF template page in Anvil (the path is /org/<your org slug>/pdf/<pdf template id>). Click copy on the PDF Template ID / Cast EID button:
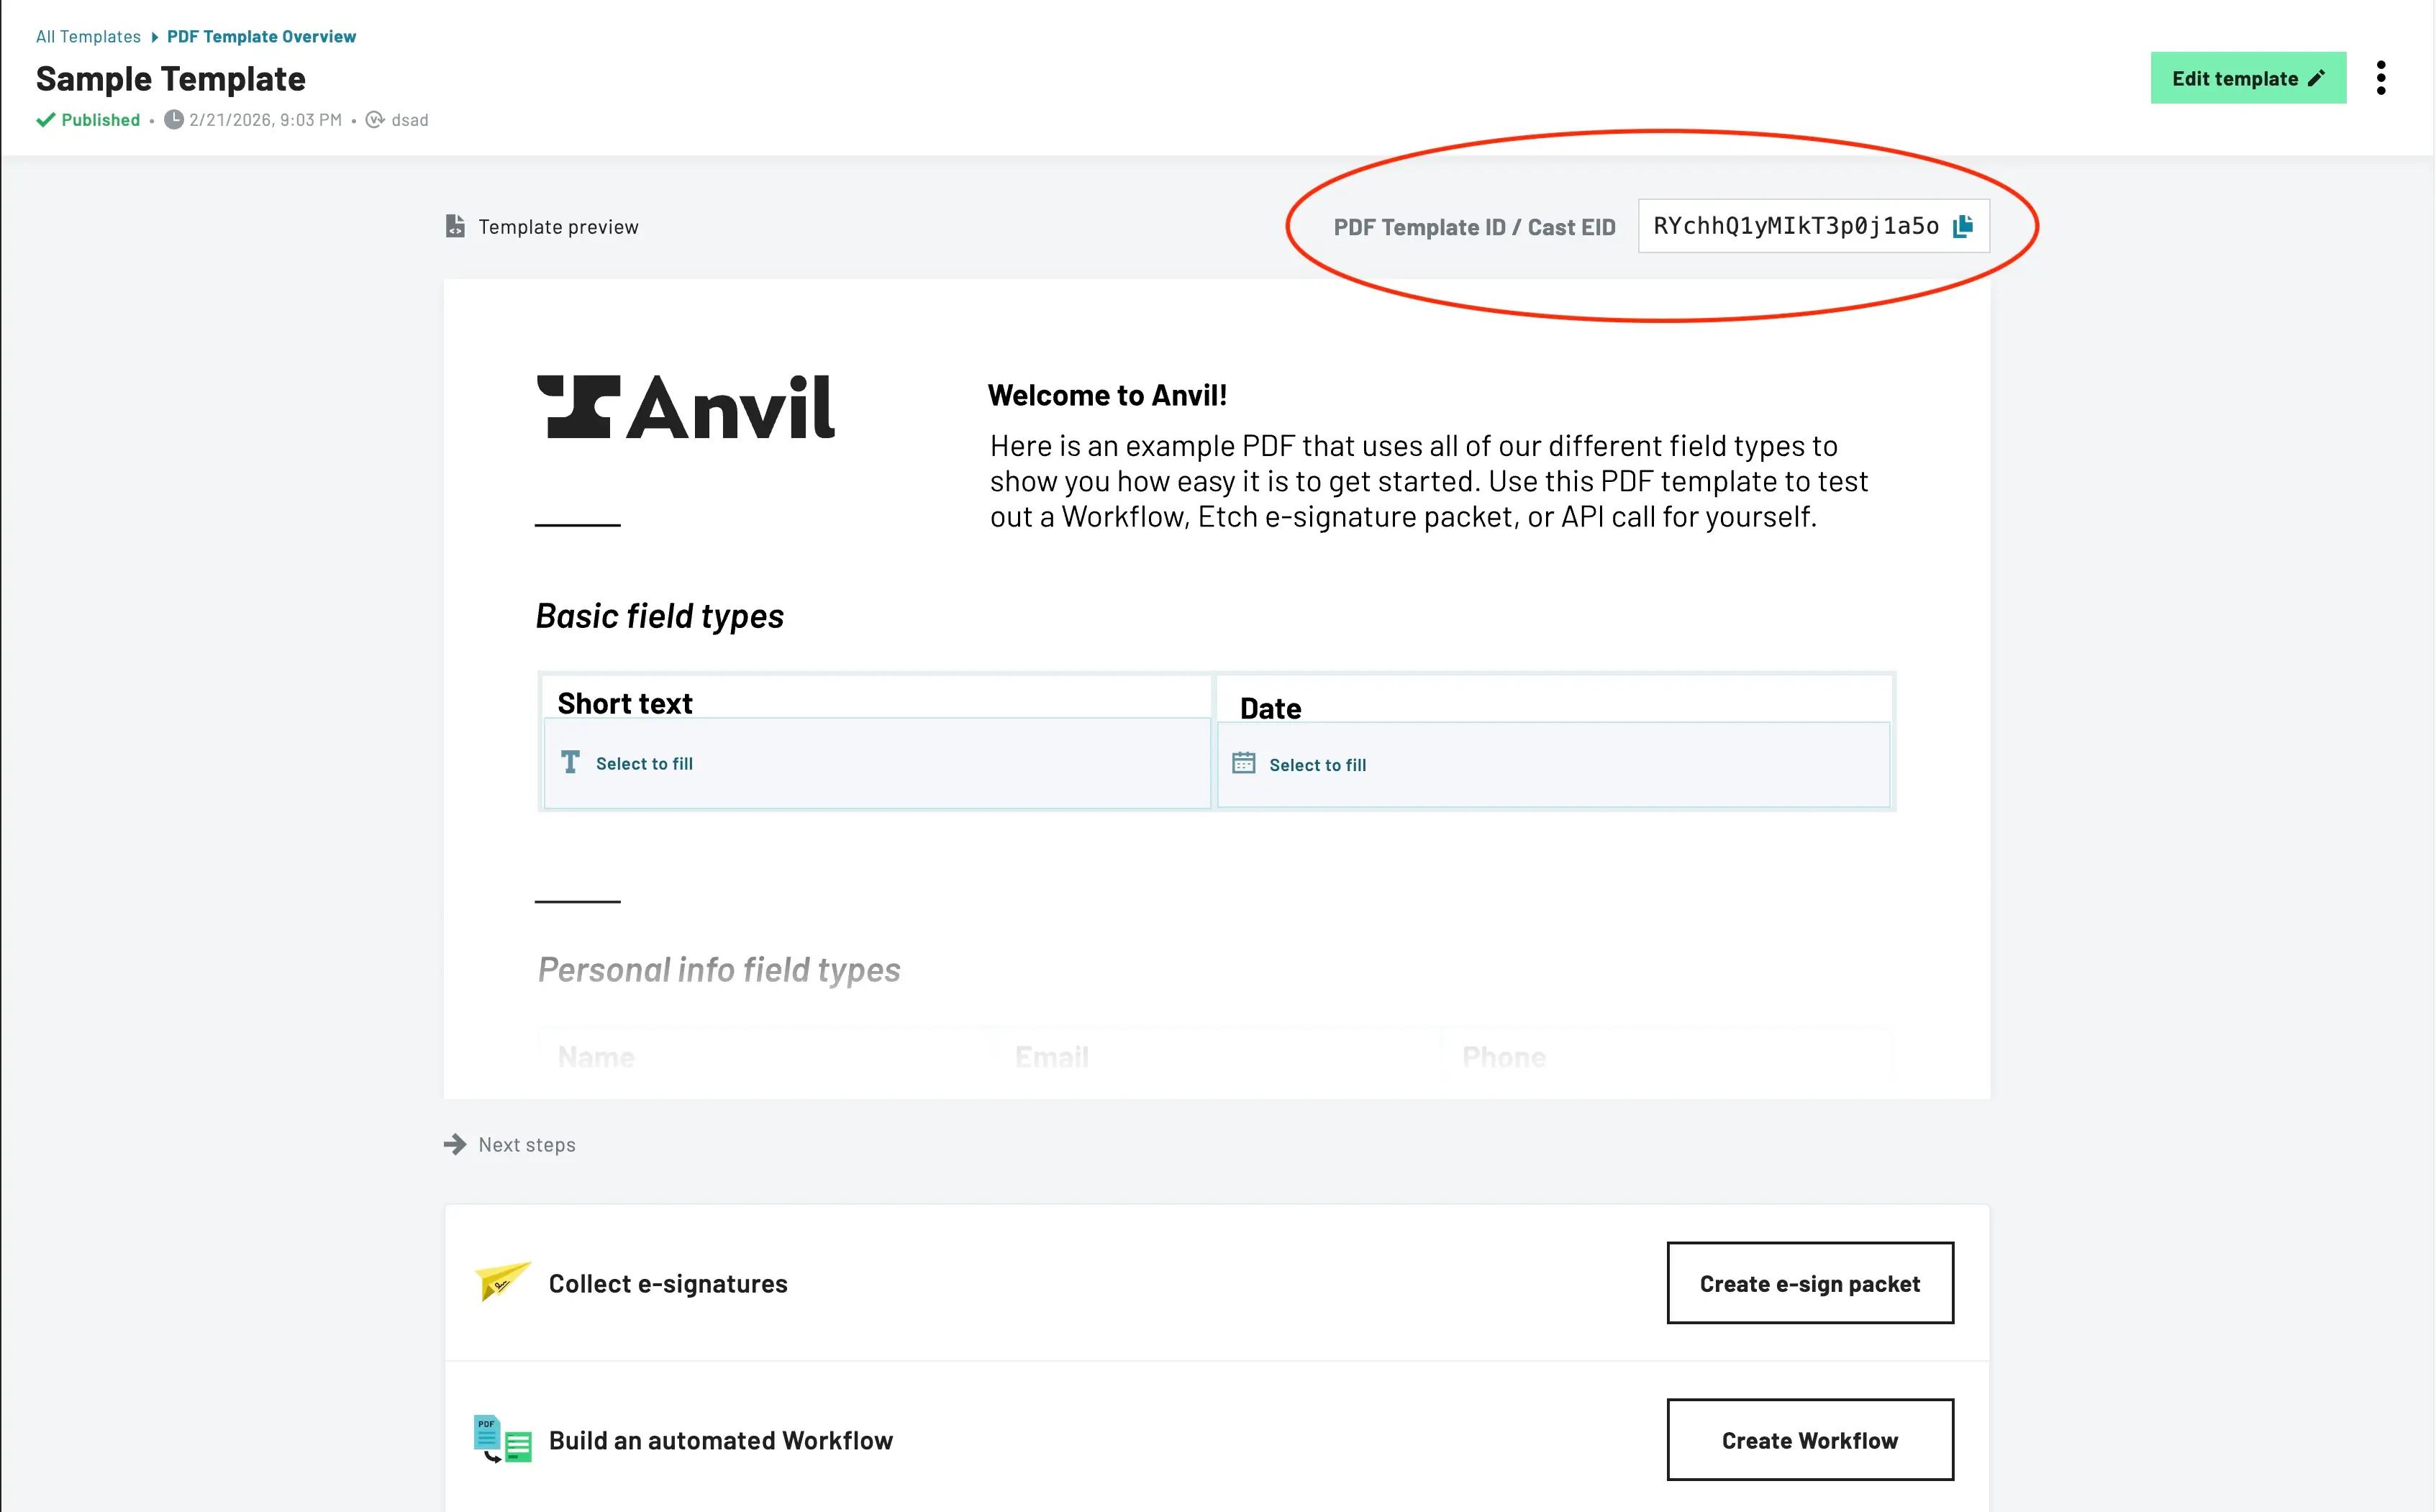 Click-to-copy PDF Template ID
- Keys in
datacorrespond to a field alias in the PDF template. - Values in
datamust be in a format corresponding to their field type. See all field types for more info. - Any fields not specified or specified with a
nullorundefinedwill be ignored. - Keys specified in
datathat do not have a corresponding PDF template field will be ignored. datacan be an array of objects. See Repeating an entire PDF for details.- The response body will be raw binary data for the filled PDF.
- Anvil does not save the data sent to this endpoint.
Using curl
curl \
  -X POST \
  -u YOUR_API_KEY: \
  -H 'Content-Type: application/json' \
  -d '{ "data": { "someKey": "some data" } }' \
  https://app.useanvil.com/api/v1/fill/{pdfTemplateID}.pdf > test.pdf
Saving the response as a PDF
The response from the PDF fill endpoint will be binary PDF bytes.
Make sure you save the response to PDF as binary data.
By default, many HTTP clients give you the HTTP response body as a text string. Additionally, many file handling libraries, even those built into your language of choice will default to encoding a file as UTF-8 on save. This can cause a corrupt file on disk even though the HTTP response was a valid PDF.
If you are seeing corrupt files:
- Make sure you are receiving the HTTP response body from your HTTP client as binary (no encoding)
- When you save the file, ensure you save the the file as binary (also no encoding)
Encrypting data payloads
You can encrypt the data sent in to fill the PDF. Setup an RSA keypair, encrypt the string value of the data property with your public key. You can use our node encryption library.
POST https://app.useanvil.com/api/v1/fill/{pdfTemplateID}.pdf
{
  // Encrypt with your RSA key
  "data": 'an encrypted JSON string'

  // Other metadata
  "title": "Some Title",
}
// => binary PDF bytes
Using an API client
For convenience, we provide language-specific API clients that help with authentication and PDF filling. Below is an example using our Node.js API client. It handles authentication, filling the PDF, and handling errors to help with debugging.
import fs from 'fs'
import Anvil from '@anvilco/anvil'

const pdfTemplateID = 'kA6Da9CuGqUtc6QiBDRR'
const apiKey = '7j2JuUWmN4fGjBxsCltWaybHOEy3UEtt'

const exampleData = {
  title: 'My PDF Title',
  fontSize: 10,
  textColor: '#CC0000',
  data: {
    someFieldId: 'Hello World!',
  },
}
const anvilClient = new Anvil({ apiKey })
const { statusCode, data } = await anvilClient.fillPDF(
  pdfTemplateID,
  exampleData
)

console.log(statusCode) // => 200

// Data will be the filled PDF binary data
fs.writeFileSync('output.pdf', data, { encoding: null })
Testing changes before publish
You can fill PDF templates before publishing your changes by supplying -1 to the versionNumber query parameter.
POST https://app.useanvil.com/api/v1/fill/{pdfTemplateID}.pdf?versionNumber=-1
Changes made in the UI will be reflected immediately in subsequent filled PDFs. This is useful to test your changes before publishing them, and can make the development loop faster.
For example, this template has unpublished font styling changes (changed employee last name to have a blue font and a different font style):
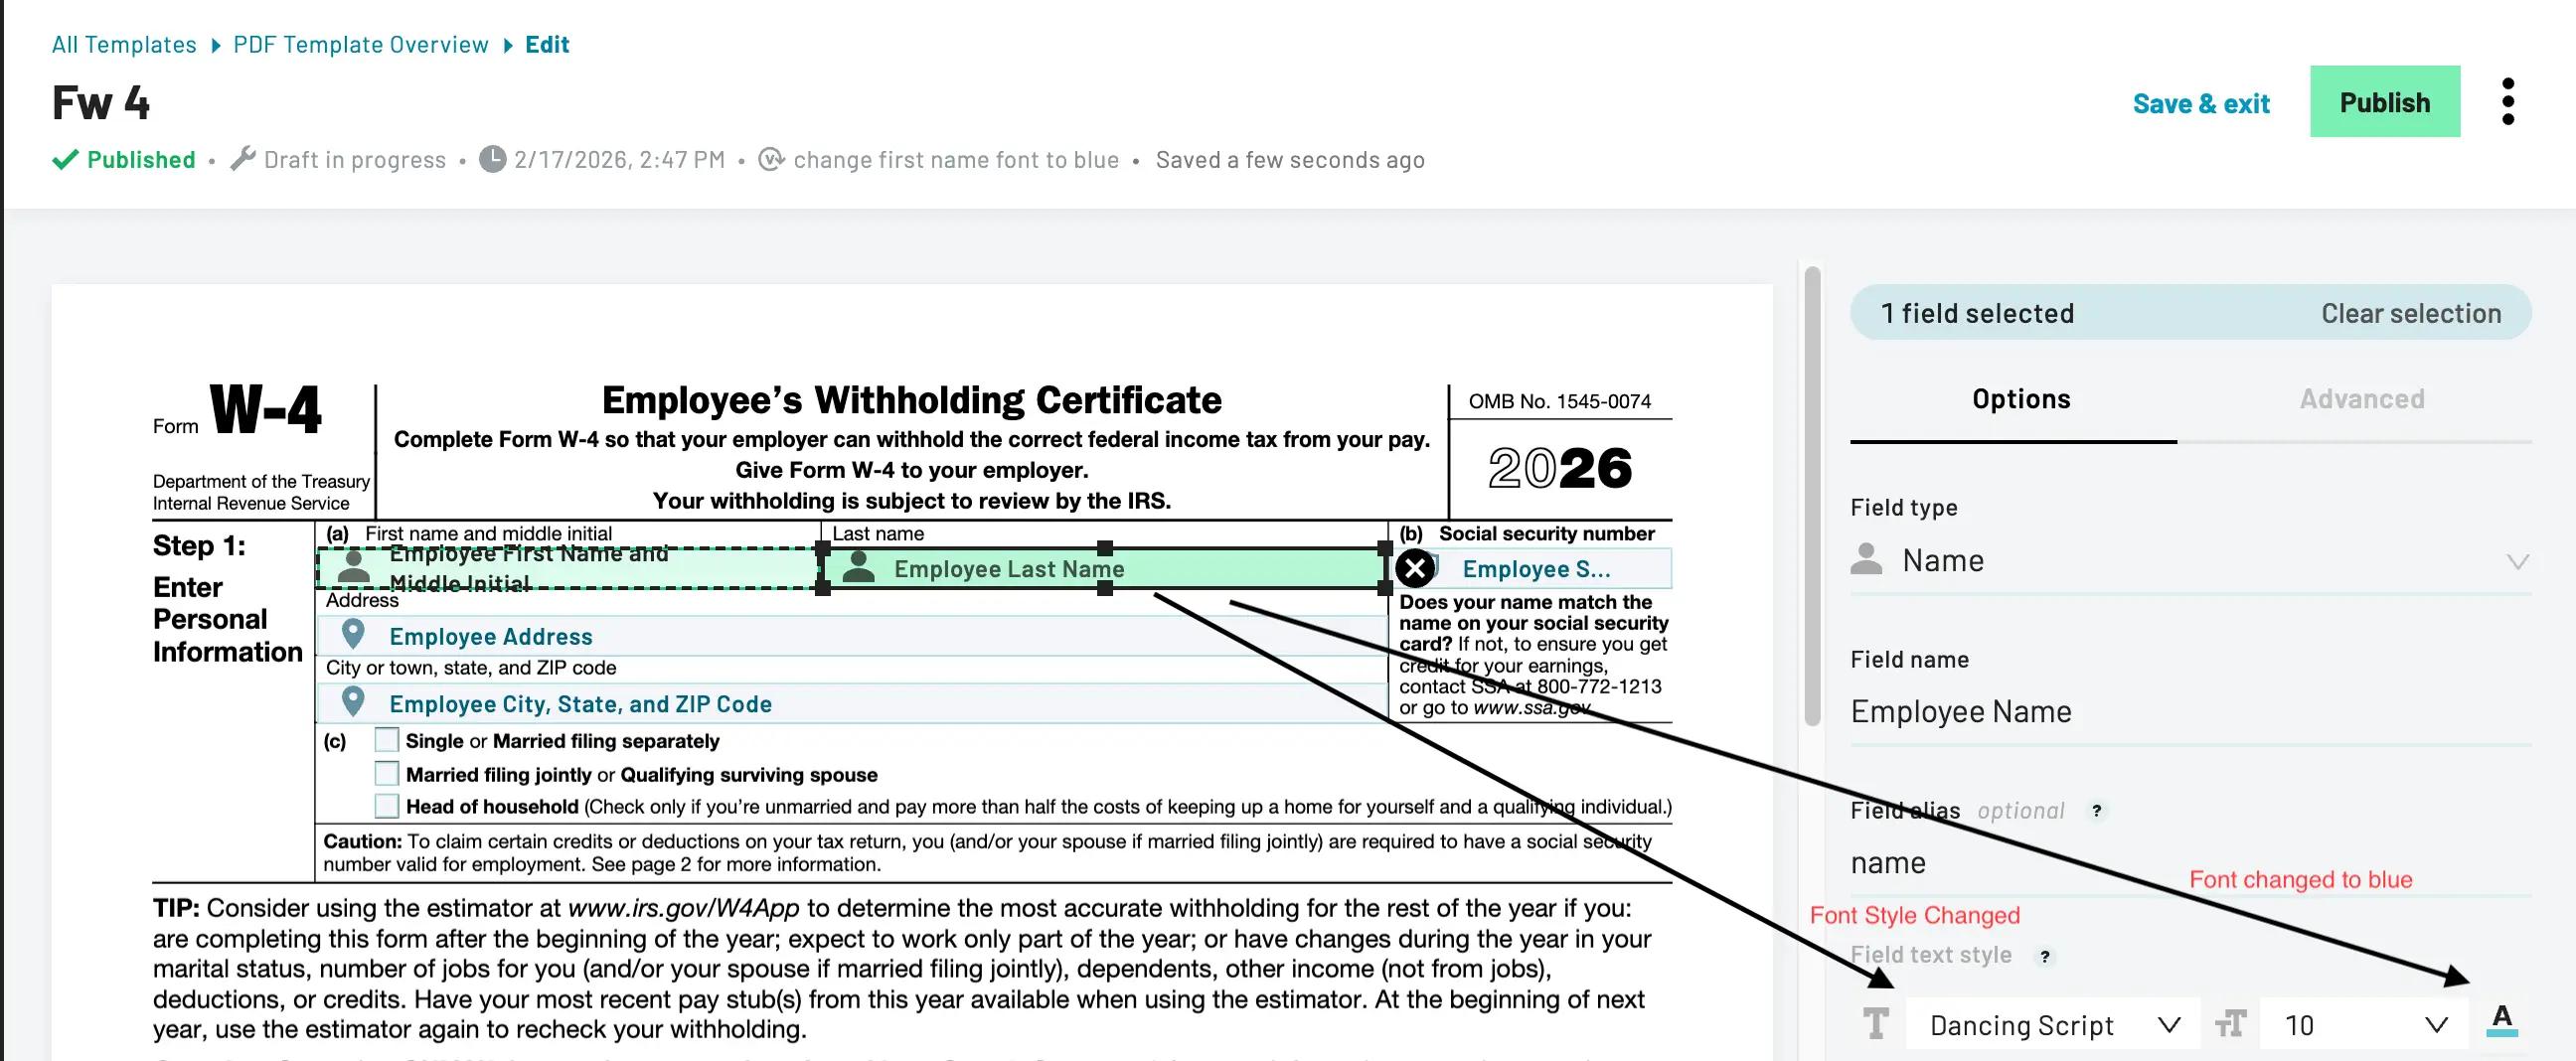 Template with unpublished font styling changes
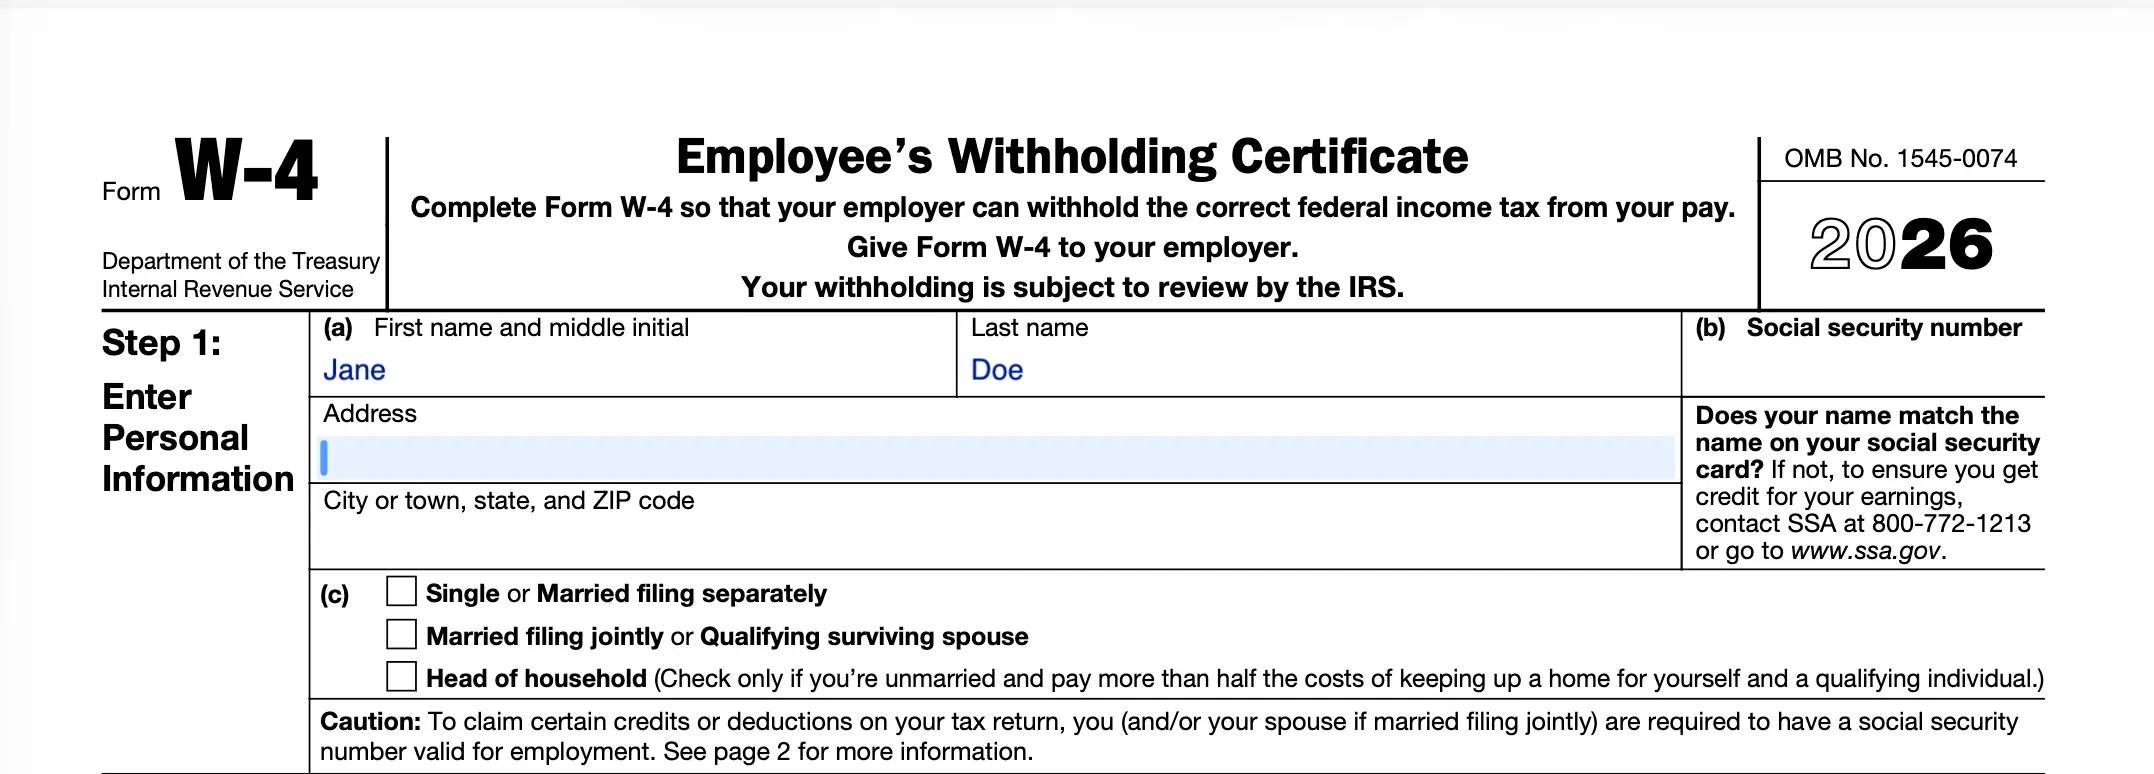
When filled with ?versionNumber=-1, the unpublished font styles are used:
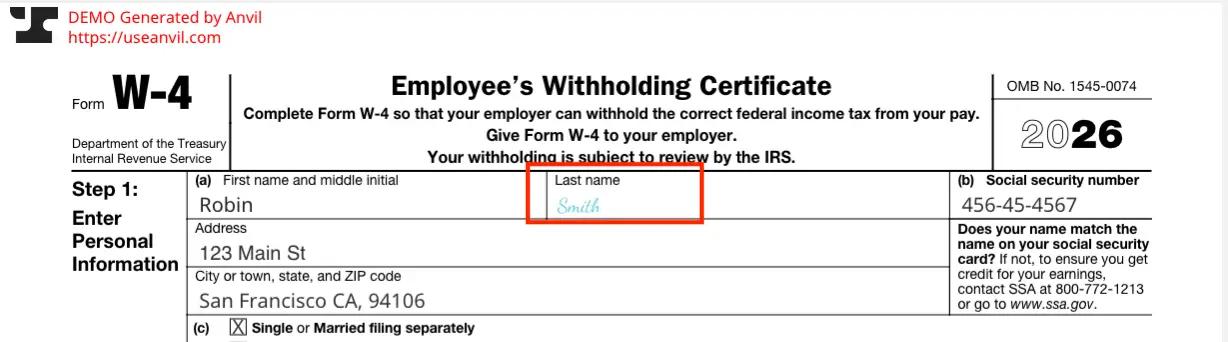 Filled PDF using unpublished font styles
Each of our API client libraries supports the versionNumber query param as a function argument. See the docs for your specific library for details.
Handling errors
Should you run into any errors, the response status will be >= 400, and the body will be a JSON payload.
POST https://app.useanvil.com/api/v1/fill/{pdfTemplateID}.pdf
{
  // empty request body!
}
// => 400
{
  "name":"ValidationError",
  "fields":[{
    "message":"Required",
    "property":"data"
  }]
}
Request size limit
At this time, an application/json POST request body is limited to a maximum size of 1 megabyte (1,048,576 bytes). Exceeding the limit will result in a 413 - Request Too Large error. When rendering images, it is good practice to send them in as URLs.
If you need to send a larger payload, you can use a multipart/form-data POST request. All top level fields attributes (title, data, etc.) should be specified as a separate request part within the request.
Rate limits
See the rate limits section of our getting started guide for full details.
Styling fields
Several field text styling properties can be customized:
- Font family
- Font size
- Text color
- Alignment
- Bold / Italic
Each of these properties can be customized via the UI or via the API, and each can be configured across the entire document or on a field-level basis.
Styling in the PDF template builder
Visit the PDF template builder from your Anvil dashboard. When editing your template, use the "Field text style" section to customize the styling of the filled text on your document:
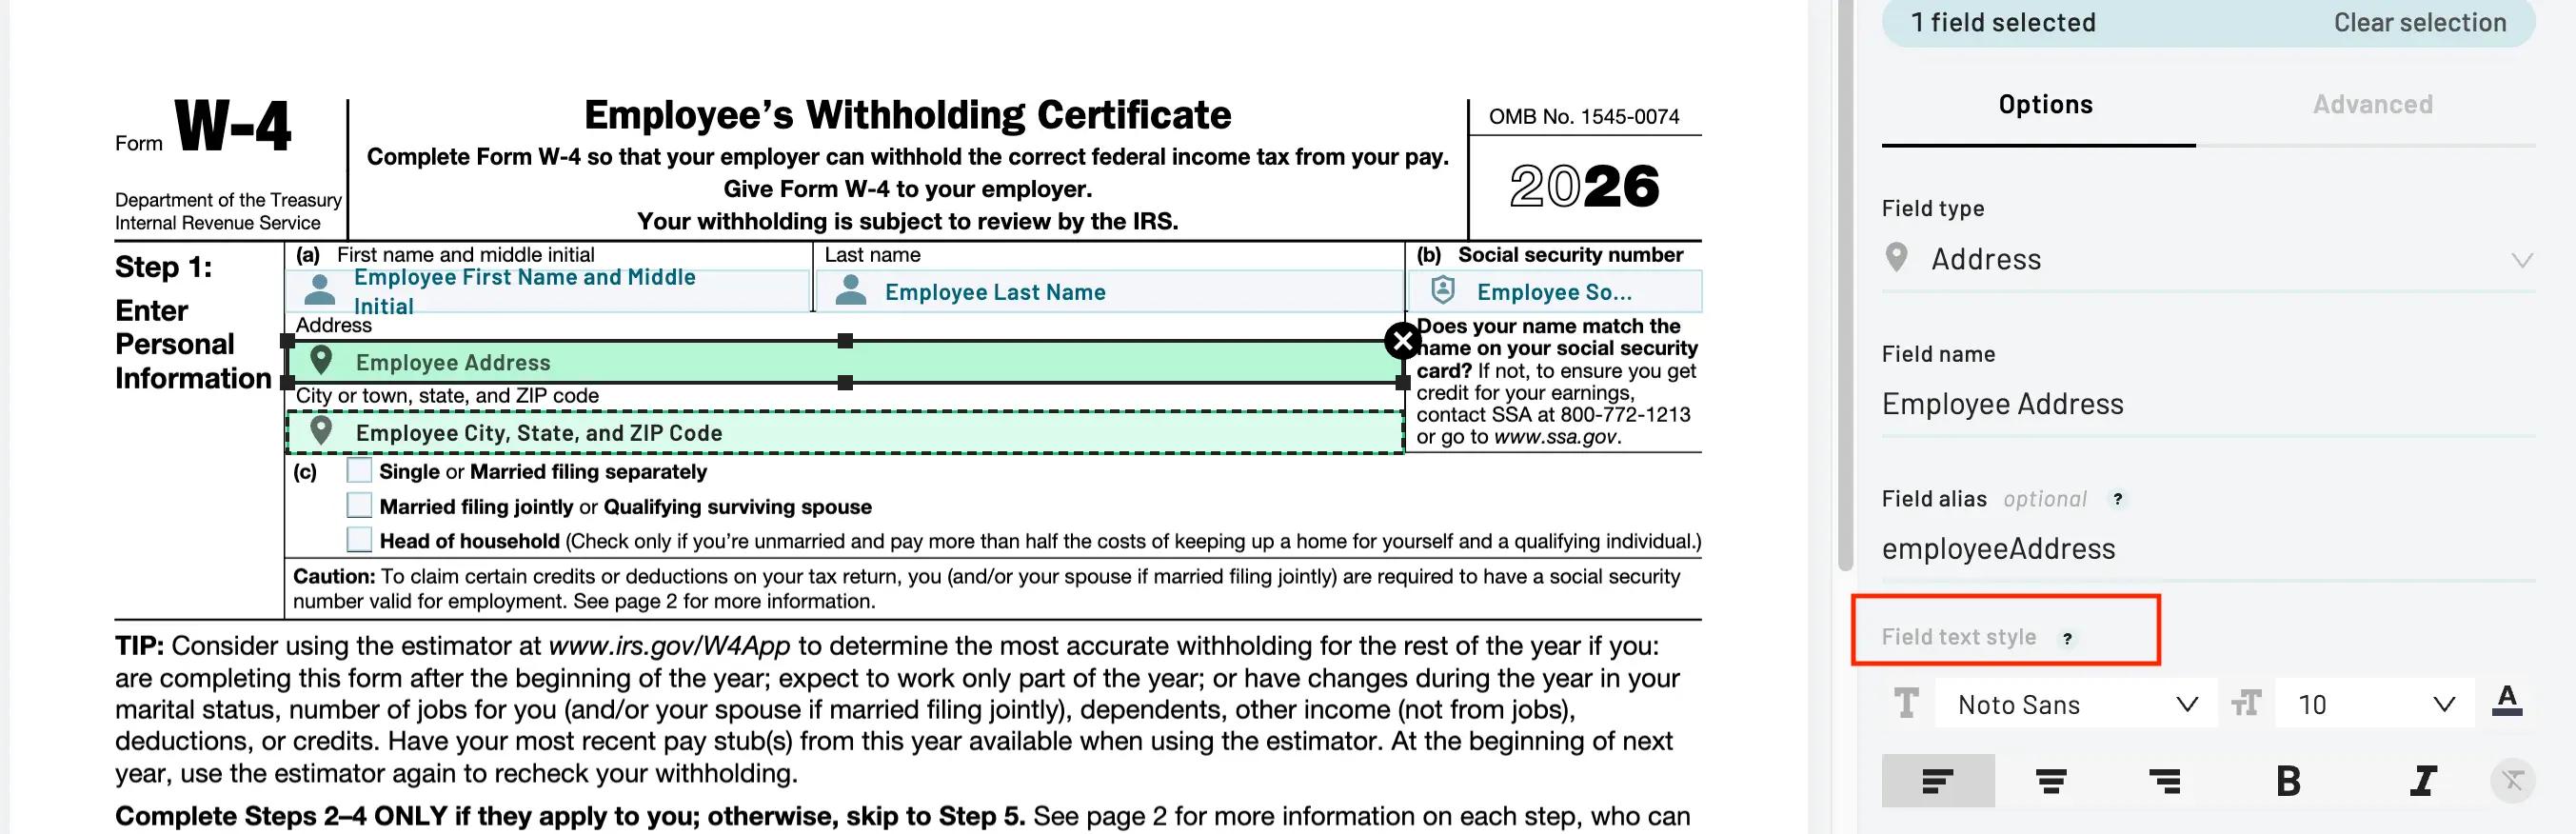 Field text style settings in the PDF template builder
Similarly, you can customize an individual field's styles by clicking into each field you'd like to individually style.
Styling via the API
We support the following field styling properties via the API:
fontFamily(String) Default is"Noto Sans"fontSize(Integer) Default is10textColor(String) Must be 6 digit hex code. Default is"#3E3E57"alignment(String) Options:"left","center","right". Default is"left"fontWeight(String) Options:"normal","bold","italic","boldItalic". Default is"normal"
To style all fields at the document level, use these properties in the root of the JSON payload object. For example:
POST https://app.useanvil.com/api/v1/fill/{pdfTemplateID}.pdf
{
  "fontFamily": "Roboto",
  "fontSize": 8,
  "textColor": "#333333",
  "alignment": "center",
  "fontWeight": "boldItalic",

  "title": "Doc with style",
  "data": {
    "aTextField": "Lorem ipsum",
  }
}
To style individual fields, replace your fill value with an object that has a value property, then add field styling properties to the new object. For example:
// Style an individual field via the API
{
  "data": {
    // Convert from this structure
    "aTextField": "Lorem ipsum",

    // To this structure
    "aTextField": {
      // Field-specific styling properties
      "textColor": "#CC0000",

      // Fill data moves to the `value` property
      "value": "Lorem ipsum",
    },
  }
}
To style Arrays or their individual fields, the process is similar, but you can also provide styling properties to individual array elements. For example:
// Style an individual field via the API
{
  "data": {
    // Convert from this structure
    "anArrayField": ["Item 1", "Item 2", "Item 3"],

    // To this structure
    "anArrayField": {
      // Field-specific styling properties
      "textColor": "#CC0000",

      // Fill data moves to the `value` property
      "value": ["Item 1", "Item 2", "Item 3"],
    },

    // Or even this structure
    "anArrayField": {
      // Field-specific styling properties
      "textColor": "#CC0000",

      // Fill data moves to the `value` property
      "value": [
        "Item 1",
        {
          // Array-element-specific styling properties
          "fontSize": 24,
          // And the data moves to the nested 'value' property
          "data": "Item 2",
        },
        "Item 3",
      ],
    },
  }
}
A full example:
POST https://app.useanvil.com/api/v1/fill/{pdfTemplateID}.pdf
{
  "title": "Doc with style",

  // Document-level styling properties
  "fontSize": 12,

  "data": {
    // An individually-styled field
    "aTextField": {
      "fontFamily": "Roboto",
      "fontSize": 8,
      "textColor": "#333333",
      "alignment": "center",
      "fontWeight": "boldItalic",

      "value": "Lorem ipsum"
    },

    // A individually-styled complex field
    "aFullName": {
      "fontFamily": "Lato",
      "fontSize": 14,
      "textColor": "#CC0000",

      // For complex values,
      "value": {
        "firstName": "Sally",
        "lastName": "Sanders",
      }
    },

    // A field that will inherit the template's styling
    "aDocumentStyledField": "Document styling only"
  }
}
Styling precedence
Style properties can be applied at both the field and document level, and chosen in the UI or supplied via the API. The order of precedence from highest priority to lowest:
- Field-specific styling supplied via the API in the fill payload
- Field-specific styling chosen in the template builder UI
- Document-specific styling supplied via the API in the fill payload
- Document-specific styling chosen in the template builder UI
- Default styling
Supported custom fonts
By default the Noto Sans family is used to fill fields. Other fonts can be chosen in the PDF template builder and supplied via the API.
Supported fonts:
Courier,Helvetica,Times New Roman- All Google fonts. Specify the name exactly as the Google fonts website indicates.
When supplying a font name via the API, font family names are case-sensitive and must be exact, i.e. "Roboto Slab", not "roboto slab". You will receive an error if your specified font is not found or if the font name is incorrect.
POST https://app.useanvil.com/api/v1/fill/{pdfTemplateID}.pdf
{
  "fontFamily": "Roboto Slab", // case sensitive!

  "data": {
    "aTextField": "Lorem ipsum",
  }
}
If the font you specify does not contain a glyph used in your data, the Noto Sans font will be used as a fallback. For example, if you specify Times New Roman then fill a field with Japanese characters, Noto Sans will be used.
Interactive fields
You may need your users to update or fill fields on an Anvil-filled PDF. Interactive fields allow your users use external software (Mac preview, etc.) to type into fields on an Anvil-filled PDF.
For example, the address field here is interactive:
 Interactive short text field on a filled PDF
The API allows you to enable interactivity for specific fields or for the entire document.
Document-level settings
You can set interactivity at the document level with the useInteractiveFields and defaultReadOnly attributes.
POST https://app.useanvil.com/api/v1/fill/{pdfTemplateID}.pdf
{
  // Optional - When true, the PDF will be filled with interactive fields
  // See the Interactive Fields section below for more info.
  // Default is `false`
  "useInteractiveFields": true,

  // Optional - When true, all filled fields on the document will be read
  // only, unless `readOnly` is overridden at the field level.
  // Default is `false`
  "defaultReadOnly": false,

  "data": {
    // Because `defaultReadOnly` is false, this will be interactive
    "aTextField": "Lorem ipsum",

    // An empty string will show the unfilled interactive field on
    // the document. An empty string can be used for any field type
    // to output its empty interactive fields.
    "aDate": "",

    // For complex fields, each subfield will be interactive
    "aFullName": {
      "firstName": "Sally",
      "lastName": "Sanders",
    }
  }
}
// => response body will be binary PDF bytes
Field-level settings
Interactivity can be overridden at the field level. You can set the defaultReadOnly to true or false, then override with the readOnly attribute on each field
POST https://app.useanvil.com/api/v1/fill/{pdfTemplateID}.pdf
{
  "useInteractiveFields": true,
  "defaultReadOnly": true,

  "data": {
    // Will be readOnly: true Because `defaultReadOnly` is true
    "aTextField": "Lorem ipsum",

    // Will be editable because we override with readOnly: false here
    "aDate": {
      "value": "",
      "readOnly": false,
    },

    // It works for complex fields as well.
    // These fields will be editable:
    "aFullName": {
      "readOnly": false,
      "value": {
        "firstName": "Sally",
        "lastName": "Sanders",
      }
    }
  }
}
// => response body will be binary PDF bytes
Field IDs
Each field on the PDF is referenced in the data with a unique ID. You can set your own IDs to make a PDF template easier to fill via the Field Alias field. Once done, hit publish to see the changes in the API
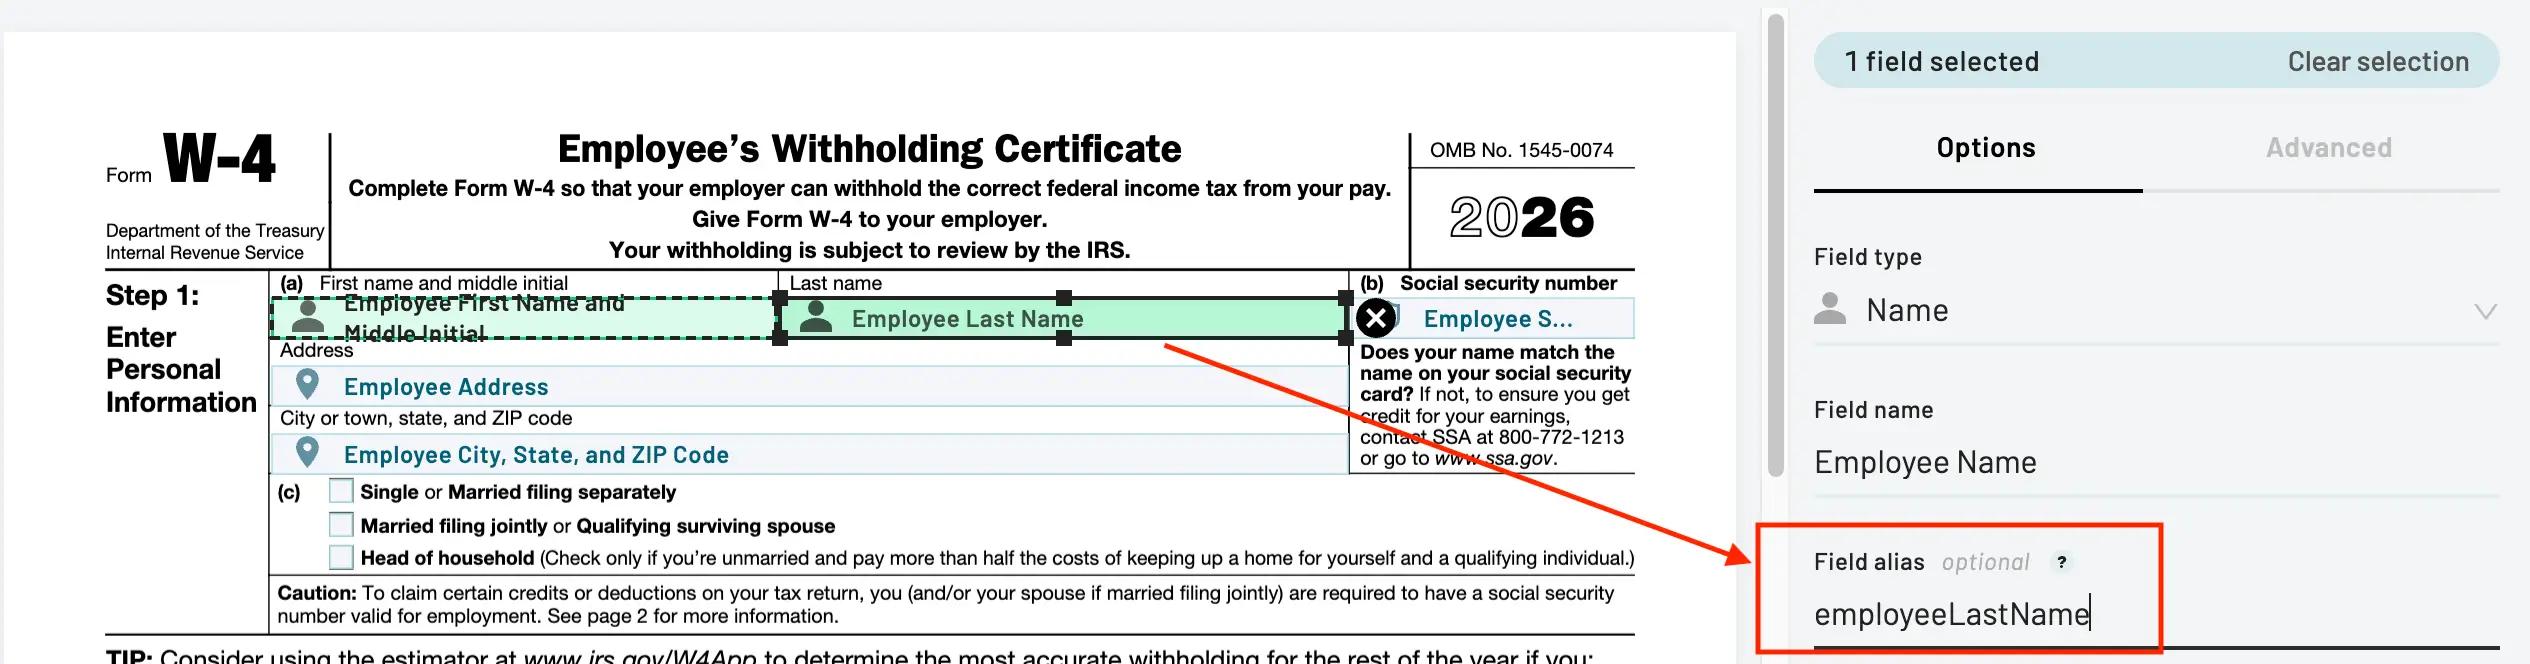 Setting a Field Alias in the PDF template builder
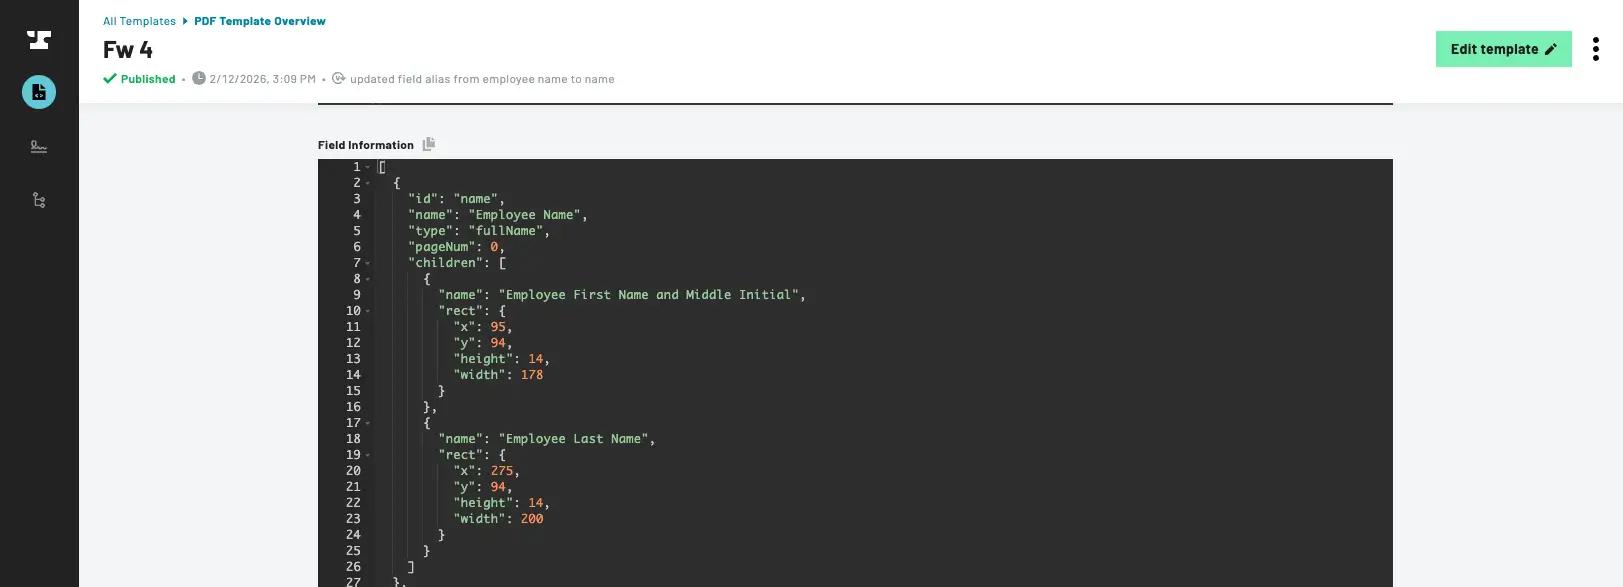
Once published, your new id will be reflected in the API:
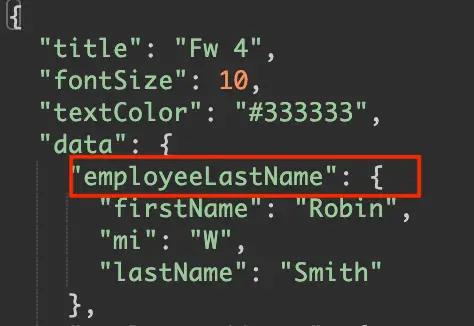 Field Alias reflected in the API
Combining fields
You may have a PDF that requires the same data to be placed in multiple fields on the PDF. For example, if someone's name was required to be placed at the bottom of each page.
You can combine fields by setting the Field Alias on each field to the same value. Then sending { name: "Robin Jones" } will fill any fields with the name field alias.
Field types
Each field has a type (e.g. phone, date, address, etc.). When you pass data to fill a PDF, the data will be formatted based on the type's rules before being inserted onto the PDF.
For many types, formatting rules can be chosen in the PDF template editor (e.g. dates, dollar, number, etc.).
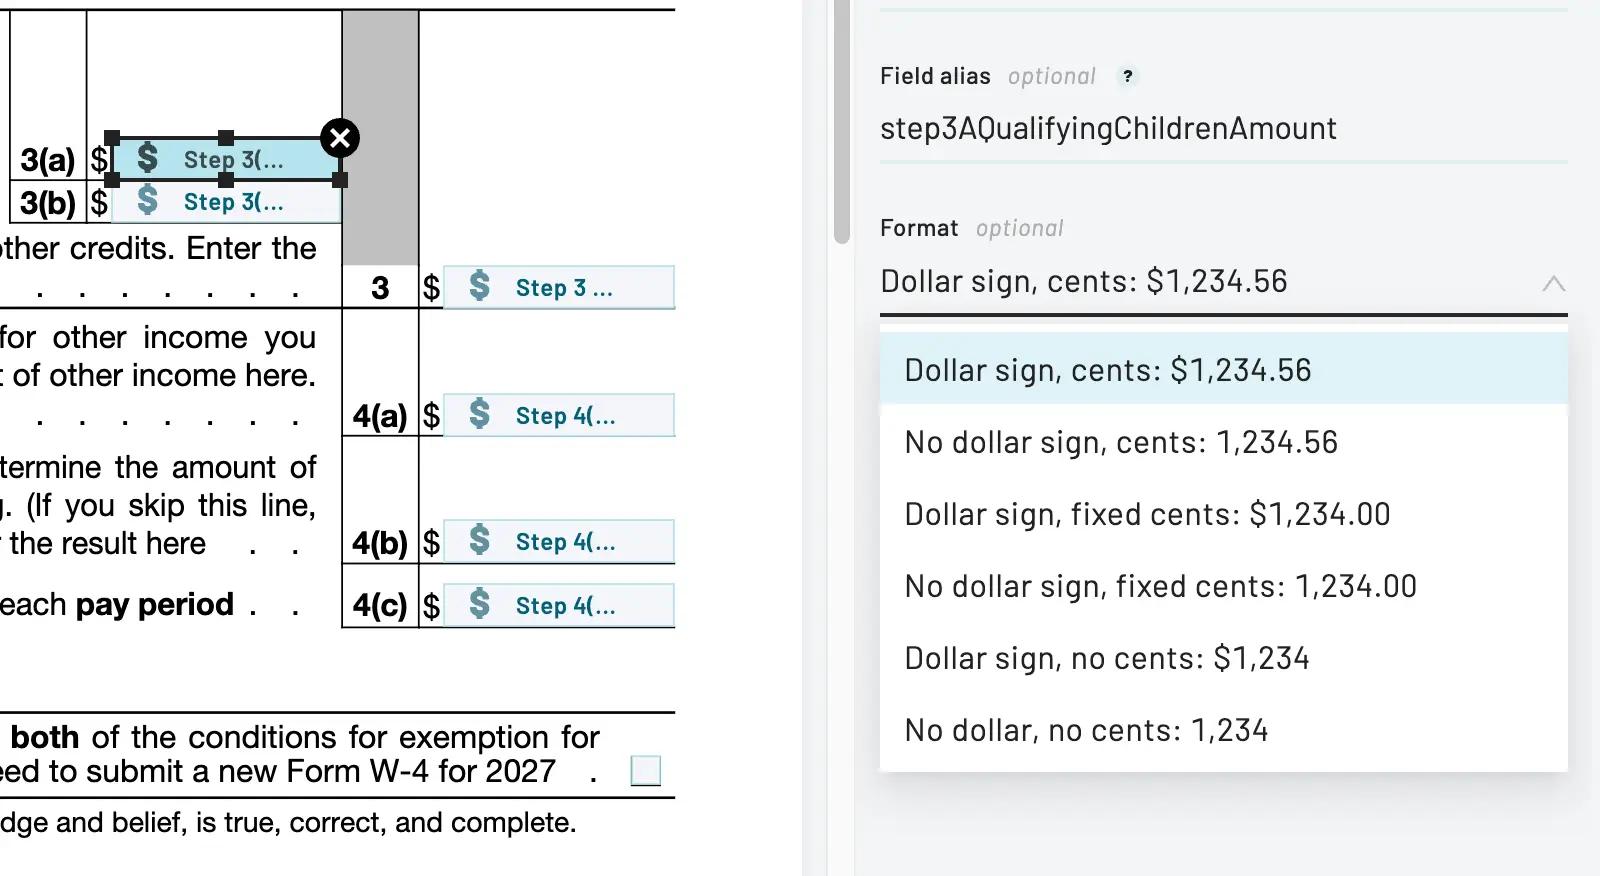 Specifying a field's format in the PDF template editor
Finding field types
To find API information, go to your dashboard and click on the template you want information on.
Document template dashboard
Scroll down to see the API information:
 Field type information for a document template
All field types
This shows all field types and the format they need to be specified in the payload's data parameter.
// Strings
shortText: String
longText: String
email: String
ssn: String // in format '123121234'
ein: String // in format '921234567'
date: String // in format 'YYYY-MM-DD'

radioGroup: String // ID of the child field that should be selected

// Image fields accept a publicly accessible http URL of your image (max
// size: 10MB), or a 'data:' URL (max size of all data URLs in a payload: 100k). If an http image is too large or the URL is not a valid image, the
// image field will not be filled. The max request body size is 100k,
// requests with data URLs over 100k will respond with a 413 error code.
imageFile: String

// Bools
checkbox: Boolean

// Numbers
number: Number
dollar: Number
integer: Number
percent: Number // 0 to 100

// Complex types

// "Boxes Per Letter" in the UI. This will render each character
// in a separate field. e.g. [][][][] with 'Unicorn' input will
// render [U][n][i][c]
charList: String

// "Boxes Per Line" in the UI. It represents several boxes stacked
// into lines. Each newline or element in the array will be rendered
// into the subsequent box.
textWrap: String or Array of lines

// A fullName represents a group of boxes for
// firstName, middle initial, and lastName
fullName: Object {
  firstName: 'Bobby',
  mi: 'W',
  lastName: 'Jones'
}

usAddress: Object {
  street1: '123 Main St',
  street2: '#18', // (Optional) used when street2 field is drawn
  city: 'San Francisco',
  state: 'CA',
  zip: '94106',
  country: 'US' // (Optional) used when country field is drawn
}

phone: Object {
  num: '555113333',

  // Region information is optional, default is US. Currently
  // supported regions are US, MX, CA, GB and any related regions
  // using the +1 (US, CA, GU, etc.), +44 (GB, IM, GG, JE), or +52
  // country codes.
  //
  // If `baseRegion` and `region` match, it will display the number
  // as a local number, without country code information.
  //
  // e.g.
  // { num: '4355345345', region: 'US', baseRegion: 'US' } => '(435) 534-5345'
  // { num: '4355345345', region: 'US', baseRegion: 'MX' } => '+1 (435) 534-5345'
  // { num: '4355345345', region: 'MX', baseRegion: 'MX' } => '435 534 5345'
  // { num: '4355345345', region: 'MX', baseRegion: 'US' } => '+52 435 534 5345'
  region: 'US',
  baseRegion: 'US'

  // `phone` data can be supplied as a string for convenience.
  // `region` and `baseRegion` will be assumed to be `US`
}
Repeating an entire PDF
Anvil can fill a PDF template multiple times and return a single merged PDF.
Repeating a PDF requires no special setup in your template. All you need to do is pass data an array of objects instead of a single object. For example:
POST https://app.useanvil.com/api/v1/fill/{pdfTemplateID}.pdf
{
  "data": [
    {
      "aTextField": "PDF one!",
    },
    {
      "aTextField": "PDF two!",
    }
  ]
}
// => response body will be binary PDF bytes
Will produce a single, merged PDF with the original PDF template filled twice:
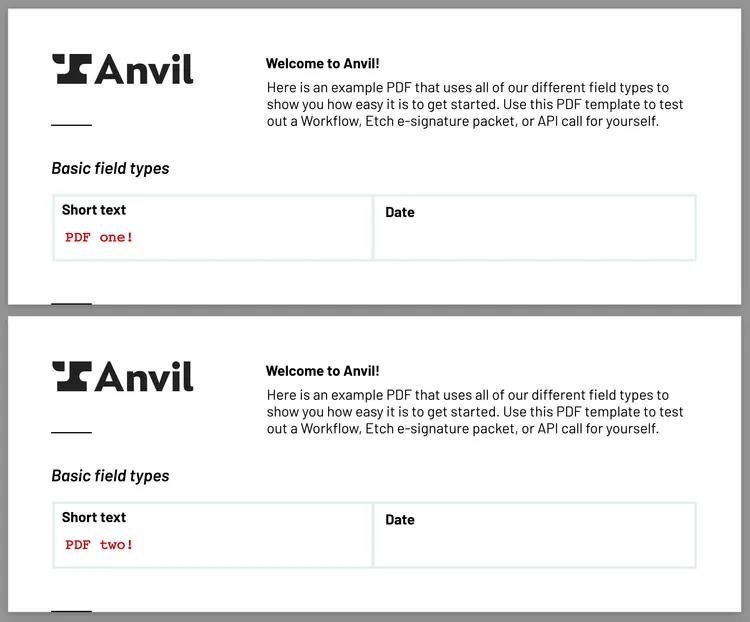 A merged PDF with the template filled twice
Repeating PDF pages
You can also repeat pages within your PDF template. Say you have a 3 page PDF with an invoice page as the 2nd page. You can repeat this page any number of times and end up with a 4+ page PDF.
Check out our PDF page repeating tutorial to get up to speed with an example invoice.
There are 2 ways to repeat pages in your template:
- Overflow items: you have a PDF with a page that has room for a static
nrows, but you haven + mitems to display. An example is an invoice with a static number of line items. - Explicit repeat: you want to repeat a page with totally different data for each repeat. An example is if you have a consent page in your PDF that needs to be repeated for
npeople.
These two operations can be combined to both overflow and explicitly repeat in the same fill call.
To discuss both of these operations, we'll use an invoice example.
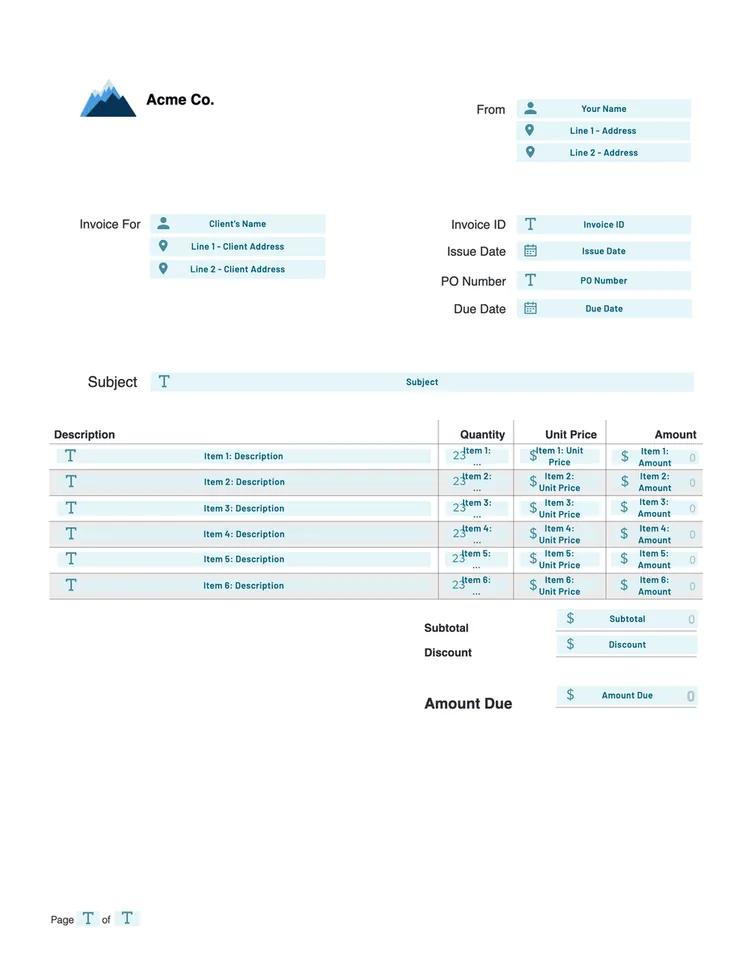 Invoice PDF template example
Overflow items
Our invoice example shows only 6 rows for line items. The goal of overflow repeating in our invoice example is to render more than 6 items. When we fill the PDF with more than 6 items, we want the page to repeat so all items are rendered on a page.
A little setup is required to make overflowing work. For each column in your table, you want to wrap all column fields in an array. Click one of the fields in your column, click the Advanced tab, create an array, then add all the other column items to the array. All fields in an array must have the same type. Here's an example with our amount column.
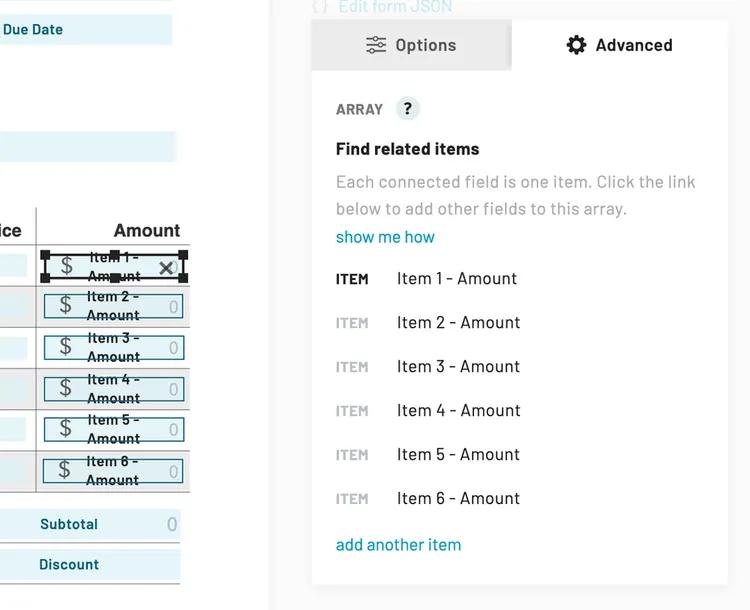 Creating an array field for the amount column
Now, do the same with any other columns on the PDF. You can give each of your columns a Field Alias to make filling easier.
Once you have all your columns set up, you will be able to send a fill request with an array of data. If the array of data is longer than the number of fields, the page will repeat.
For example, this request will produce only 1 invoice page:
POST https://app.useanvil.com/api/v1/fill/{pdfTemplateID}.pdf
{
  "title": "My Invoice",
  "data": {
    "clientName": "Acme Co.",
    "invoiceId": "#1234",
    "amounts": [
      1.11,
      2.22,
      3.33,
      4.44,
      5.55,
      6.66,
    ]
  }
}
Add one more item to the amounts array, and the page will repeat:
POST https://app.useanvil.com/api/v1/fill/{pdfTemplateID}.pdf
{
  "title": "My Invoice",
  "data": {
    "clientName": "Acme Co.",
    "invoiceId": "#1234",
    "amounts": [
      1.11,
      2.22,
      3.33,
      4.44,
      5.55,
      6.66,
      7.77, // will be in the first amount row on the 2nd page
    ]
  }
}
You can fill all your columns in this way in the same payload. It will repeat pages based on the longest array:
POST https://app.useanvil.com/api/v1/fill/{pdfTemplateID}.pdf
{
  "title": "My Invoice",
  "data": {
    "clientName": "Acme Co.",
    "invoiceId": "#1234",
    "amounts": [
      1.11,
      2.22,
      3.33,
      4.44,
      5.55,
      6.66,
      7.77, // will be in the first amount row on the 2nd page
    ]
    "quantities": [
      1,
      2,
      3,
      4,
      5,
      6,
      7, // will be in the first quantity row on the 2nd page
    ]
  }
}
Explicit repeat
With an explicit repeat, you can repeat a page n times with different payloads. In our invoice case, you could repeat the invoice multiple times for different invoice numbers for the same client.
The explicit repeat case requires no special field setup. All you need to do is send array data to non-array fields.
Say Acme Co. had 2 invoices with different items and totals. We just pass those values in as an array. The following code will result in two separate invoice pages: one for invoice #1111 for $100, and one for invoice #2222 for $200.
POST https://app.useanvil.com/api/v1/fill/{pdfTemplateID}.pdf
{
  "title": "My Invoice",
  "data": {
    // Since clientName is not an array, it will be applied to all pages.
    "clientName": "Acme Co.",

    "invoiceId": ["#1111", '#2222'],
    "totalAmount": [100, 200],

    // The line items info is covered in the next section...
  }
}
Combining overflow and explicit repeats
Extending our multiple invoice scenario above, we'd want to separate the line items out for each invoice. To do this, we'd pass in an array of arrays for each overflow column. It will repeat the page for each item in the top level arrays, then use the 2nd level arrays to do the overflow repeating.
For example, the following payload will create a 3 page PDF.
- Page 1: Invoice
#1111, Amounts 1.11 - 1.66 - Page 2: Invoice
#1111, Amounts 1.77 - Page 3: Invoice
#2222, Amounts 2.11-2.33
POST https://app.useanvil.com/api/v1/fill/{pdfTemplateID}.pdf
{
  "title": "My Invoice",
  "data": {
    // Since clientName is not an array, it will be applied to all pages.
    "clientName": "Acme Co.",

    "invoiceId": ["#1111", '#2222'],
    "totalAmount": [100, 200],

    "amounts": [
      [
        // Invoice #1111 data
        1.11,
        1.22,
        1.33,
        1.44,
        1.55,
        1.66,
        1.77, // renders on page 2 of invoice #1111
      ],
      [
        // Invoice #2222 data: page 3
        2.11,
        2.22,
        2.33,
      ]
    ]

    "quantities": [
      // ... 2 arrays here
    ]
  }
}
Filling page numbers
Dynamic page numbers can be injected into the document by way of template strings sent to any Short Text or Long Text field. This is especially useful when using the page repeating features described above.
Create a field, and make sure it's a text type (not a numeric type!). The default Short Text type is sufficient. Then give it a good Field Alias so it's easy to fill.
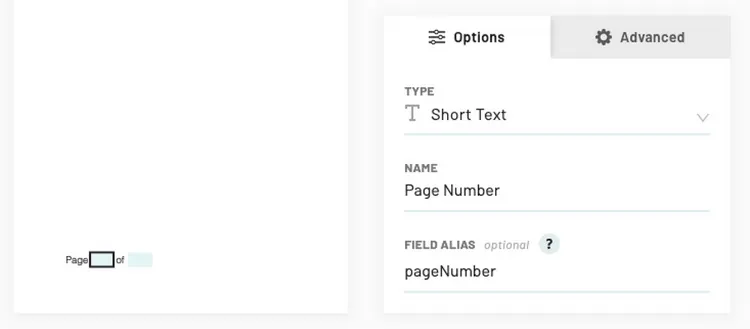 Creating a page number field with a Field Alias
Pass the template strings into the fill payload:
POST https://app.useanvil.com/api/v1/fill/{pdfTemplateID}.pdf
{
  "title": "Page number test",
  "textColor": "#CC0000",
  "data": {
    "pageNumber": "{{pageNumber}}",
    "totalPages": "{{totalPages}}",

    // You can use multiple variables a string
    "allPageInformation": "Page {{pageNumber}} of {{totalPages}}",
  }
}
And the page numbers are rendered in the resulting PDF:
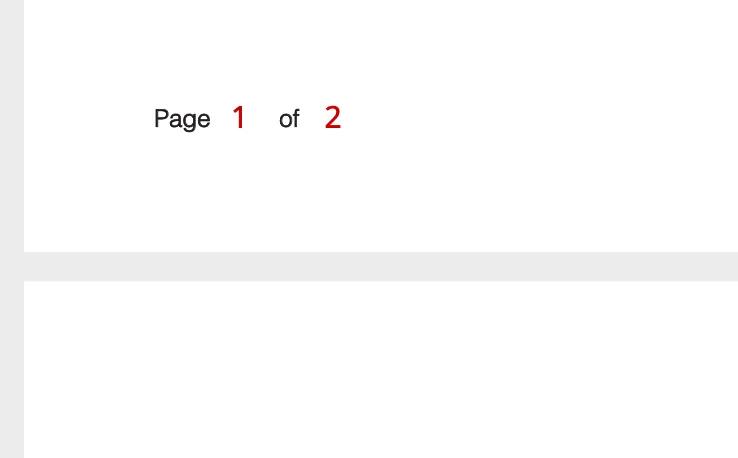 Page numbers rendered in the filled PDF
Template strings can be used in any Short Text or Long Text field. Several page-related variables are supported in template strings:
pageNumber- Page number within the PDFpageIndex- 0-basedpageNumber, i.e.pageNumber - 1totalPages- Total number of pages in the PDFpageRepeatNumber- Page number within this repeat loop. It will be1if there is no repeatingpageRepeatIndex- 0-basedpageRepeatNumberpageRepeatTotal- Total number of pages within this repeat loop
Remember to wrap each of those in curly braces to have them replaced with page information, e.g. {{pageNumber}}.
Troubleshooting
Sometimes things go wrong! That's ok, here are some common problems and steps to resolve them. If after reading this, you are still having issues, please contact support, and we can help sort it out.
The saved PDF file is corrupt / invalid
This is often an encoding issue. PDF is a binary format, and the PDF filling endpoint's response body will be binary PDF bytes.
- Make sure you are receiving the HTTP response body as binary (no encoding) from your HTTP client
- When you save the file, ensure the file is saved as binary (also no encoding)
See saving the response as a PDF for full details.