A common thread in HR, insurance, healthcare, and financial services is mountains of PDFs. If you're building a product in one of these industries, without a doubt you have had to process PDFs and get them signed.
Today, programmatically working with PDFs is painful. It's a big, complicated spec with poor library support. E-signatures only add to the complexity.
We're working toward a future where you have full control over these PDF processes while being painless to integrate into your product. Our e-signature API endpoints are a big part of this vision, allowing you to programmatically fill PDF documents with data from your system, then send the filled PDFs to the correct parties for signature.
In this post, we'll show you how to quickly embed e-signatures integrated into your application.
E-signature embedding goals
We'll be sending out a packet of HR documents for a new hire to review and sign. Our example will cover the following concepts to help you get up and running quickly.
- Requesting e-signatures from multiple signers
- Requesting signatures on multiple PDFs
- Pre-filling PDFs with data before requesting signatures
- Using a template PDF
- Uploading a raw PDF and specifying fields
While the examples will be in JavaScript / Node using the node-anvil client library, concepts are the same across platforms. node-anvil abstracts authentication and GraphQL requests for us, but the meat of the integration is in the variables passed to the GraphQL mutation, which will work the same on any platform, and in any of our other language-spoecific API clients.
Sample HR Signature Packet
Our example HR packet will consist of two PDFs, an IRS form W-4 and an NDA. Two people will need to sign the documents:
- The new employee (W-4 & NDA)
- An HR representative (only the NDA).
The W-4
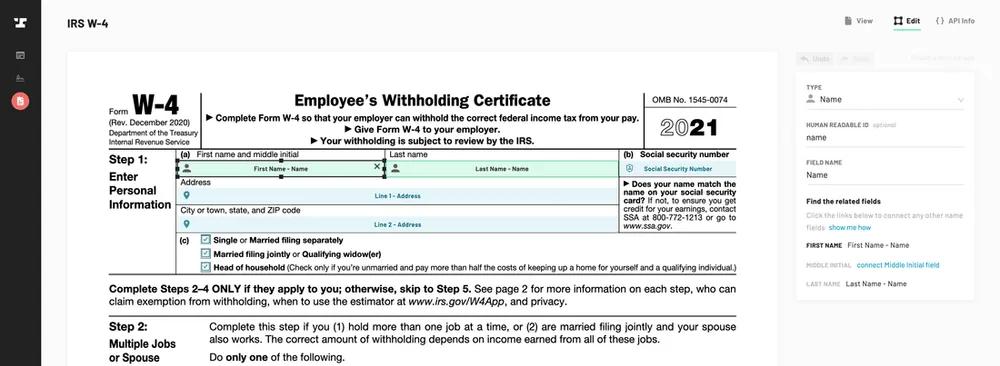
Only the employee needs to sign the W-4. We already have the employee's info in our hypothetical system, so we'll want to pre-fill the PDF before we send it out for signatures.
The NDA
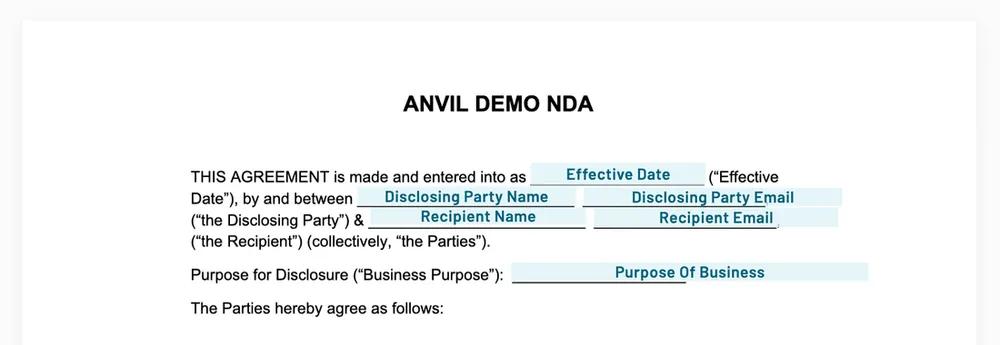
Both the HR representative and the employee need to sign the NDA. We'll also need to pre-populate the NDA PDF with some information like the employee's name and email, employer info, and date of the agreement.
How the e-signature process works
First we'll create a signature packet that contains our two PDFs. We will pre-fill the PDFs with employee data as part of the creation process, then we’ll send our new packet out for signatures.
For simplicity, we'll be using packet defaults. With these defaults, Anvil manages all electronic signature request notifications via email.
The end-to-end process will look like this:
- Your app will create a packet over the API
- The employee will receive an email asking them to sign the documents; this person will be asked to add their signature to both documents.
- After the employee reviews and signs the documents, the HR rep will get an email to countersign. The HR rep will see both documents but only be asked to sign the NDA.
- When the HR rep signs, your team will get an email indicating that everyone has signed and the process is complete.
You can get a quick feel for the signing process by trying out the e-sign demo app.
Code overview
From a code perspective, we'll be working with a single GraphQL mutation, createEtchPacket, to create the packet, pre-fill the documents, and send the signature packet.
Since Anvil is handling the signer notifications, one mutation call is all you need to both create and send. The rough outline is below.
import Anvil from '@anvilco/anvil'
const apiKey = 'YOUR API KEY'
const anvilClient = new Anvil({ apiKey })
const packetVariables = {
  // Specify the files, signers, and data to fill the
  // PDFs here. The rest of this tutorial is dedicated to
  // fleshing these variables out!
}
const { data: result } = await anvilClient.createEtchPacket({
  variables: packetVariables,
})
const { data, errors } = result

// Provided there are no errors, the employee will have
// been sent an email to sign their part
console.log('Result', errors || data.createEtchPacket)

// Your new EtchPacket ✨
// {
//   eid: 'Rb26TSuj5OxLfymG8tYv',
//   name: 'HR Documents - Sally Employee',
//   detailsURL: 'https://app.useanvil.com/org/your-org/etch/Rb26TSuj5OxLfymG8tYv',
//   documentGroup: {
//     eid: 'xXna1BmEFwBc32A3sGTe',
//     status: 'sent',
//     files: [ ... ],
//     signers: [ ... ]
//   }
// }
If you're a tl;dr kind of person, check out the example script with all the code from this post.
Before you start: Authenticate to Anvil
First, you'll need to get your API key by signing up for an Anvil account.
Once logged in, you will be directed to copy the API key from your organization’s API settings page.
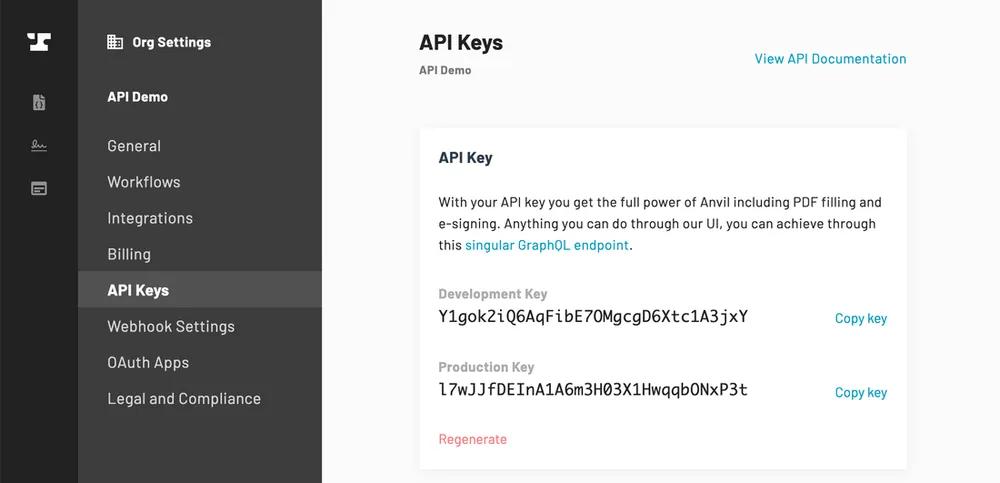
There are a couple of differences between your development and production keys. Calls made to your development key are always free, but it has a more restrictive rate-limit than the production key, and PDFs are watermarked.
For the purposes of this tutorial, copy your development key.
When you’re ready to make your application live, switch over to your production key.
We'll use the node-anvil client in this guide, but you can use any platform you'd like. Visit our API authentication documentation.
Install the node-anvil client:
yarn add @anvilco/anvil
# or
npm install @anvilco/anvil
Then import it and create an instance of the client:
import Anvil from '@anvilco/anvil'

// The API key from your Anvil organization settings
const apiKey = '7j2JuUWmN4fGjBxsCltWaybHOEy3UEtt'

const anvilClient = new Anvil({ apiKey })
Step 1: Configure the packet details
Over the next three steps, we'll be building up a variables object called packetVariables, then sending it to the createEtchPacket GraphQL mutation.
The first variables in packetVariables will set up the packet itself. We'll also define a few consts for signer names and emails here so we can reuse them in other parts of the packet configuration.
const employeeName = 'Sally Employee'
const employeeEmail = 'sally@example.com'

const employerName = 'Bill AcmeManager'
const employerEmail = 'bill@acme.com'

const packetVariables = {
  // Indicate the packet is all ready to send to the
  // signers. An email will be sent to the first signer.
  isDraft: false,

  // Test packets will use development signatures and
  // not count toward your billed packets.
  isTest: true,

  // Specify the name of this packet in your dashboard.
  name: `HR Documents - ${employeeName}`,

  // Subject & body of the emails to signers
  signatureEmailSubject: 'HR Documents',
  signatureEmailBody: 'Please sign these HR documents....',

  // Only the beginning!
  ...otherVariables,
}
Step 2: Set up PDFs
Adding onto packetVariables, we'll specify that we want to use both the W-4 and the NDA, then the data to pre-fill them.
W-4 details
The IRS form W-4 is a ready-made template—we have already templatized it so you don't need to. We'll specify the PDF template ID in our packet, plus the data to pre-fill it.
The goal here is to show you how to use and fill PDF templates in your signature packet. Using PDF templates is the most common method of including PDFs in signature packets.
Specify the template you want to use in the files property, then add the data to fill it in the data.payloads property.
const packetVariables = {
  ...otherPacketVariables,

  files: [
    {
      // Our ID we will use to reference and fill
      // it with data. It can be any string you want!
      id: 'templatePdfIrsW4',

      // The id to the ready-made W-4 template.
      //
      // You can upload and templatize your own PDFs from
      // the Anvil UI, then use them in the same way as
      // this W-4.
      // Anyone on your team can build PDF templates!
      castEid: 'XnuTZKVZg1Mljsu999od',
    },
  ],

  data: {
    payloads: {
      // 'templatePdfIrsW4' is the file ID specified above
      templatePdfIrsW4: {
        data: {
          // This data will fill the PDF before it's sent
          // to any signers. IDs here were set up on each
          // field while templatizing the PDF.
          name: employeeName,
          ssn: '111223333',
          address: {
            street1: '123 Main St #234',
            city: 'San Francisco',
            state: 'CA',
            zip: '94106',
            country: 'US',
          },
          filingStatus: 'Joint',
          employerEin: '897654321',
          employerAddress: {
            street1: '555 Market St',
            city: 'San Francisco',
            state: 'CA',
            zip: '94103',
            country: 'US',
          },
        },
      },
    },
  },
}
NDA details
Now we'll add the second file: the NDA. For the purposes of this guide, we'll upload the NDA and specify the field locations when creating the signature packet. The code snippet below looks long, but it's just specifying where each field is on the PDF.
It's possible to templatize all of your PDFs and include the templates as we did with the W-4. But you may have one-off or dynamic PDFs you need to include in addition to templatized PDFs.
Download test-pdf-nda.pdf and save it somewhere local.
Add the following code to your request:
const ndaFile = Anvil.prepareGraphQLFile('path/to/test-pdf-nda.pdf')
const packetVariables = {
  ...otherPacketVariables,

  files: [
    // The NDA is included in addition to the W-4
    ...otherFiles,
    {
      // This is a file we will upload and specify the
      // fields ourselves
      id: 'fileUploadNDA',
      title: 'Demo NDA',
      file: ndaFile,
      fields: [
        // Define where the all the fields are for the
        // fresh PDF upload
        {
          id: 'effectiveDate',
          type: 'date',
          rect: { x: 326, y: 92, height: 12, width: 112 },
          format: 'MM/DD/YYYY',
          pageNum: 0,
        },
        {
          id: 'disclosingPartyName',
          type: 'fullName',
          rect: { x: 215, y: 107, height: 12, width: 140 },
          pageNum: 0,
        },
        {
          id: 'disclosingPartyEmail',
          type: 'email',
          rect: { x: 360, y: 107, height: 12, width: 166 },
          pageNum: 0,
        },
        {
          id: 'recipientName',
          type: 'fullName',
          rect: { x: 223, y: 120, height: 12, width: 140 },
          pageNum: 0,
        },
        {
          id: 'recipientEmail',
          type: 'email',
          rect: { x: 367, y: 120, height: 12, width: 166 },
          pageNum: 0,
        },
        {
          id: 'purposeOfBusiness',
          type: 'shortText',
          rect: { x: 314, y: 155, height: 12, width: 229 },
          pageNum: 0,
        },
        {
          id: 'recipientSignatureName',
          type: 'fullName',
          rect: { x: 107, y: 374, height: 22, width: 157 },
          pageNum: 1,
        },
        {
          id: 'recipientSignature',
          type: 'signature',
          rect: { x: 270, y: 374, height: 22, width: 142 },
          pageNum: 1,
        },
        {
          id: 'recipientSignatureDate',
          type: 'signatureDate',
          rect: { x: 419, y: 374, height: 22, width: 80 },
          pageNum: 1,
        },
        {
          id: 'disclosingPartySignatureName',
          type: 'fullName',
          rect: { x: 107, y: 416, height: 22, width: 159 },
          pageNum: 1,
        },
        {
          id: 'disclosingPartySignature',
          type: 'signature',
          rect: { x: 272, y: 415, height: 22, width: 138 },
          pageNum: 1,
        },
        {
          id: 'disclosingPartySignatureDate',
          type: 'signatureDate',
          rect: { x: 418, y: 414, height: 22, width: 82 },
          pageNum: 1,
        },
      ],
    },
  ],

  data: {
    payloads: {
      // Data to fill the NDA is included in addition
      // to the W-4's data
      ...otherPayloads,

      fileUploadNDA: {
        fontSize: 8,
        textColor: '#0000CC',
        data: {
          // The IDs here match the fields we created in
          // the files[].fields array above
          effectiveDate: '2024-01-30',
          recipientName: employeeName,
          recipientSignatureName: employeeName,
          recipientEmail: employeeEmail,

          disclosingPartyName: 'Acme Co.',
          disclosingPartySignatureName: employerName,
          disclosingPartyEmail: employerEmail,

          purposeOfBusiness: 'DEMO!!',
        },
      },
    },
  },
}
Step 3: Set up signers
The last thing we need to do is configure the signers. Each signer must be associated with at least one field to sign in signers[].fields.
When it's their turn to sign, each signer will be shown both PDF documents, but only directed to click on their assigned signature boxes.
const packetVariables = {
  ...otherPacketVariables,

  signers: [
    // Signers will sign in the order they are specified
    // in this array. e.g. `employer` will sign after
    // `employee` has finished signing
    {
      // `employee` is the first signer
      id: 'employee',
      name: employeeName,
      email: employeeEmail,

      // These fields will be presented when this signer
      // signs. The signer will need to click through
      // the signatures in the order of this array.
      //
      // Each field referenced here must be of type
      // `signature`, `signatureDate`, or `initial`. You
      // can see in the NDA config above we specified two
      // `signature` fields and two `signatureDate` fields.
      // Here, we link them up!
      fields: [
        {
          fileId: 'templatePdfIrsW4',
          fieldId: 'employeeSignature',
        },
        {
          fileId: 'templatePdfIrsW4',
          fieldId: 'employeeSignatureDate',
        },
        {
          // The file ID we specified in the NDA section
          fileId: 'fileUploadNDA',

          // We specified this field ID the NDA section
          fieldId: 'recipientSignature',
        },
        {
          fileId: 'fileUploadNDA',
          fieldId: 'recipientSignatureDate',
        },
      ],
    },
    {
      // `employer` is the 2nd signer.
      id: 'employer',
      name: employerName,
      email: employerEmail,
      fields: [
        // The employer only signs the NDA, so we only
        // specify fields on the NDA
        {
          fileId: 'fileUploadNDA',
          fieldId: 'disclosingPartySignature',
        },
        {
          fileId: 'fileUploadNDA',
          fieldId: 'disclosingPartySignatureDate',
        },
      ],
    },
  ],
}
All together now
You made it! Check out the running example script that includes all the code from this post.
import Anvil from '@anvilco/anvil'
const apiKey = 'YOUR API KEY'
const employeeName = 'Sally Employee'
const employeeEmail = 'sally@example.com'

const employerName = 'Bill AcmeManager'
const employerEmail = 'bill@acme.com'

async function main() {
  const anvilClient = new Anvil({ apiKey })
  const ndaFile = Anvil.prepareGraphQLFile('path/to/test-pdf-nda.pdf')
  const packetVariables = getPacketVariables(ndaFile)
  const { data: result } = await anvilClient.createEtchPacket({
    variables: packetVariables,
  })
  const { data, errors } = result
  console.log(errors || data.createEtchPacket)
}

function getPacketVariables(ndaFile) {
  return {
    isDraft: false,
    isTest: true,
    name: `HR Docs - ${employeeName}`,
    signatureEmailSubject: 'HR Documents ok',
    signatureEmailBody: 'Please sign these HR documents....',
    files: [
      {
        id: 'templatePdfIrsW4',
        // The id to the ready-made W-4 template
        castEid: 'XnuTZKVZg1Mljsu999od',
      },
      {
        // This is a file we will upload and specify the
        // fields ourselves
        id: 'fileUploadNDA',
        title: 'Demo NDA',
        file: ndaFile, // The file to be uploaded
        fields: [
          {
            id: 'effectiveDate',
            type: 'date',
            rect: { x: 326, y: 92, height: 12, width: 112 },
            format: 'MM/DD/YYYY',
            pageNum: 0,
          },
          {
            id: 'disclosingPartyName',
            type: 'fullName',
            rect: { x: 215, y: 107, height: 12, width: 140 },
            pageNum: 0,
          },
          {
            id: 'disclosingPartyEmail',
            type: 'email',
            rect: { x: 360, y: 107, height: 12, width: 166 },
            pageNum: 0,
          },
          {
            id: 'recipientName',
            type: 'fullName',
            rect: { x: 223, y: 120, height: 12, width: 140 },
            pageNum: 0,
          },
          {
            id: 'recipientEmail',
            type: 'email',
            rect: { x: 367, y: 120, height: 12, width: 166 },
            pageNum: 0,
          },
          {
            id: 'purposeOfBusiness',
            type: 'shortText',
            rect: { x: 314, y: 155, height: 12, width: 229 },
            pageNum: 0,
          },
          {
            id: 'recipientSignatureName',
            type: 'fullName',
            rect: { x: 107, y: 374, height: 22, width: 157 },
            pageNum: 1,
          },
          {
            id: 'recipientSignature',
            type: 'signature',
            rect: { x: 270, y: 374, height: 22, width: 142 },
            pageNum: 1,
          },
          {
            id: 'recipientSignatureDate',
            type: 'signatureDate',
            rect: { x: 419, y: 374, height: 22, width: 80 },
            pageNum: 1,
          },
          {
            id: 'disclosingPartySignatureName',
            type: 'fullName',
            rect: { x: 107, y: 416, height: 22, width: 159 },
            pageNum: 1,
          },
          {
            id: 'disclosingPartySignature',
            type: 'signature',
            rect: { x: 272, y: 415, height: 22, width: 138 },
            pageNum: 1,
          },
          {
            id: 'disclosingPartySignatureDate',
            type: 'signatureDate',
            rect: { x: 418, y: 414, height: 22, width: 82 },
            pageNum: 1,
          },
        ],
      },
    ],

    data: {
      // This data will fill the PDF before it's sent to
      // any signers.
      // IDs here were set up on each field while
      // templatizing the PDF.
      payloads: {
        templatePdfIrsW4: {
          data: {
            name: employeeName,
            ssn: '111223333',
            filingStatus: 'Joint',
            address: {
              street1: '123 Main St #234',
              city: 'San Francisco',
              state: 'CA',
              zip: '94106',
              country: 'US',
            },
            employerEin: '897654321',
            employerAddress: {
              street1: '555 Market St',
              city: 'San Francisco',
              state: 'CA',
              zip: '94103',
              country: 'US',
            },
          },
        },
        fileUploadNDA: {
          fontSize: 8,
          textColor: '#0000CC',
          data: {
            effectiveDate: '2024-01-30',
            recipientName: employeeName,
            recipientSignatureName: employeeName,
            recipientEmail: employeeEmail,

            disclosingPartyName: 'Acme Co.',
            disclosingPartySignatureName: employerName,
            disclosingPartyEmail: employerEmail,

            purposeOfBusiness: 'DEMO!!',
          },
        },
      },
    },

    signers: [
      {
        id: 'employee',
        name: employeeName,
        email: employeeEmail,
        fields: [
          {
            fileId: 'templatePdfIrsW4',
            fieldId: 'employeeSignature',
          },
          {
            fileId: 'templatePdfIrsW4',
            fieldId: 'employeeSignatureDate',
          },
          {
            fileId: 'fileUploadNDA',
            fieldId: 'recipientSignature',
          },
          {
            fileId: 'fileUploadNDA',
            fieldId: 'recipientSignatureDate',
          },
        ],
      },
      {
        id: 'employer',
        name: employerName,
        email: employerEmail,
        fields: [
          {
            fileId: 'fileUploadNDA',
            fieldId: 'disclosingPartySignature',
          },
          {
            fileId: 'fileUploadNDA',
            fieldId: 'disclosingPartySignatureDate',
          },
        ],
      },
    ],
  }
}

function run(fn) {
  fn()
    .then(() => {
      process.exit(0)
    })
    .catch((err) => {
      console.log(err.stack || err.message)
      process.exit(1)
    })
}

run(main)
Elevate your application signing PDF documents
If you’re looking for a deeper embedded e-signature experience in your application, here are a few resources to help you dig in.
First, try out the live e-sign demo app and view the demo app's code. The demo app should help you get a feel for the document signing process. It contains code for a number of important concepts, notably embedded signers. Then, check out the following resources:
- Quickly test your ideas with the e-signature Postman collection
- Get notified when signers sign with webhook notifications.
- Customize the signer experience by embedding the e-sign UI directly into your application.
- Personalize your e-signature page with your brand colors and logo.
- Secure your data by encrypting information when filling PDFs.
- Review the createEtchPacket reference docs for advanced implementation.
Need help? Get in touch to learn more about embedding e-signatures into your application.