How to set up a custom CSS stylesheet in Anvil
When it comes to creating a professional and polished look for your website, custom styling is key. In this blog post, we’ll provide an in-depth guide on how to create a custom CSS stylesheet that you can integrate into your Anvil Webforms or signature pages. We will go over the basics of creating a custom stylesheet, white labeling your stylesheet, and configuring your documents to make use of custom styling. We’ll also explain why custom styling is important and discuss the many benefits associated with using it. Finally, we’ll provide resources for further reading and help so you can get started right away!
Why custom styling is important
Custom CSS styling is an essential part of creating professional and trustworthy-looking documents. It allows businesses to create a consistent brand image, improve customer experience, and increase the chances of successful sign-off. Custom styling also provides businesses with a higher level of control over the look and feel of their documents. With custom stylesheets, you have full power to style anything on your Anvil Webforms and signature pages. You can customize fonts, colors, logos, and element sizes to match your brand.
Creating a custom stylesheet not only makes your e-sign documents look more professional but it also gives customers confidence that they are dealing with an organization that takes pride in its appearance and professionalism. This can help to build trust between you and your customers, which is key for successful sign-offs. Having consistent branding across all e-sign documents also guarantees that customers have a cohesive experience throughout the entire process, from start to finish.
 Anvil signature page with default styling
Customizing elements such as fonts and colors helps give customers a more personalized experience as they fill out forms or review documents online. Personalization has been proven to increase engagement and conversion rates, so it’s important to make sure that you are taking advantage of this opportunity when designing your stylesheet. Additionally, by having full control over the look and feel of your documents, you can make sure that they match your website design exactly so everything looks uniform and cohesive.
 Anvil signature page with custom style and logo
Finally, using custom styles offers flexibility when it comes to making changes or updating designs as needed. By making simple tweaks or adjustments, you can quickly update all your documents at once, without needing to go back into each one individually. This saves time and effort while still giving you full control over the look of your documents.
As you can see, there are many benefits associated with creating custom styles for your Anvil documents – from creating a consistent brand image across all communications to increasing customer engagement rates through personalization – so be sure to take advantage of this powerful tool!
Creating a customized CSS stylesheet
Constructing a custom stylesheet can help you ensure that your company’s branding is accurately represented in the documents you create. It allows you to define a range of colors, fonts, and logos that reflect your company's image, and also provides customers with confidence when signing documents.
Luckily, creating one is easy to do. All you need is a little CSS magic and you can style your Anvil Workflows or signature pages to perfectly match your brand. We have two Github gists that have everything you need to help you get started building your own custom stylesheet. See here and here. You can change fonts, styling, colors, background, and more.
Once you have created your custom stylesheet, you will need to host it so that you can inject it into your Anvil application. An easy way to do this is to simply host your stylesheet on GitHub pages. You can do this by creating a new project within GitHub, creating a style.css document, adding your styling, and committing your changes.
In the pages tab of your project’s settings, you can choose which branch you want to deploy from, and find the URL for your deployed site. Once you have the URL you are ready to use your custom styling in Anvil. Make sure that the project is public so that you can access the URL.
How to white label your CSS stylesheet
Stylesheet injection, also known as white labeling, will inject a stylesheet URL of your choice into your workflow or signature pages. This stylesheet can be served from your website, giving you full control over the custom styles.
Once enabled for your organization, you can set a custom stylesheet URL in a few different ways. The first way is to go to your organization settings in Anvil, and go to the White labeling tab. There, you can upload your company logo or add a stylesheet that will apply to your webforms and signature pages.
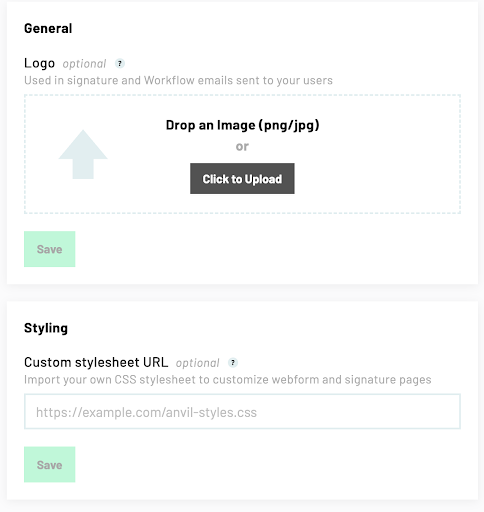 Anvil CSS Stylesheet upload UI
Note: the URL you input must be HTTPS, or the styling will not be applied. Also, make sure that the URL points to the stylesheet of your hosted project. For example, if you hosted your project with GitHub pages, your URL might look like this: https://your-company.github.io/your-project/style.css.
You can also set a custom stylesheet URL on a per-Workflow basis in each Workflow's settings. Just go to your Anvil account, choose the Workflow you want to add custom styling to, and include the stylesheet URL to the White label settings.
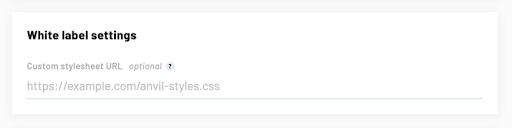 Anvil per Workflow stylesheet URL
Finally, you can specify a custom stylesheet injected into the signature page for all signers. Simply include the stylesheet URL as part of your GraphQL mutation.
"signatureOptions": {
  "style": {
    // Specify a custom stylesheet served from
    // your website that will be injected into
    // the signature page for all signers.
    "stylesheetURL": "https://example.com/anvil-styles.css"
  }
}
When you style your documents directly using a GraphQL mutation, you can even apply additional styling directly within the mutation itself. This works alongside any stylesheet you may have applied.
"style": {
  "primaryColor": "#1985a1",
  "successColor": "1985a1",
  "infoColor": "#46494c",
  "linkColor": "1985a1"
}
These style properties can be applied at both the field and document level, and can be chosen in the UI or supplied via the API. The order of precedence from highest priority to lowest is as follows:
- Field-specific styling supplied via the API in the fill payload
- Field-specific styling chosen in the template builder UI
- Document-specific styling supplied via the API in the fill payload
- Document-specific styling chosen in the template builder UI
- Default styling
Achieving seamless brand integration with custom CSS
Custom CSS styling is an invaluable tool for creating a unique and powerful document process. It allows businesses to create a consistent brand image, improve customer experience, and increase the chances of successful sign-off. Custom styling also gives customers confidence that they are dealing with a professional organization, builds trust, and provides flexibility when it comes to making changes or updating designs.
Using custom CSS stylesheets described in this post is a major part of this customizability, but not the end all! You can embed styled Webforms, and styled e-signature pages into your application for a seamless experience. Custom stylesheets can be combined with custom strings on the signature pages, your custom logo, and you can even handle iframe events to provide your users with custom finish screens.
White labeling with custom stylesheets in production is a feature of our Custom plan. Ready to elevate your document workflows? Test drive our Document AI now! If you want to learn more about how Anvil’s solutions can transform your document processes, get in touch today.
Key Takeaways:
- Custom styling improves brand consistency, builds customer trust, and aligns e-signature and form pages with company aesthetics.
- The flexibility of CSS styling means businesses can modify fonts, colors, and layouts for tailored user experiences, boosting engagement.
- Use hosted stylesheets in Anvil’s workflows or e-signature pages, with setup available via organization or workflow settings.
- Update designs efficiently across documents with CSS stylesheet tweaks.