
What text tags are
Text tags are small pieces of text you can type into your document indicating where someone should sign, where to place names, dates, etc. After the document has been uploaded to Anvil, your text tags will be converted into fields on the document. Fields specified by text tags can be attached signers or filled just like fields you'd draw.
For example, say you have an agreement that has a name and agreement date in the first paragraph, then has users sign at the end of the document. An example NDA:
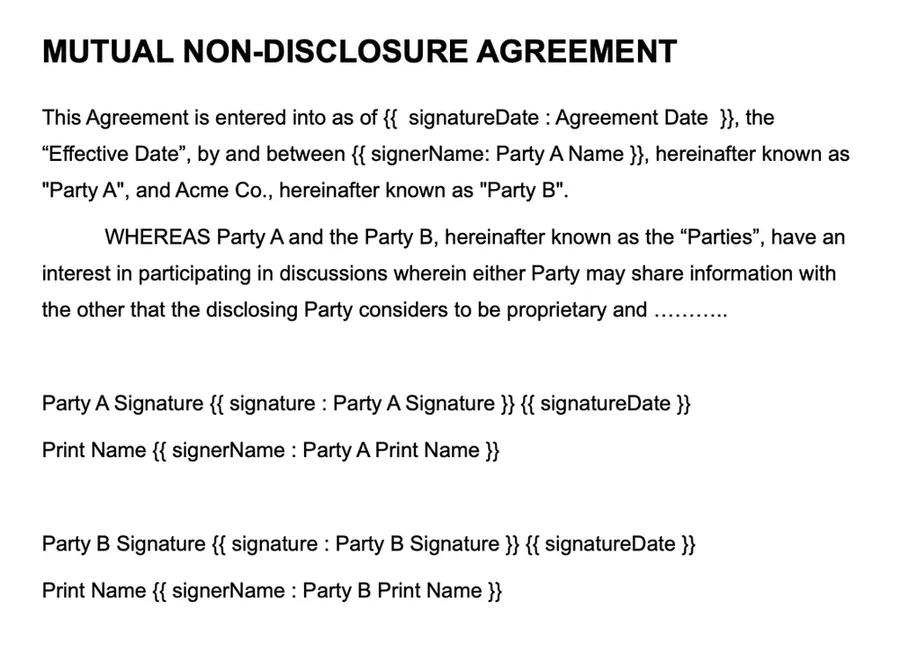
Text tags are the text surrounded by the curly braces, for example, {{ signatureDate : Agreement Date }}. Each tag will tell Anvil to place a field where it found the tag in the document.
Note that Anvil will not remove the text tags from the document when filling or signing. We do not modify the underlying document in an effort to keep the document's length and formatting as you intended.
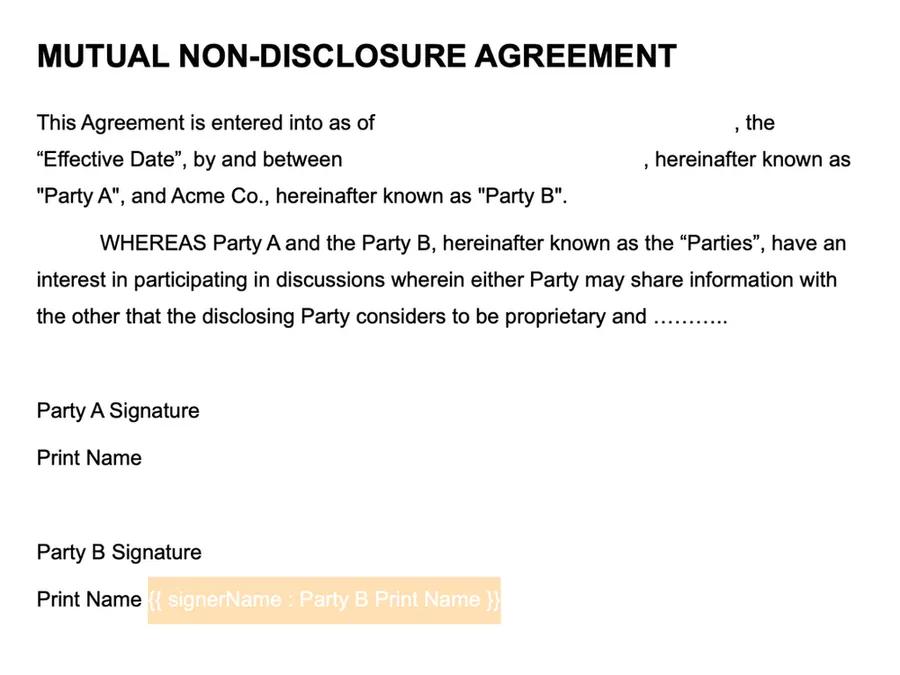
To hide the tags from the user, set their font color to be the same as the page, in this case you'd set them to white. Your end-user will not be able to see the tags, but Anvil will find them.
Here is the previous example with the text tags set to have a white font color. You can see the last text tag selected so you know it's there.
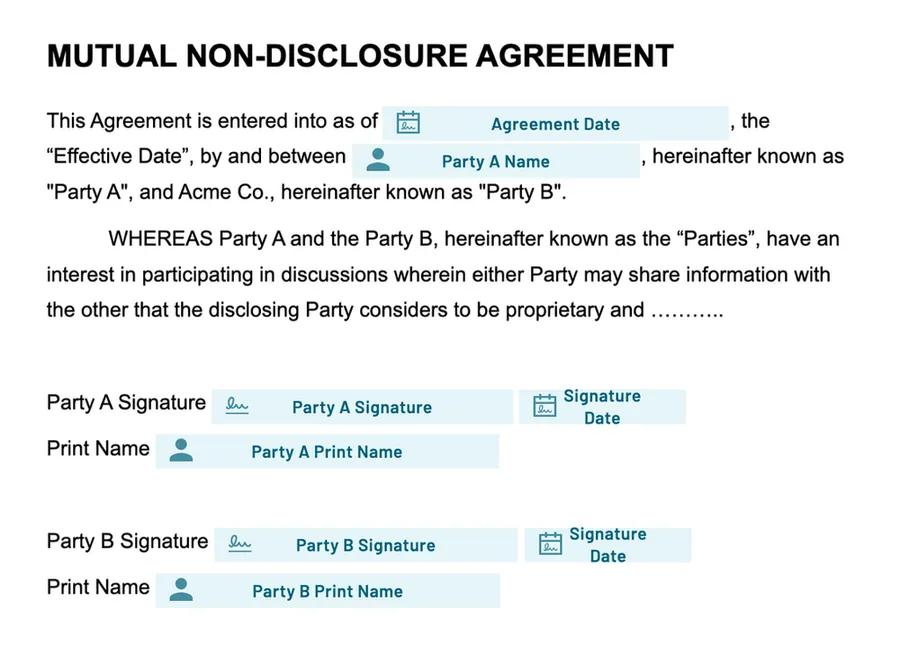
Once uploaded to Anvil, all text tags will be detected and converted into fields:
Where you can use text tags
You can use text tags:
- In Document Templates
- Documents uploaded to Workflows
- Documents uploaded to Etch signature packets
- Through the API with any of the above, notably in the Etch e-sign API
Anvil will parse text tags any time you upload a PDF or Word document to Anvil.
Text tags format
Tags are indicated by double curly braces containing up to four arguments separated by colon characters. Text tags must start with {{ and end with }}.
{{ fieldType : fieldName : fieldAlias : signerID }}
Only fieldType is required. All other arguments are optional.
fieldType(Required) - one of our PDF field types. PDF fields you can create in the UI are supported including signature fields likesignature,initials,signatureDate,signerName, and fill fields likeusAddress,ssn,shortText, etc. See the reference below for a list of all supported field types.fieldName(Optional) - the name of the field shown in the UI.fieldAlias(Optional) - an ID that API users can use to reference the field for filling. This is useful for docs uploaded as templates intended to be used by the PDF filling endpoint or in Etch e-sign packets.signerID(Optional) - an ID referencing a signer. When specified alongside signers in the Etch e-sign API, it will automatically associate the field with the matching signer.
Spaces between {{ and }} are ignored. You can use spaces to make the tag fill the space you'd like to use. For example {{signature:Signature 1}} and {{ signature : Signature 1 }} are equivalent.
Skipping optional arguments is done with consecutive colon characters. For example, to specify a fieldType and signerID only, you'd write {{ signature ::: signer1 }}.
Text tags must fit within one line. If your text tag spans across a line break, Anvil won't be able to detect them. Try removing excess spaces and/or reducing the font size of your tag so that it fits on one line.
Examples
The arguments you specify in your text tags depend on how you're using the uploaded document.
The simplest example is to only specify a fieldType. It will create a field at the location of the text tag, and auto-generate a name for the field:
{{ signature }}
If you are mapping fields in the UI after upload, specifying a name is a good idea. This tag will set the field's display name in the UI to Client Signer:
{{ signature : Client Signer }}
If you are uploading the document as a PDF template to fill or sign with the API, it's a good idea to specify the fieldAlias argument. In this example, it will set the field alias to clientSigner. Then you can use clientSigner as the id to fill the field via the API. For example, you can specify it in the data param in the PDF filling endpoint.
Note there is no fieldName argument set in this tag; it will be auto-generated.
{{ signature :: clientSigner }}
If you are uploading a document with text tags for use with the Etch e-sign API, you can associate fields with signers in the text tag. Say you have a signer specified by mySigner, when you upload the document or use the template in your createEtchPacket request, the fields will automatically be associated with the mySigner signer. See the Etch e-sign API guide for details on using text tags with the e-signature API.
{{ signature :: clientSigner : mySigner }}
Supported field types
Here is a list of all fieldTypes you can use in text tags. Specify the first name in each bullet point in your text tag. For example {{initial}} or {{shortText}}.
Signature types
signature: Signatureinitial: Signature InitialsignatureDate: Signature DatesignerName: Signer NamesignerEmail: Signer Email
Fill types
charList: Boxes Per Lettercheckbox: Checkboxdate: Datedollar: Dollarein: Tax ID Number (EIN)email: EmailfullName: NameimageFile: Imageinteger: IntegerlongText: Paragraphnumber: Decimal Numberpercent: Percentphone: PhoneradioGroup: Radio GroupshortText: Short Textssn: Social Security NumbertextWrap: Boxes Per LineusAddress: US Address