
Explanation text is exactly what it sounds like- a block of text in a Webform that you can use to provide explanations. So why is it so special? Explanation text fields support Markdown, a formatting language which offers a range of text customization options. You can also reference objects, other Webform fields, and JSON expressions within explanation texts.
All this combined gives you more flexibility when customizing your Webforms and helps you create guided experiences for your customers.
In this article, we'll specifically cover formatting explanation text. To learn more about template references, please see this article instead.
Getting started
Explanation text fields can be added in the same way as any other Webform field. If you need a refresher on how to add a field to a Webform, please see this article first.
Once you have your explanation text field added, there are a couple of field options you can edit, the Content and the Font Size. Any changes you make within the field options will be instantaneous, so you can immediately see what the text looks like in your Webform.
-
Content: Where you input the text you want displayed in your Webform.
- Formatting needs to be added with Markdown
- To expand your viewing area, click and drag the bottom right corner of the content section.
-
Font size: Choose between
Small,Default, andLarge.- Applies to the entire contents of the explanation text field
- Use Markdown to emphasize particular sections within your content, or add multiple explanation text fields if you want parts of your text to be a different font size.

Formatting explanation text
Now that you know how to add explanation text to your Webform, let’s dive into formatting your text. Formatting can help emphasize specific points and convey information more clearly. Explanation text fields can be formatted with Markdown.
If you’re not familiar with Markdown, it’s a universal markup language used to format plaintext. Explanation text fields specifically support the following flavors of Markdown:
Emphasis
| Style | Notes | Markdown formatting |
|---|---|---|
| Header | Anvil supports Header level 1. Any subsequent header levels are treated the same as H1. | # Header |
| Bold | Use two asterisks at each end of the text you want bolded. | **bold text** |
| Italic | Use a single asterisk at each end of the text you want italicized. | *italic text* |
| Bold & italic | Use three asterisks at each end of the text you want emphasized. | ***bolded and italicized*** |
| Nested bold & italic | Use a mix of single and double asterisks at each end of your emphasized text. | **Bolded sentence with an *italicized* word.** *Italicized sentence with a **bolded** word.* |
| Strikethrough | Use two tildes at each end of your strikethrough text. | ~~strikethrough~~ |
Here's an example of what emphasis formatting looks like in a Webform:
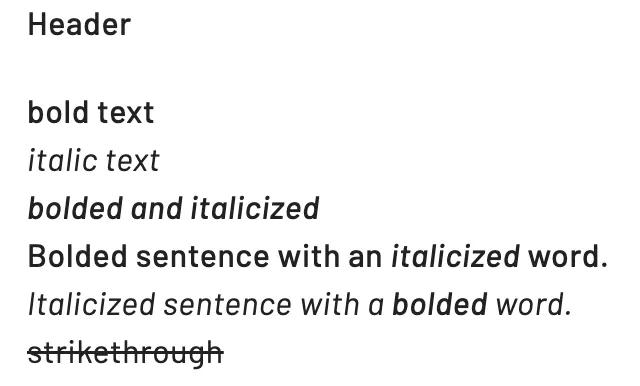 Emphasis formatting examples in Anvil Webforms: Headers, bold, and italicized text
Lists
| Style | Notes | Markdown formatting |
|---|---|---|
| Numbered lists | Use a number immediately followed by a period then a space to create numbered lists. Numbers don’t need to be in order. You can use the same number throughout your list or mix the numbers out of order and the output will still be in the correct order. | 1. Item 1 2. Item 2 3. Item 3 1. Item 1 1. Item 2 1. Item 3 3. Item 1 1. Item 2 2. Item 3 |
| Bulleted lists | Use an asterisk, dash, or plus symbol to create bulleted lists. | * Item 1 * Item 2 * Item 3 - Item 1 - Item 2 - Item 3 + Item 1 + Item 2 + Item 3 |
| Nested Lists | Both ordered and bulleted lists can include nested items. Simply add four spaces in front of your nested item. | 1. Item 1 * Nested 2. Item 2 1. Nested * Item 1 * Nested 2. Item 2 1. Nested |
Here's an example of what list formatting looks like in a Webform:
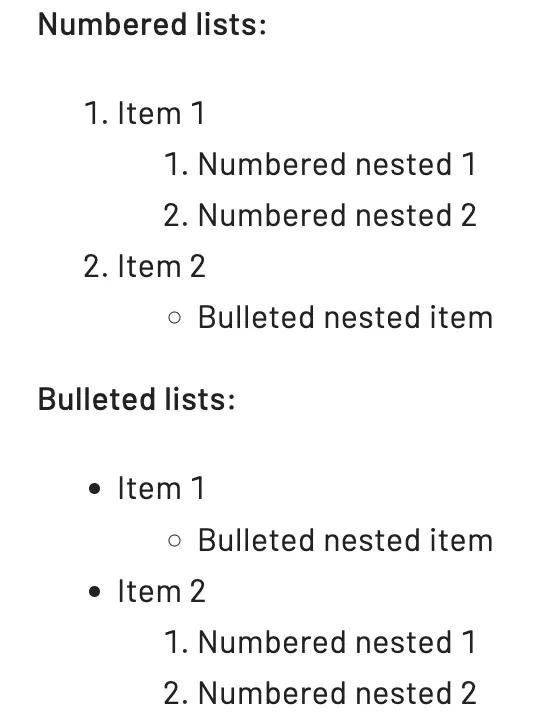 List formatting options in Anvil Webforms: Numbered, bulleted, and nested lists
Other
| Style | Notes | Markdown formatting |
|---|---|---|
| Hyperlink | Add square brackets at each end of your text. Immediately follow it with your link wrapped with parenthesis. | [text](wwww.useanvil.com) |
| Horizontal rule | Add a line break before and after three dashes. | --- |
| Code | Add a backtick at each end of your code. Code will be presented with a different font but the background color doesn't change. | `code` |
Here's an example of what these other formatting options look like in a Webform:
 Other formatting options in Anvil Webforms: Hyperlinks, horizontal rules, and code
Tying it all together
Here’s an example of finishing instructions created with Markdown formatting in a Webform.

We used the following template to create the example above. You can copy the template into your explanation text and modify to suit your needs:
Congratulations Alex, your Demo Workflow
is now complete!

Please bring the following items to your appointment:

- A signed copy of this form
- A valid passport
- $20 in cash or cashiers check
  - If you will be paying with cashier’s check,
    make checks payable to: **Poppy Pop Popcorn**.
  - We **do not** accept credit card payments
- 2 recent passport photos
  - Photos must be _(2”x2”)_

For full instructions and requirements please visit our
[Website](www.websiteexample.com). If you have any
additional questions before your appointment, please
email poppypopcorn@email.com, or call (333)-444-5555.