
Workflows
Before you get into workflows, make sure you check out our getting started guide.
Introduction
Anvil Workflows allow you to collect data from your users via a simple Webform, automatically fill PDFs with the user's data, then gather signatures from relevant people, either with Anvil's own Etch e-signatures, or with your own DocuSign account.
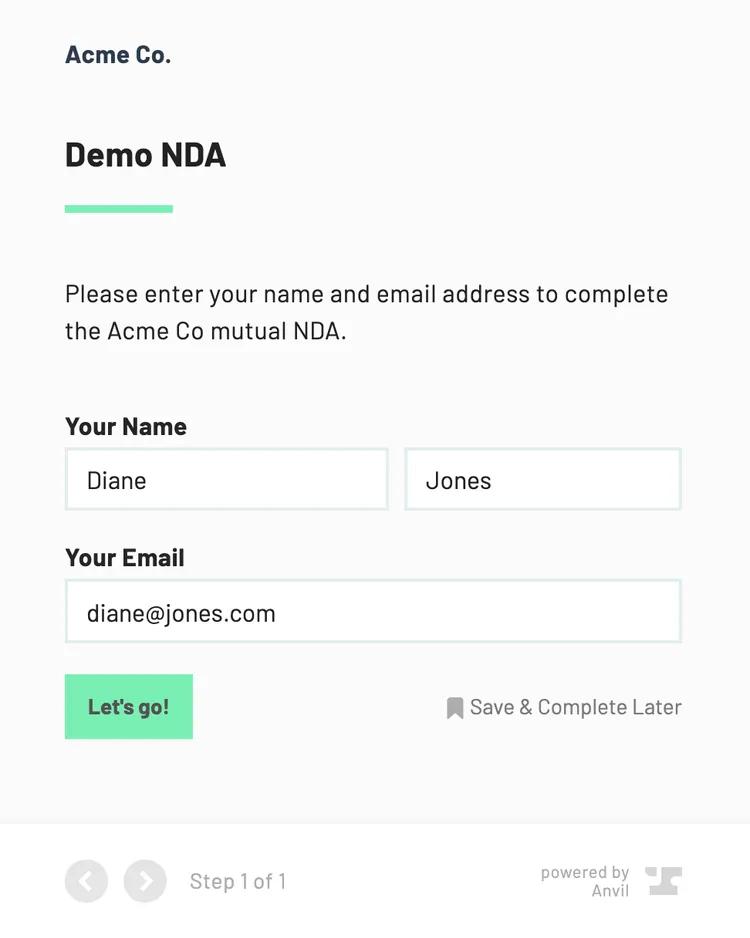
For example, say you wanted a client to sign an NDA. You can give the client an easy Webform to fill:
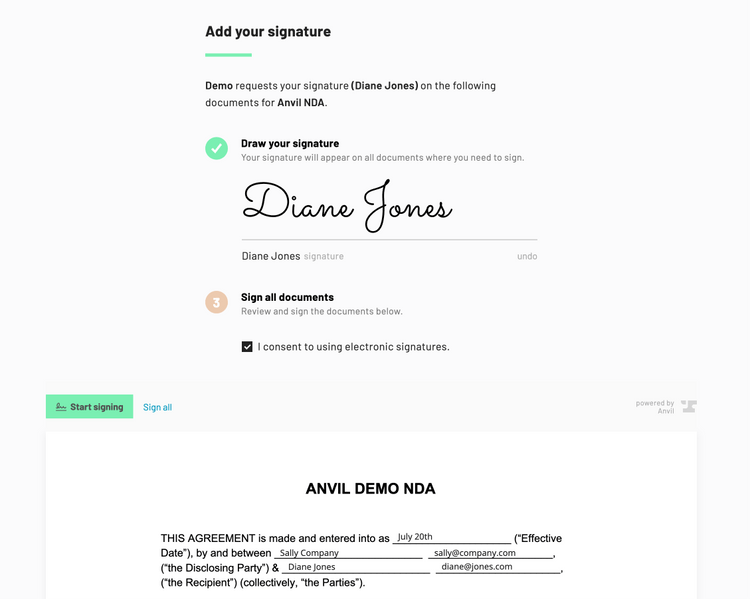
When the client is finished filling the Webform, it will fill the NDA with their information, then ask them to sign:
Already have the data you need to fill and sign documents? Only need e-signatures? See our Etch e-sign API guide. Etch e-sign allows you to do everything a Workflow can do, programmatically without Webforms.
Quick start
To get up and running quickly with workflows, follow these steps:
- Navigate to the Workflows Dashboard and use the
Sample Workflowprovided for you to publish a workflow. Alternatively, you may copy a Webform from our forms library. - Click
NextandPublishto set your workflow live. - In the upper right, launch a test submission and fill out the worfklow to see it in action.
Embedding Workflows into your app
To embed a workflow into your app:
- Whitelist your domain: Enable iframe embedding in your API settings and whitelist your domain(e.g., http://localhost:3000).
- Embed it inside an iframe: Grab the URL from the
API informationsetting on your workflow.
<iframe src="https://app.useanvil.com/form/demo/sample-workflow"></iframe>
For more information, check out Some additional resources below:
Workflow capabilities
Workflows are extremely flexible and can be completely programmatically controlled.
- Capture data from users with any number of separate Webforms
- Fill any number of PDFs when all Webforms have been completed
- Send filled documents out for signature to any number of signers
Workflows have features to make for easy integration into your app or website:
- Logic: Show and hide Webform fields, Webform pages, turn on and off PDFs, and conditionally fill fields based on Webform data entered by the user
- Webhooks: Get notified when actions are taken by your users
- Embedding: Embed Webforms and signature pages in your app or website
- White labeling: Style Webforms and signature pages with CSS to match your organization's visual style
This guide will cover the most common ways of interacting with Workflows via the API. A few things to keep in mind:
- Anything the Anvil UI can do, and any data the UI shows is available to you via the API. If you want to do something that is not covered in this guide, see the GraphQL reference, or contact us at support@useanvil.com.
- You can programmatically control the entire Workflow process: who gets forms when, and who signs when.
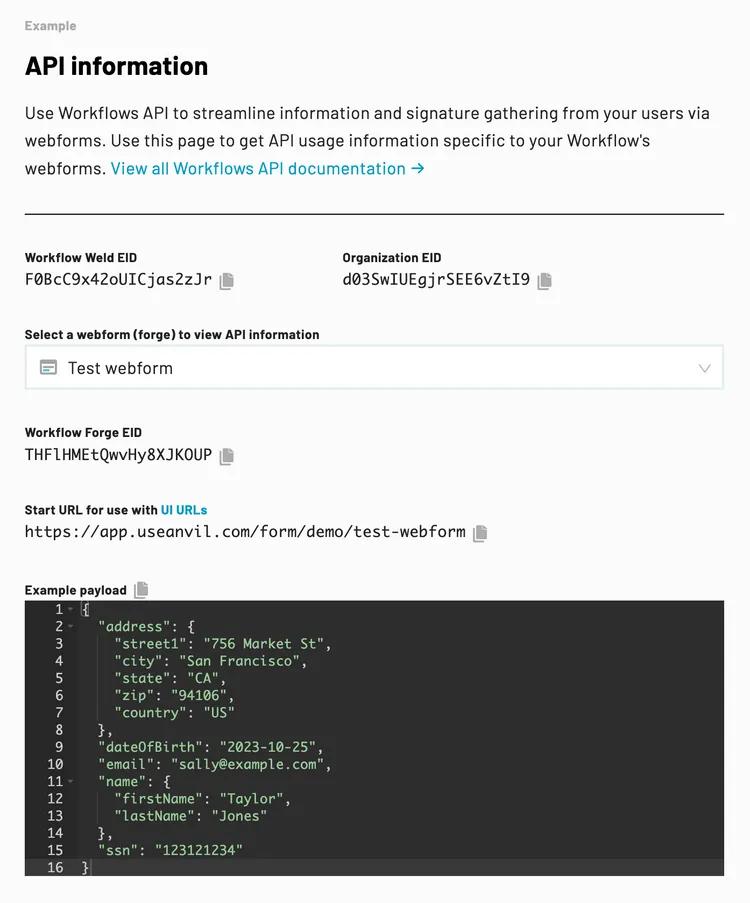
Workflow API information
For much of this guide, you will need to know IDs of your organization, your Workflow (weld), Webforms (forges) within the Workflow, etc. Each Workflow has an API Information page to help you in building out your integration. Access the API information page from the gear on your Workflow's dashboard page:
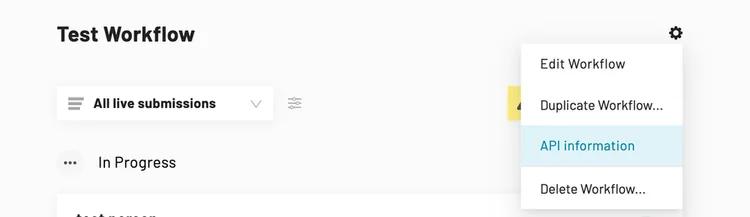
The API information page will show you all the IDs you will need to start the Workflow, submit data to the Webforms, and more.
No code: UI URLs
The simplest way of interacting with a Workflow is starting it by way of specially crafted URL. You can kick off a Workflow submission and seed it with data without an API key.
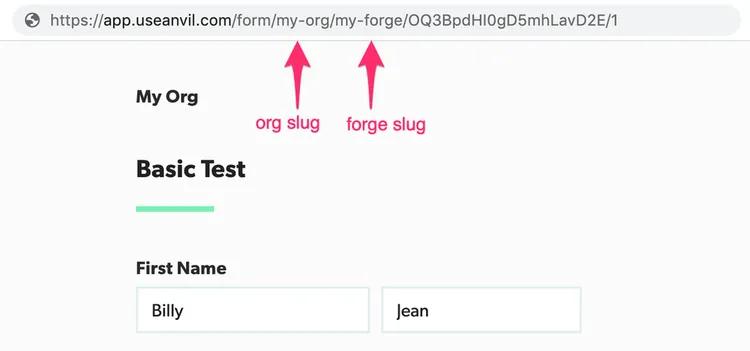
Start Workflow: /form/:org/:forge
Kick off a Workflow with this URL. You can construct this URL or copy it from your your Workflow's API information page, then send it to a client to use in their browser. This is a simple way to integrate a Workflow into your app: create these URLs and link your users to them in your app.
https://app.useanvil.com/form/${organization.slug}/${forge.slug}?d={...}
When the user hits the link in their browser, Anvil will create a Submission and WeldData, then redirect them to the submission URL:
https://app.useanvil.com/form/myorg/admin-onboarding/${submissionEid}
Finding URL slugs
Find the slugs for the URL either by
- Using the Workflow's API information page
- Using the GraphQL API and fetching your organization and related objects
Query parameters
There are two query parameters you can pass to the URL:
test
Pass ?test=true to create a test item. Test items will use demo signatures (not legally binding) and will show on your dashboard under Test mode. Any submissions in test mode will not count towards your plan's Workflow submission quota and not be billed.
d
Pass a ?d=${jsonData} query param to seed a Workflow. Check out how to generate the d query parameter below for an example, but here are some important things to know:
jsonDatais in{key: value}form, wherekeycorresponds to a Webform Field alias andvalueis the data you want to populate the field. See the payload format section of this document for full details on acceptable formats.jsonDatafields will be validated according to the Webform field type. Fields that do not pass validation will be omitted and not show in the resulting Workflow submission.jsonDatacan be encrypted via theencryptRSA(publicKey, stringifiedJSON)func from our encryption lib, or a raw JSON string.- Ensure
jsonDatais stringified. You can pass it through JavaScript'sJSON.stringifyor an equivalent function in your language of choice. - Ensure
jsonDatais URL encoded. You can pass it through JavaScript'sencodeURIComponentor an equivalent function in your language of choice.
Generating the d query parameter
Here is a quick Node script generating a d param:
import { encryptRSA } from '@anvilco/encryption'

const publicKey = `-----BEGIN PUBLIC KEY-----
add yours here
-----END PUBLIC KEY-----`

function buildURL(path, dParam) {
  // optionally, append &test=true at the end of the URL to create a test submission
  return `https://app.useanvil.com/form/my-org/my-form?d=${encodeURIComponent(
    dParam
  )}`
}

const exampleData = {
  name: 'Sally Jones',
}

const dParam = JSON.stringify(exampleData)
const encryptedDParam = encryptRSA(publicKey, dParam)

const url = buildURL(formURL, dParam)
const encryptURL = buildURL(formURL, encryptedDParam)

console.log(url)
console.log(encryptURL)
Code examples
Check out our runnable example scripts in the language of your choice. Each language has an example for starting a workflow, creating a submission, and updating a submission.
API Authentication
Interacting with Workflows via the API happens through GraphQL queries and mutations. To access the API, the first thing you'll need to do is grab your API keys from your Organization Settings -> API Settings page. See the getting started guide for detailed steps to get your keys and authenticate to the API.
We provide language-specific API clients that wrap authentication and make using our API easier.
Postman collection
To get you up and running with the API showing authentication and usage of a number of endpoints and GraphQL queries, see the examples in our Embeddable Webforms API Postman collection:

For more information on using the Postman workspace, see our Postman workspace guide.
Terminology
In order to effectively use the API, you'll need to get a handle on our terminology. See a comprehensive list in the terminology section of the Getting Started guide.
For Workflows, there are five main objects you need to understand. First, there are three that hold configuration information: Cast, Forge, and Weld. You can think of them as classes in OOP parlance.
Cast: Configuration for a single PDF template. ACastdefines the location of boxes on PDF pages, and the type of each box (e.g. date, phone number, etc.).Forge: Configuration for a single Webform. AForgedefines a Webform's fields, the page fields are on, their types, Webform logic, etc.Weld: A Weld is a Workflow. It connects one or moreForges with zero or moreCasts. AWeldbasically glues (ahem, welds) together the other objects to create the configuration for a single Workflow.
As the previous objects are OOP classes, there are instances of these objects:
Submission: An instance of aForge. ASubmissionholds the data for one form submission on a particularForge.WeldData: An instance of aWeld. It contains theSubmissions for all theForges in aWeld. When we say 'Workflow submission', we meanWeldData
For example, say you have one Workflow that has two Webforms and fills three PDFs.
In this case, there will be one Weld with two Forges and three Casts. When the user completes the Workflow, there will be a WeldData with 2 Submissions: one Submission for each Forge. Additionally, there will be one DocumentGroup that is a zip file containing three PDFs.
Your first query
A great place to start playing with the API is the currentUser query. From here, you can view all the objects on your organization. For example, this query fetches casts (PDF templates), welds (Workflows), and forges(Webforms):
POST https://graphql.useanvil.com
{
  currentUser {
    eid
    organizations {
      eid
      name
      slug
      casts {
        eid
        name
      }
      welds {
        eid
        title
        forges {
          eid
          name
        }
      }
    }
  }
}
Submitting data
The most common uses of the API with Workflows are:
- Starting a Workflow seeded with data from your system
- Updating data in an existing submission
For example, you already have your user's name and email address, but want them to complete a few pieces of missing info. In this case you'd want to generate a link to a Webform with the user's name and email prefilled. At a later date, you may want to update, say, their address.
The forgeSubmit mutation is the centerpiece of the processes described above. It allows you to kick off Workflows and update data for existing submissions. You only need forgeSubmit if you want total programmatic control. A simpler way to start Workflows is with our UI URLs described at the top of this guide.
Any time data is submitted to a Workflow, it flows through forgeSubmit. There are a couple situations forgeSubmit handles:
- Starting a Workflow. Use
forgeSubmitto create a brand newWeldDataandSubmissionon a givenWeld. e.g. - Submitting data to an existing
Submission. After a Workflow has been started, you can submit data to theSubmission, adding data to thepayloador overwriting data already in thepayload. - Continuing a Workflow. When there are multiple Webforms that need to be filled to complete a Workflow,
forgeSubmitcan create aSubmissionfor an unstartedForge.
forgeSubmit (
  forgeEid: String!,
  weldDataEid: String,
  submissionEid: String,
  payload: JSON!,
  currentStep: Int,
  complete: Boolean,
  isTest: Boolean=false,
  timezone: String,
  webhookURL: String,
): Submission
Starting a Workflow
Starting a Workflow entails passing a forgeEid and an optional payload. A Forge is a Webform, so you are seeding the Webform described by the forgeEid with your data in payload.
forgeSubmit will return a new Submission on the specified Forge with a new WeldData.
Here's the mutation:
mutation ForgeSubmit(
  $forgeEid: String!,
  $weldDataEid: String,
  $submissionEid: String,
  $payload: JSON!,
  $complete: Boolean,
  $isTest: Boolean,
  $webhookURL: String,
) {
  forgeSubmit (
    forgeEid: $forgeEid,
    weldDataEid: $weldDataEid,
    submissionEid: $submissionEid,
    payload: $payload,
    complete: $complete,
    isTest: $isTest,
    webhookURL: $webhookURL,
  ) {
    eid
    weldData {
      eid
      continueURL
    }
    forge {
      eid
      slug
    }
  }
}
And an example with the Node API client:
const result = await anvilClient.forgeSubmit({
  variables: {
    forgeEid: forge.eid,
    complete: false,
    isTest: false,

    // Seed the submission with data here...
    payload: {
      // See field aliases section below
      name: 'Sally Jones',
      email: 'sally@example.com',
    },

    // optional webhook URL for actions taken on the new
    // WeldData, Submission, and Signers. You must first
    // enable webhooks.
    webhookURL: 'https://mysite.com/anvil-webhook',
  },
})

const newSubmission = result.data.data.forgeSubmit
// => {
//   eid: 'abc123'
//   payload: {} // the actual data
//   weldData: {
//     eid: 'def456',
//     continueURL: 'https://app.useanvil.com/form/demo/my-form/abc123'
//   }
//   forge: {
//     eid: 'ghi789',
//     slug: 'my-form'
//   }
// }

// UI URL for this Forge Submission is
// https://app.useanvil.com/form/${organization.slug}/${forge.slug}/abc123
Starting a Workflow in test mode
Test mode submissions can be created via the API by setting the isTest variable to true.
- Test Workflow submissions are free and will not count towards your plan's Workflow submission quota.
- PDFs filled and signed in a test Workflow submission will contain a watermark and have red signatures.
- Once a Workflow submission is in test mode, it cannot be converted to live. Similarly, a live Workflow submission cannot be converted to test mode.
const result = await anvilClient.forgeSubmit({
  variables: {
    forgeEid: forge.eid,

    isTest: true, // The submission will be in test mode

    payload: { ... },
  },
})
const newSubmission = result.data.data.forgeSubmit
Updating a submission
Submitting data to the created submissions requires the forgeEid, weldDataEid, and submissionEid. You only need to specify the payload information you wish to update. If there is data at the key specified, it will be overwritten.
forgeSubmit({
  variables: {
    forgeEid: forge.eid,
    weldDataEid: subimssion.weldData.eid,
    submissionEid: subimssion.eid,
    payload: {
      // You only need to specify the data you want to update
      email: 'bobby@tables.com',
    },
    complete: false,
  },
})
Continuing a Workflow
Say you have a Workflow with 2 Webforms: Admin Form and Client Form. There will be two Forges, one for Admin Form and one for Client Form. In order to complete the Workflow, there needs to be one WeldData with two completed Submissions, one Submission for the Admin Form Forge, and one for the Client Form Forge.
Often in this situation, there will already be a WeldData and one Submission, the other Submission just needs to be created. Create the other submission this way:
forgeSubmit({
  variables: {
    forgeEid: clientForge.eid,
    weldDataEid: subimssion.weldData.eid, // the weldData.eid that was created earlier
    payload: {},
    complete: false,
    isTest: false,
  },
})
// => submission: {
//   eid: 'abcdef'
//   payload: {} // the actual data
//   weldData: {
//     eid: 'def456'
//   }
// }

// UI URL for this Forge Submission is
// https://app.useanvil.com/form/${organization.slug}/${clientForge.slug}/abcdef
Look through our example in code on Postman here.
Payload format
In the last few examples, there's been a payload object. For example:
forgeSubmit({
  variables: {
    // ...
    payload: {
      email: 'bobby@tables.com',
    },
  },
})
Generally the payload object format is
{
  "fieldAliasOfFormField": valueToSetInFormField,
  "fieldAliasOfAnotherFormField": valueToSetInFormField,
  // ...
}
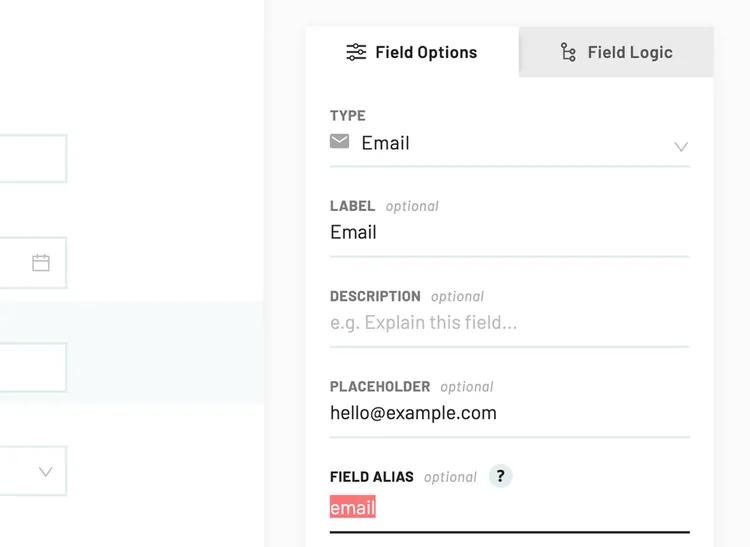
Payload keys
The keys in payload can be set "Field alias" in the Webform editor. Click on your field of choice, then the "More options" button, and add a "Field alias":
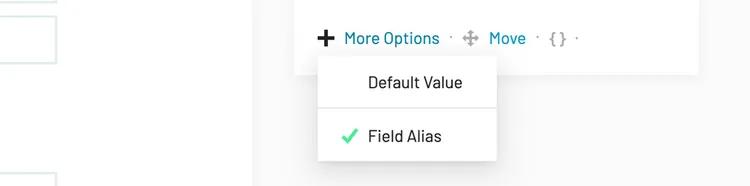
Then set it to your key of choice
Payload values
Values you send in the payload object correspond to the type of Webform field you are filling. See below for a comprehensive list of Webform field type to their acceptable value types:
Each entry below describes payload types by field: the field name shown in
the Workflow bulder, the field's `fieldTypeString` used under the hood, and
the object type (`String`, `Object`, etc).

Example:

Field name in UI (`fieldTypeString`): <ValueType>

## Strings

Basic Text (`shortText`): <String>
Long Text (`longText`): <String>
Numeric Text (`numericText`): <String> with 0-9 characters only
Email (`email`): <String> with an `@` and a valid domain
Social Security Number (`ssn`): <String> in format `123121234`
Tax ID Number / EIN (`ein`): <String> in format `921234567`

## Dates

Date (`date`): <String> in the format `YYYY-MM-DD`
Date Dropdowns (`dateSelect`): <String> in the format `YYYY-MM-DD`

## Options

Checkbox (`checkbox`): <Boolean> `true` or `false`
Dropdown (`compoundSelect`): <String> text or ID of the selected option
Radio Buttons (`radioButtons`): <String> text or ID of the selected button

## Numbers

Decimal Number (`number`): <Number>
Dollar (`dollar`): <Number>
Integer (`integer`): <Number>
Percent (`percent`): <Number> `100` is 100%

## Complex types


Phone (`phone`): One of
  <String> with no formatting `555113333` or `+4402012341234`
  <Object> {
    region: 'US',
    num: '555113333'
  }

First and last name (`fullName`): One of
  <String> 'Bobby Jones'
  <Object> {
    firstName: 'Bobby',
    mi: 'W',
    lastName: 'Jones'
  }

Address - US (`usAddress`) and International (`intlAddress`): <Object> {
  street1: '123 Main St',
  street2: 'Apt. 14', // optional
  city: 'San Francisco',
  state: 'CA',
  zip: '94106',
  country: 'us' // ISO 3166 country code
}

## Lists

Lists will have `n` Objects and will contain the types above

List (`array`): <Array> [
  {
    aFieldId: ...one of the above types...,
    anotherFieldId: ...one of the above types...,
    ...
  },
  {...}
]
Fetching data and status info
You can fetch data and status information from an individual Workflow submission (WeldData), or from a collection of them on a specific Workflow (Weld).
Individual weldData
To fetch an individual Workflow submission, use the weldData query:
query weldData($eid: String!) {
  weldData(eid: $eid) {
    eid
    isTest
    status # See the WeldData object reference for all possible values
    continueURL # The next step URL. Use this after starting the Workflow
    displayTitle # Title shown in the UI
    numberRemainingSigners
    dataUpdatedAt

    # submissions on each Webform

    submissions {
      eid
      status # See the Submission object reference for all possible values
      resolvedPayload # Data submitted by the user with related form-field data
      forge {
        eid
        name
        slug
      }
    }

    # A DocumentGroup will only be available if the weldData
    # has been sent for signatures, or totally completed
    documentGroup {
      eid
      status # See the DocumentGroup reference for all possible values
      downloadZipURL
      currentRoutingStep
      signers {
        eid
        status
        name
        email
        routingOrder
      }
    }
  }
}
See our Postman example for more info.
All weldDatas on a weld
To get a listing of all WeldDatas on a Weld, use the use the weld query:
query WeldQuery($eid: String!, $pageNum: Int) {
  weld(eid: $eid) {
    eid
    slug
    name

    forges {
      eid
      slug
      name
    }

    weldDatas(offset: $pageNum) {
      rowCount
      pageCount
      page
      pageSize
      items {
        eid
        isTest
        status
        dataUpdatedAt
        displayTitle
        numberRemainingSigners
      }
    }
  }
}
Check out our Postman example for more information.
E-signature settings and experience
Configure how signers interact with and experience the signing process, including signature acceptance flow, information updates, and required fields.
Signature experience
Control when signers accept their e-signatures during the signing process with the signatureExperience setting:
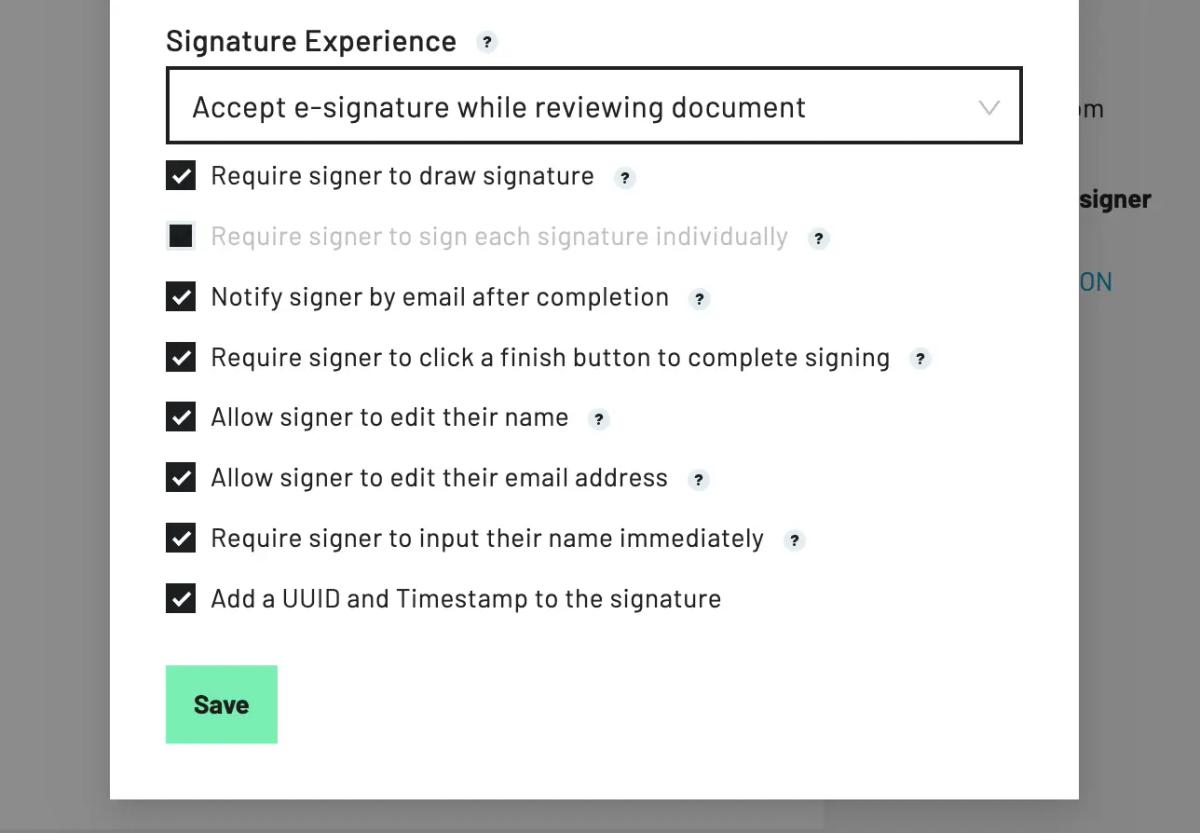
Accept e-signature while reviewing document (default): Modern flow where signers accept their signature while reviewing documents.
Note: When this option is selected Require signer to sign each signature individually is required and automatically enabled.
Start with accepting e-signature: Traditional flow where signers accept their signature before reviewing documents.
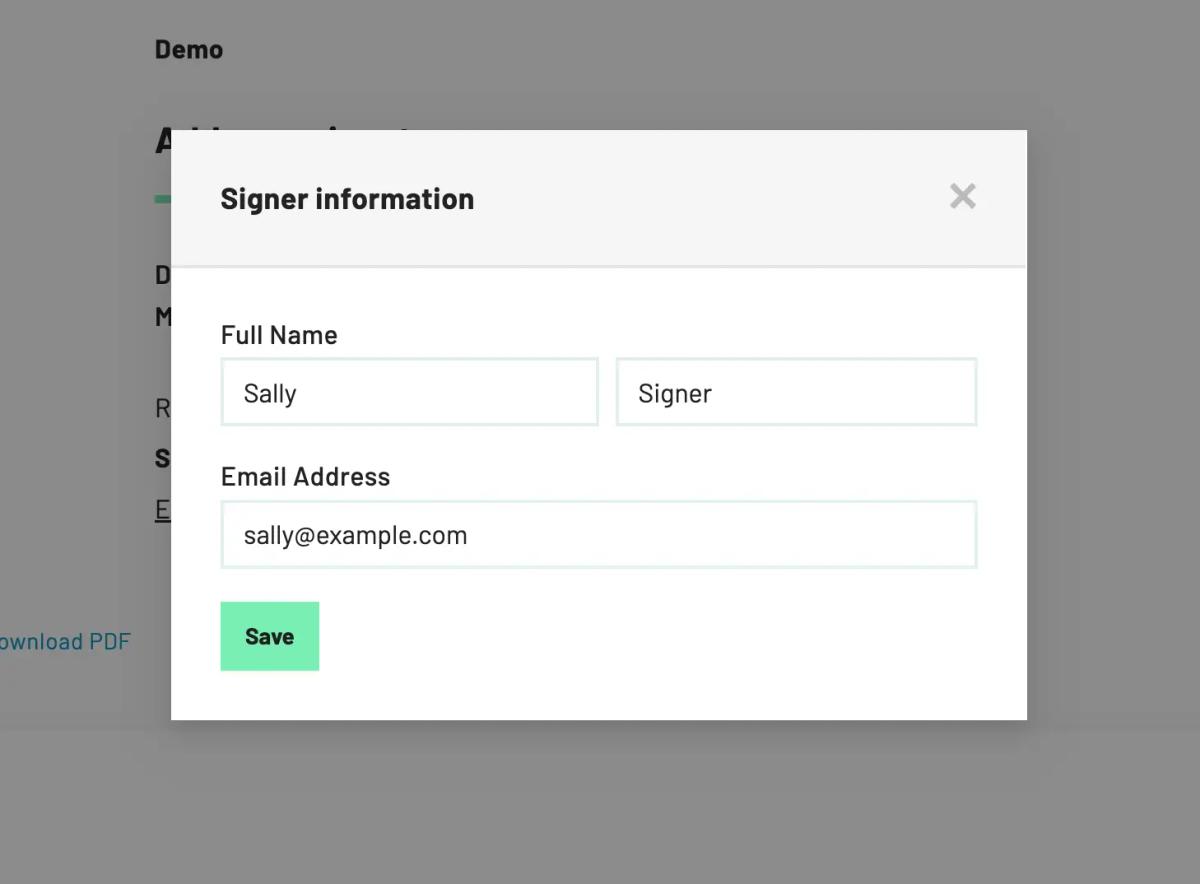
Allowing signers to update their own information
Allow signers to update their name and/or email during the signing process:
Behavior:
- Name/Email changes: URL remains valid, change logged in activity
- All changes trigger signerUpdateStatus webhook
- Updates mapped Webform fields in submission payload
Requiring signer information on load
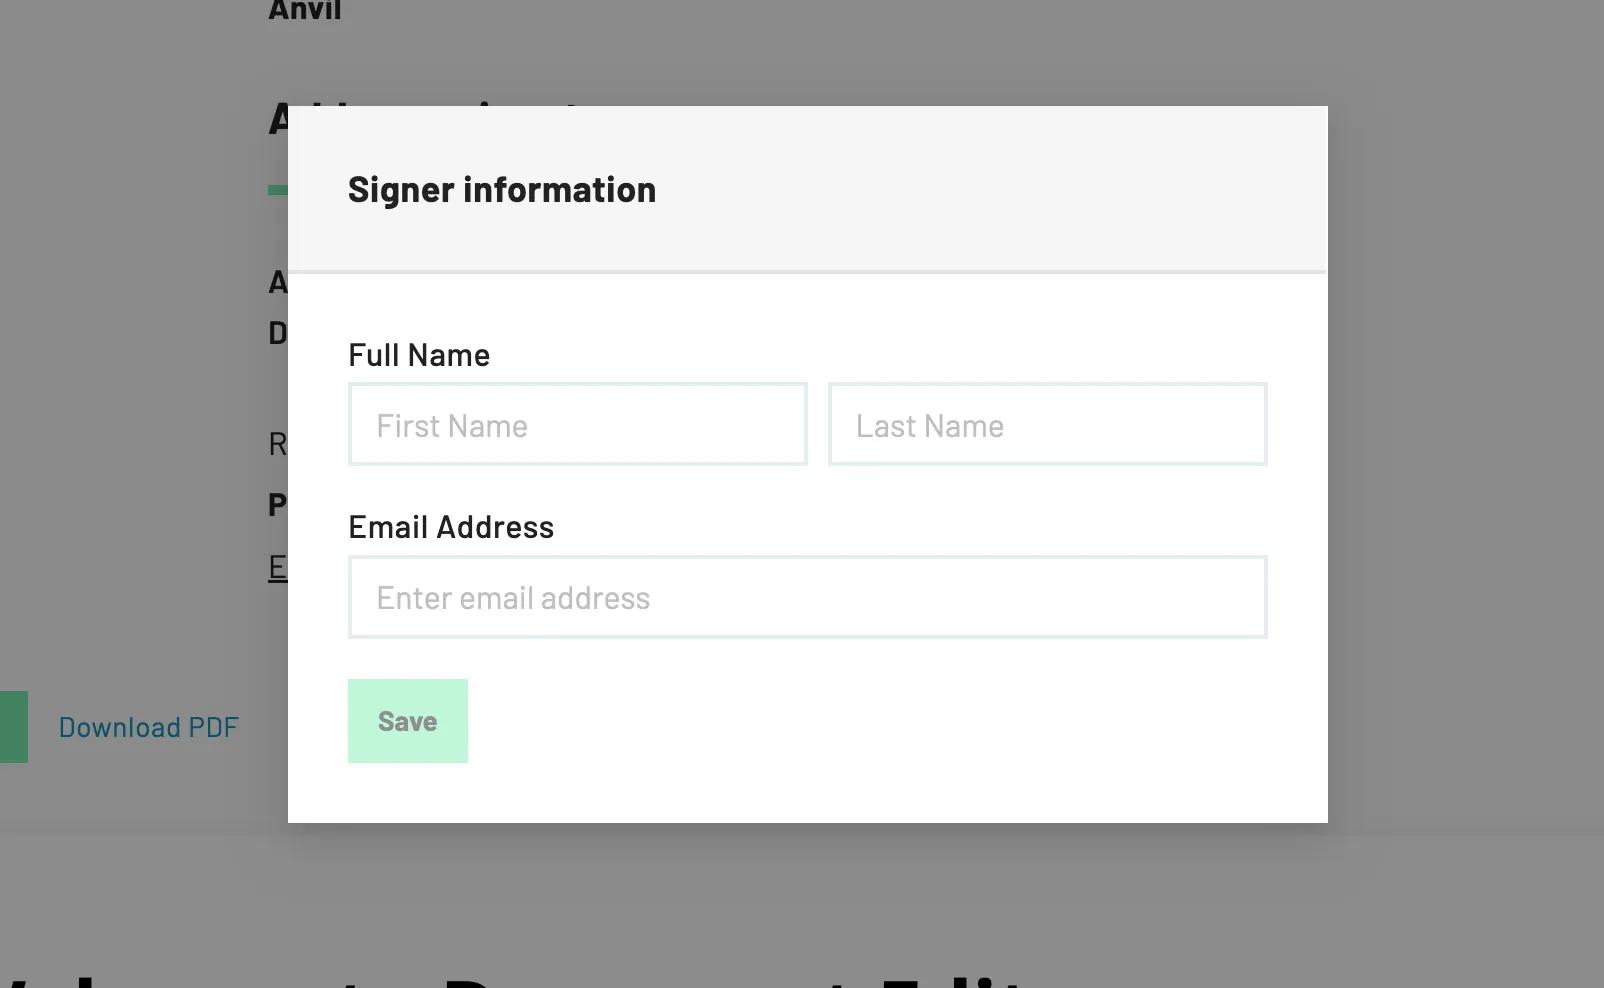
Require signers to input their name and/or email immediately when they begin signing.
Note: requireEmailOnLoad only works with embedded and inline signer types.
Behavior:
- Modal appears immediately when accessing signing interface
- Cannot be dismissed until required information is provided
- Updates signer record and mapped Webform fields
- All changes logged in workflow activity
For more details please refer to the corresponding e-signatures features.
You may set defaults in organization settings (https://app.useanvil.com/org/<your-org-slug>/settings/etch-esign).
For Workflows it is recommended that you set these signer options via the UI. If you wish to do so through the API, refer to the docs about updateWeld
Webhook notifications
You can be notified when the user takes some actions via webhooks. That is, we will POST to a URL on your server when these actions take place. You can set up two kinds of webhooks:
- Global webhooks - actions on all Workflows in your organization will call your organization webhook URL.
- Per-object webhooks - actions on a specific
WeldDatawill call a specific webhook URL.
Workflow-specific actions you can listen for:
weldCreate- called when a new Workflow is created.forgeComplete- called when a single Webform within a Workflow is has been submitted by a user.signerComplete- called when a signer finishes signing.weldComplete- called when a Workflow submission (aweldData) has all Webforms completed and all parties have completed signing.
See the webhooks guide for full details on their set up and handling.
If you plan on embedding your Workflow's Webforms in your app, you may find iframe events as an alternative to using webhooks in some cases.
Embedding Workflows in your app
You can embed Workflows in an iframe on your app or website. That way, you control the Webform filling + signing experience, and a user does not need to leave your site.
See the embedding blog post for a Workflow embedding tutorial.
Embedding the Webform UI in an iframe is simple. Just point the src attribute at your Workflow's Webform URL:
<iframe
  src="https://app.useanvil.com/form/my-org/my-form/nA1ORcANs4MXAQ83KsdY"
></iframe>
React component
If you use React, the easiest way to embed Webforms is with our AnvilEmbedFrame React component. The component will handle lifecycle callbacks for you.
import AnvilEmbedFrame from '@anvilco/anvil-embed-frame'

export default (
  <AnvilEmbedFrame
    iframeURL={webformURL}
    onEvent={(eventObject) => console.log('Event object:', eventObject)}
  />
)
Starting an embedded Workflow
You can start Workflows exactly as you would without an iframe embed with either of the options described in previous sections of this document:
- Embed a UI URL
- Create a Workflow submission via
forgeSubmit
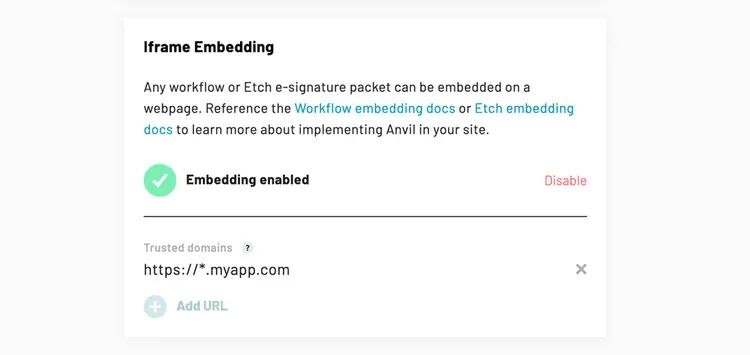
Enabling Workflow embedding
Out of the box, you can embed test Workflow submissions in your app. That is, you can embed URLs to any WeldData started via the UI URL with test=true or via forgeSubmit with isTest set to true.
You can enable production Workflow embedding from the API tab in your organization's settings.
Once you enable embedding, you will be asked to add your domains to a whitelist:
Events from the iframe
For some actions, the iframe will emit events that your parent frame can capture. These events will help you know when the user is finished filling a page, finished with the Webform, and finished signing.
With a plain iframe HTML element, you can subscribe to the window's message event on the page that renders the iframe. The events emitted by the iframe should provide you with any ids you need to query our system for the user's submitted data.
window.addEventListener('message', ({ origin, data: eventObject }) => {
  if (origin !== 'https://app.useanvil.com') return
  console.log('Event object:', eventObject)
})
When using the AnvilEmbedFrame component, these same events are emitted in the onEvent callback:
<AnvilEmbedFrame
  iframeURL={webformURL}
  onEvent={(eventObject) => console.log('Event object:', eventObject)}
/>
Iframe event details
As a user makes their way through filling a Webform, a number of events will be emitted from the iframe to your parent frame at each step in this process. This guide will cover all events right up to the signature step (see the e-sign guide for signature event details). Here are all supported Workflow and Webform iframe events:
forgeChangePage- A Webform page has changed.forgeClickChangePage- The user clicks arrows to page through Webform.forgeComplete- A Webform has been completed.forgeFinishLoad- The finish page has loaded.forgeFinishReady- The finish page has fully loaded and is ready for user interaction.forgeFinishSubmitReviewAndSign- The user clicks review and sign on the finish page.forgeLoad- A Webform has loaded.forgeLoadPage- A Webform page has loaded and is ready for user interaction.forgeReviewLoad- A Webform's review page has loadedforgeReviewSubmit- The user clicks submit on a Webform's review page.forgeSubmitPage- A Webform page's submit button has been clicked.weldComplete- An entire Workflow submission is complete: all Webforms have been completed and all signers have signed.documentGroupGenerateProgress- A DocumentGroup is being generated.
A common scenario where a user fills a Webform, then signs documents is made up of a few steps:
- A user fills their information into the Webform.
- The user visits a review page to review the information they entered into the Webform.
- The user click submit on the review page to indicate the information they entered is correct.
- The user is directed to a "finish" page where they see progress on PDFs being generated and their packet being created.
- The user is redirected to a signature page where they sign documents.
- See the e-sign guide for signature event details.
- All users have signed and the workflow submission everything has been completed
forgeChangePage
forgeChangePage is triggered when the a Webform is moving to a new page. It will be triggered after a user submits a page (forgeSubmitPage event), or when the user clicks one of the page arrow buttons (forgeClickChangePage event). The page is not necessarily ready for user interaction when forgeChangePage is triggered,
the UI may be animating to the next page. forgeChangePage will be triggered before (forgeLoadPage).
{
  action: 'forgeChangePage',
  pageNumber: 2,
  previousPageNumber: 1
  organizationSlug: 'my-org',
  weldDataEid: 'bdwIX5TUiLBzldgdwzL2',
  forgeEid: 'wIX5TUiLBzldgdwzL2bd',
  submissionEid: 'X5TUiLBzldgdwzL2bdwI',
}
forgeClickChangePage
forgeClickChangePage is triggered each time a user clicks between pages via the page arrow buttons. It is called immediately after the user clicks, before the new page is rendered.
{
  action: 'forgeClickChangePage',
  pageNumber: 1,
  nextPageNumber: 2
  organizationSlug: 'my-org',
  weldDataEid: 'bdwIX5TUiLBzldgdwzL2',
  forgeEid: 'wIX5TUiLBzldgdwzL2bd',
  submissionEid: 'X5TUiLBzldgdwzL2bdwI',
}
forgeComplete
forgeComplete is triggered when the Webform has been completed by the user. The user has filled all required information, they have reviewed their information, and they have submitted the review page.
{
  action: 'forgeComplete',
  organizationSlug: 'my-org',
  weldEid: 'zldgdwzL2bdwIX5TUiLB',
  weldDataEid: 'bdwIX5TUiLBzldgdwzL2',
  forgeEid: 'wIX5TUiLBzldgdwzL2bd',
  submissionEid: 'X5TUiLBzldgdwzL2bdwI',
}
forgeFinishLoad
forgeFinishLoad is triggered when the user has finished filling data and is has been shown the "finish" page.
The "finish" page will tell the user next steps to finish the submission. If everything has been completed, it will tell them they are all done; if they need to sign next, it will tell them they need to sign; if there is a document group being generated, it will show them progress status, etc.
{
  action: 'forgeFinishLoad',

  // Will be true when the workflow submission's DocumentGroup
  // is being generated. When a DocumentGroup is being generated,
  // the user will see a loading spinner and progress info.
  isGeneratingDocumentGroup: false,

  // Signer information will be null when
  // `isGeneratingDocumentGroup`: true, or if a DocumentGroup
  // has not been created yet
  signerEid: 'nA1bdwIX5TUiLBzldgdw',
  signerStatus: 'sent',
  signerActionType: 'inline', // 'email', 'embedded', or 'inline'

  organizationSlug: 'my-org',
  organizationEid: 'BzldgdELyfX5TUizL2Lw',
  weldEid: 'zldgdwzL2bdwIX5TUiLB',
  weldDataEid: 'bdwIX5TUiLBzldgdwzL2',
  forgeEid: 'wIX5TUiLBzldgdwzL2bd',
  submissionEid: 'X5TUiLBzldgdwzL2bdwI',
  documentGroupEid: 'L2bdwIX5TUiLBzldgdwz',
}
forgeFinishReady
forgeFinishReady is triggered when the finish page has finished loading and ready for user interaction. forgeFinishReady will occur after forgeFinishLoad and after DocumentGroup generation (documentGroupGenerateProgress)
{
  action: 'forgeFinishReady',

  // isGeneratingDocumentGroup will always be false here
  // as `forgeFinishReady` is only triggered after
  // DocumentGroup generation has finished.
  isGeneratingDocumentGroup: false,

  // Signer information will be null when
  // isGeneratingDocumentGroup: true, or if
  // a DocumentGroup has not been created yet
  signerEid: 'nA1bdwIX5TUiLBzldgdw',
  signerStatus: 'sent',
  signerActionType: 'inline', // 'email', 'embedded', or 'inline'

  organizationSlug: 'my-org',
  organizationEid: 'BzldgdELyfX5TUizL2Lw',
  weldEid: 'zldgdwzL2bdwIX5TUiLB',
  weldDataEid: 'bdwIX5TUiLBzldgdwzL2',
  forgeEid: 'wIX5TUiLBzldgdwzL2bd',
  submissionEid: 'X5TUiLBzldgdwzL2bdwI',
  documentGroupEid: 'L2bdwIX5TUiLBzldgdwz',
}
forgeFinishSubmitReviewAndSign
forgeFinishSubmitReviewAndSign is triggered from finish page when the user clicks the 'Review and Sign' button to kick off the signing process. After this event is fired, the user will be redirected to the signature page.
{
  action: 'forgeFinishSubmitReviewAndSign',

  signerEid: 'nA1bdwIX5TUiLBzldgdw',
  signerStatus: 'sent',
  signerActionType: 'inline', // 'email', 'embedded', or 'inline'

  organizationSlug: 'my-org',
  organizationEid: 'BzldgdELyfX5TUizL2Lw',
  weldEid: 'zldgdwzL2bdwIX5TUiLB',
  weldDataEid: 'bdwIX5TUiLBzldgdwzL2',
  forgeEid: 'wIX5TUiLBzldgdwzL2bd',
  submissionEid: 'X5TUiLBzldgdwzL2bdwI',
  documentGroupEid: 'L2bdwIX5TUiLBzldgdwz',
}
forgeLoad
forgeLoad is triggered when the Webform UI has fully loaded and is ready for the user to enter their information.
{
  action: 'forgeLoad',
  organizationSlug: 'my-org',
  weldEid: 'zldgdwzL2bdwIX5TUiLB',
  weldDataEid: 'bdwIX5TUiLBzldgdwzL2',
  forgeEid: 'wIX5TUiLBzldgdwzL2bd',
  submissionEid: 'X5TUiLBzldgdwzL2bdwI',
}
forgeLoadPage
forgeLoadPage is triggered each time a Webform page is ready for user interaction. At this point, the page is fully ready for the user, i.e. transition animation has finished, all assets have loaded, etc.
{
  action: 'forgeLoadPage',
  pageNumber: 1, // 1 based
  organizationSlug: 'my-org',
  weldEid: 'zldgdwzL2bdwIX5TUiLB',
  weldDataEid: 'bdwIX5TUiLBzldgdwzL2',
  forgeEid: 'wIX5TUiLBzldgdwzL2bd',
  submissionEid: 'X5TUiLBzldgdwzL2bdwI',
}
forgeReviewLoad
forgeReviewLoad is triggered on when the Webform's review page UI has fully loaded.
{
  action: 'forgeReviewLoad',
  organizationSlug: 'my-org',
  weldEid: 'zldgdwzL2bdwIX5TUiLB',
  weldDataEid: 'bdwIX5TUiLBzldgdwzL2',
  forgeEid: 'wIX5TUiLBzldgdwzL2bd',
  submissionEid: 'X5TUiLBzldgdwzL2bdwI',
}
forgeReviewSubmit
forgeReviewSubmit is triggered when the user clicks the submit button on the review page, after reviewing the information they entered into the Webform.
{
  action: 'forgeReviewSubmit',
  forgeEid: 'wIX5TUiLBzldgdwzL2bd',
  organizationEid: 'BzldgdELyfX5TUizL2Lw',
  organizationSlug: 'my-org',
  weldEid: 'zldgdwzL2bdwIX5TUiLB',
  submissionEid: 'X5TUiLBzldgdwzL2bdwI',
  weldDataEid: 'bdwIX5TUiLBzldgdwzL2',
  weldEid: 'zldgdwzL2bdwIX5TUiLB',
}
forgeSubmitPage
forgeSubmitPage is triggered when a Webform page has been submitted by the user. After receiving a forgeSubmitPage, provided there are no validation errors on the page, you will receive a forgeChangePage then a forgeLoadPage.
{
  action: 'forgeSubmitPage',
  pageId: 'somePageId',
  pageNumber: 1,
  organizationSlug: 'my-org'
  weldDataEid: 'bdwIX5TUiLBzldgdwzL2',
  forgeEid: 'wIX5TUiLBzldgdwzL2bd',
  submissionEid: 'X5TUiLBzldgdwzL2bdwI',
}
weldComplete
weldComplete is triggered when the entire Workflow submission is complete. That is, all Webforms have been complete and all signers have signed. If your Workflow has signers, this event will happen after the last signer signs, after you receive the last signerComplete event. If your Workflow does not have signers, weldComplete will be fired after the last forgeComplete event.
{
  action: 'weldComplete',
  organizationSlug: 'my-org'
  organizationEid: 'BzldgdELyfX5TUizL2Lw',
  weldEid: 'ELyfX5TUizL2LBzldgdw',
  weldDataEid: 'bdwIX5TUiLBzldgdwzL2',
  forgeEid: 'wIX5TUiLBzldgdwzL2bd',
  submissionEid: 'X5TUiLBzldgdwzL2bdwI',
}
documentGroupGenerateProgress
documentGroupGenerateProgress is triggered on the "finish" page when a DocumentGroup is being generated. It will often be triggered right after forgeFinishLoad, and it will be called each time the status property changes. status will be 'ready' when the DocumentGroup has been generated and is ready to be signed.
{
  action: 'documentGroupGenerateProgress',

  // `documentGroupGenerateProgress` is triggered each time the status
  // changes. `status` will be 'ready' when the DocumentGroup has
  // been generated and is ready to be signed.
  status: 'ready',

  organizationSlug: 'my-org'
  organizationEid: 'BzldgdELyfX5TUizL2Lw',
  weldEid: 'zldgdwzL2bdwIX5TUiLB',
  weldDataEid: 'bdwIX5TUiLBzldgdwzL2',
  forgeEid: 'wIX5TUiLBzldgdwzL2bd',
  submissionEid: 'X5TUiLBzldgdwzL2bdwI',
  documentGroupEid: 'L2bdwIX5TUiLBzldgdwz',
}
Data in the status field is intended to help give feedback to the user. In the Anvil app, we map each of these statuses to strings shown to the user. Note that you may not receive every one of these status values.
The basic lifecycle values of status:
init- DocumentGroup generation has begun.ready- The DocumentGroup has been generated and is ready to be signed.retry- An error has occurred and DocumentGroup generation is being retried.
The following events happen for all workflow submissions that will generate documents:
createDocumentGroupcreateDocumentGroup:createSignersgenerateFiles:getSubmissionsgenerateFiles:getPdfsgenerateFiles:generatePdfsgenerateFiles:generateUploadsgenerateFiles:generateSigners
When using Anvil's built-in Etch e-signatures, statuses will be prefixed with etch:
etch:createPacketetch:uploadPacketetch:finishCreatePacket
When generating documents without signatures, statuses will be prefixed with none:
none:createPacketnone:uploadPacketnone:finishCreatePacket
When using DocuSign as a signature provider, statuses will be prefixed with docusign:
docusign:encodeDocumentsdocusign:createEnvelopedocusign:sendEnvelope
When using progressive signing and documents are being updated, events
updateDocumentGroupupdateDocumentGroup:getSubmissionsupdateDocumentGroup:getFillData
Embedded e-sign events
If your Workflow uses Anvil e-signatures, you can capture events exactly the same way you would if you were embedding a standalone e-signature packet. See the embedding section of the e-sign API guide for details on handling signing events from the iframe. See the error handling section of the same guide to learn how to handle and recover from signing errors.
Controlling signing links
Often, a Workflow submission ends with a user signing a set of documents. You can control how and when the signer gets a link to sign with a signer's type. When creating or editing a signer in the Workflow builder, update the signer type:
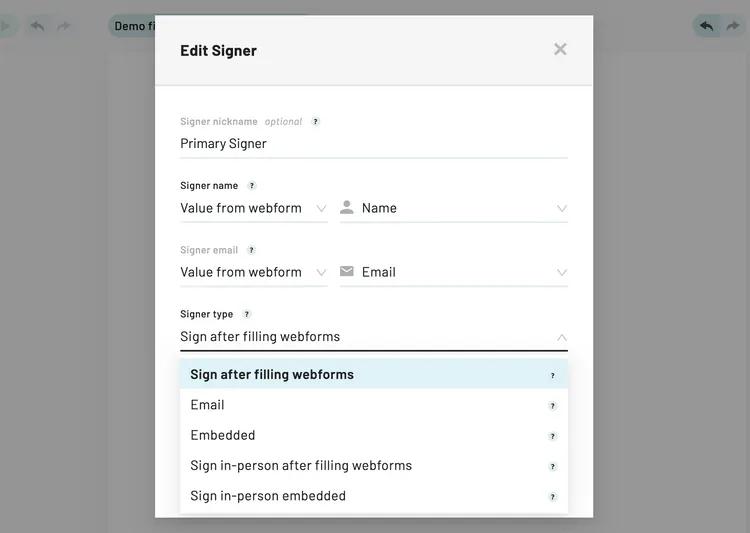
Several different signer types are supported:
- Sign after filling Webforms - The user will sign immediately after finishing the last Webform in a seamless experience. This option is only available to the first user.
- Email - The user will receive an email from Anvil with a link to sign.
- Embedded - An iframe-embeddable siganture link must be programmatically generated. See Generating links for embedded signers below for details.
- In-person embedded - Similar to
Embedded, but verified by your system. Does not require an email address.
When embedding a workflow in an iframe, an optimal experience can be had with type set to Sign after filling Webforms on the first signer, then type set to Embedded for the remaining signers. The first signer will seamlessly sign documents in your iframe after filling the Webform, then you control the signing link for the remaining signers.
Generating links for embedded signers
Any signers set to type Embedded will need to have their sign links programmatically generated when it is their turn to sign. Embedded signers will not be sent an email when it's time to sign.
Signature URLs are generated with the generateEtchSignURL mutation.
generateEtchSignURL (
  # The eid from the Signer in question
  signerEid: String!,

  # The signer's user id in your system
  #
  # NOTE: It's important that you set `clientUserId`
  # to the user ID in your system. It provides
  # traceability. E-signatures are only valid if the
  # person signing can be verified with some level
  # of confidence that they are who they say they are.
  # The `clientUserId` provides that traceability as
  # presumably your app has verified the signer's
  # email address.
  clientUserId: String!
): String # The URL
The signing URL from generateEtchSignURL will include a token with a 2 hour expiration timestamp from when it was generated.
To have your user sign documents, redirect to the resulting URL, or embed the URL in an iframe.
See the recommended flow in the e-sign API guide for details on the optimal time to generate signing URLs.
Fetching signer information
The signerEids can be found by fetching a Workflow submission (a WeldData). The weldData query is a good avenue:
weldData(
  eid: String!
) {
  eid
  status
  documentGroup {
    eid
    signers {
      eid # signerEid
      status
      routingOrder # 1 for first signer, 2 for second, etc
    }
  }
}
Note that the documentGroup and signers will be null until all Webforms in the workflow have been completed. You can get notifications when Webforms are finished via the forgeComplete webhook action.
Downloading documents
Documents can be downloaded in zip form or individually. They can also be downloaded while a WeldData is still in progress. For example, you can download documents when your users are in the process of filling Webforms or signing documents. Downloading in-progress documents will fill PDFs with the data available, and if only some parties have signed, documents will show signatures for those who have signed.
To provide files to your users, we recommend two approaches:
- Download the entire zip when a Workflow is completely finished and save it in your own infrastructure.
- Provide a URL in your app that is a proxy to the Anvil download URL. See below for details.
Download authentication
For both download routes, authenticate by using your API key in the Authorization HTTP header as outlined in the Authentication section of the getting started docs.
A common ask is if Anvil provides a way to generate download URLs for your user. We currently do not offer unauthenticated download URLs, our download URLs are API key authenticated only. The most secure method is to provide a proxy download URL in your app.
Downloading zip files
The easiest and most common way to download documents is by downloading the entire zip file via the /download/:weldDataEid.zip URL:
GET https://app.useanvil.com/download/${weldDataEid}.zip

# e.g.
# GET https://app.useanvil.com/download/GHEJsCVWsR1vtCx3WtUI.zip
If you are subscribing to webhook notifications, weldComplete actions will contain the download URL in the webhook payload:
{
  action: 'weldComplete',
  data: {
    eid: 'GHEJsCVWsR1vtCx3WtUI',
    documents: [{
      type: 'application/zip',
      url: 'https://app.useanvil.com/download/GHEJsCVWsR1vtCx3WtUI.zip',
    }],
    //....
  }
}
We provide language-specific API clients that wrap authentication and make using our API easier.
Additionally, our language-specific API clients come with functions to download documents.
Downloading individual files
You can download individual files via the URL:
GET https://app.useanvil.com/download/${weldDataEid}/${filename}
But first, you'll need to get a file listing to know which files are available for download. To do that, you can use the files resolver on the WeldData object:
query weldData($eid: String!) {
  weldData(eid: $eid) {
    eid
    files
  }
}
Which would result in a response payload like:
{
  eid: 'GHEJsCVWsR1vtCx3WtUI',
  files: [{
    filename: 'Hello World.pdf',
    name: 'Hello World',
    type: 'pdf',
  }]
}
Then you can fetch the individual file:
GET https://app.useanvil.com/download/GHEJsCVWsR1vtCx3WtUI/Hello+World.pdf
Providing a proxy download URL
The most secure way to provide a download URL to your users is through your app. This might look like https://yourapp.com/download/:eid.zip. This URL would check to make sure the user can access the file, then request the Anvil download URL to download the files. There are a couple benefits:
- Your app knows best who should access URLs and when. You can use your app's authentication to control access to the file. If a URL gets out into the wild, it will be protected by your app.
- You do not need to save the files in your own infrastructure.
Here is a JavaScript + express.js example that pipes the Anvil download response to your express server's response:
app.get('/download/:eid.zip', (req, res) => {
  const { eid } = req.params

  // Authenticate / authorize your user here!

  const anvilDownloadURL = `https://app.useanvil.com/download/${eid}.zip`

  // Authenticate to Anvil with your Anvil API key
  const encodedToken = Buffer.from(`${ANVIL_API_KEY}:`, 'ascii').toString(
    'base64'
  )
  const downloadOptions = {
    method: 'get',
    headers: { Authorization: `Basic ${encodedToken}` },
  }

  fetch(anvilDownloadURL, downloadOptions).then((downloadResponse) => {
    downloadResponse.headers.forEach((v, n) => res.setHeader(n, v))
    downloadResponse.body.pipe(res)
  })
})
White labeling with custom stylesheet
You can specify a custom stylesheet injected into your Workflow from the Worfklow settings. This stylesheet can be served from your website giving you full control over the custom styles.
White labeling with custom stylesheets is a Custom plan feature. To learn more, please visit the pricing page.
Once enabled for your organization, you can set a custom stylesheet URL on a per-Workflow basis in each Workflow's settings:
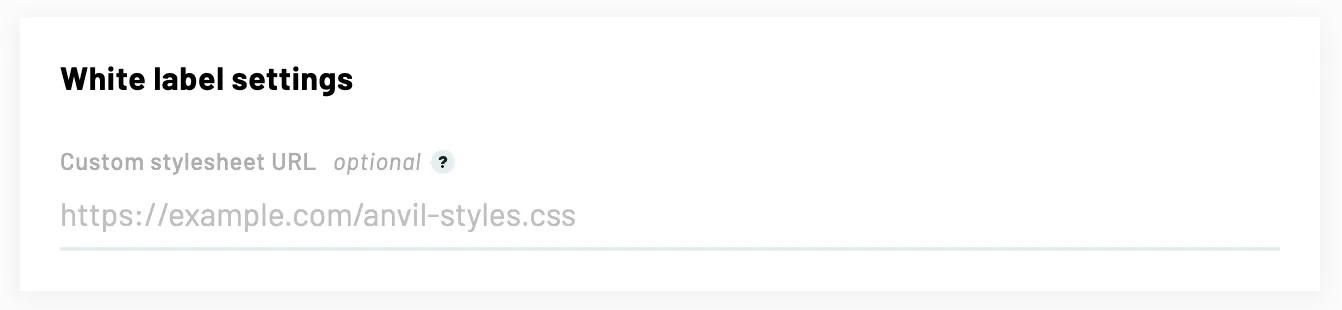
For more information on how to set up and write a custom stylesheet, see the white labeling guide.