We’ll often refer to our advanced editor as the JSON editor, sometimes defining it as JavaScript powered logic. Why is this and how is this relevant to Anvil Workflows?
Without getting too technical JSON (JavaScript Object Notation) is a text format commonly used by web browsers to store and communicate data. It’s derived from JavaScript object syntax, though it has more restrictions than JavaScript.
Our advanced editor follows JSON syntax and formatting but has underlying JavaScript support. Whereas standard JSON only allows for static data, Anvil’s JSON editor is powered by JavaScript logic, unlocking more functionally and complexity. You’ll be able to complete dynamic calculations and validation, incorporate complex logic, and have more granular control over stylizing, making your Workflows more powerful.
In this article, we’ll cover:
- Where can I use the advanced JSON editor?
- Getting started with the advanced JSON editor
- Understanding expressions and conditions
- Examples
- Additional resources
Where can I use the advanced JSON editor?
The JSON editor is available at several different levels within a Workflow. Depending on what you’re trying to accomplish, you may want to apply changes to different configuration files. A combination of changes to the three types of configuration files allow you to build any kind of Workflow.
- Webform (forge): controls field and form level formatting and logic in the Webform.
- PDF (cast): controls PDF field and document level formatting and logic which affects the final PDF output.
- Workflow (weld): controls the data connection between Webforms and PDFs, along with emails and buttons.
If you imagine the linear progression of a Workflow, users will first enter information in a Webform (forge) through Webform fields. Once the Webform is completed, the information is then populated in a PDF (cast) and mapped to specific PDF fields. A Workflow (weld) encapsulates the connections between the Webforms and PDFs, as well as the overall processes from start to finish.
As Webforms always come before PDFs, it’s possible to reference Webform (forge) expressions and fields on a PDF (cast) and/or PDF field, but the reverse isn’t true. Additionally, because the Webform (forge) acts as the data entry point, changes made at this level will result in the submission payload whereas changes made at the PDF(cast) level will not.
Changes at the Workflow (weld) level are usually reserved for process related items and actions- think of buttons and email notifications.

Accessing the advanced JSON editor
If your account has access to the advanced JSON editor, you can access the configuration files that support your Workflow anywhere you see the word JSON (e.g. {} JSON, Edit JSON, {} Field JSON, etc.). The areas in which you’d typically apply changes through the UI are the same areas you’d access your configuration files to apply calculations, logic, validation, and styling. If you’d like to apply changes to a specific page, field, or the entire Webform or PDF, navigate to the appropriate editor panel by clicking the corresponding object.
For example, if you’d like to edit a specific Webform (forge) page’s logic, you’ll need to:
- Navigate to the relevant Webform page
- Click the Webform page title
- Select the Page logic tab > Edit JSON
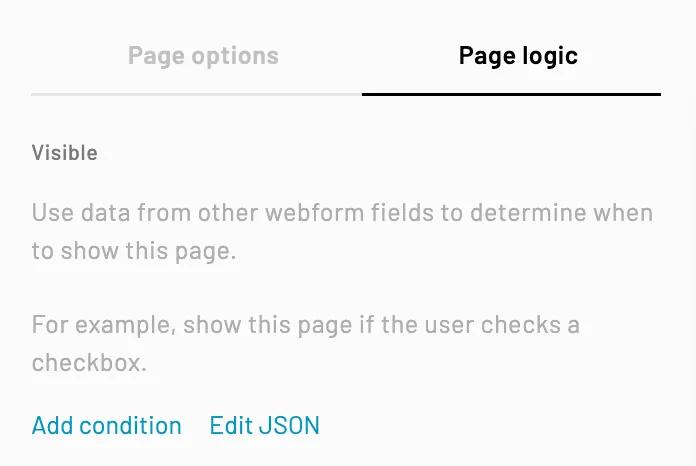
Complete a similar process to edit the configuration files for your desired area.
Notes:
- Only editors and admins will have access to the advanced editor. Viewers within an organization will not be able to access the advanced editor.
- When editing an entire Webform (forge) or PDF (cast) configuration files, you can select Edit Entire Config Object to view the full configuration file (e.g. all pages, fields, etc.)
- PDF (cast) fields support two types of JSON configuration files
{} Field JSONand{} Connection JSON. {} Field JSON: allows you to stylize the PDF field text box and is associated with how the information is displayed on the PDF. You can edit the shape, size, location, and font.{} Connection JSON: allows you to manipulate the information from the Webform before the data is presented on the output PDF.
Using the advanced editor to access Workflow level changes:
Workflow (Weld) configuration files can be accessed through the Workflow editor toolbar:
- Navigate to your Workflow editor
- Select the three vertical dots menu in the Workflow editor toolbar
- Choose the configuration file you wish to edit
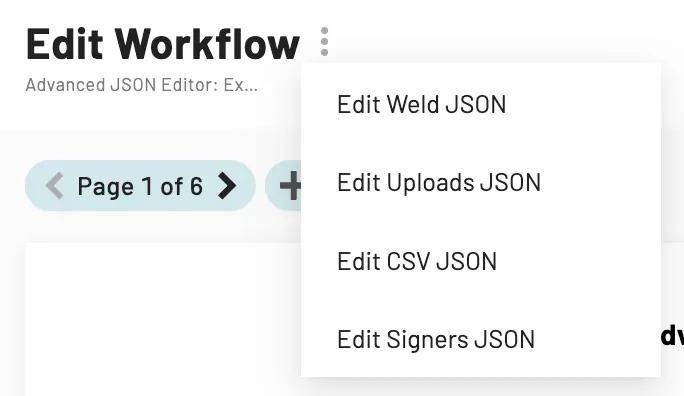
There are four types of Workflow (weld) configuration files:
- Weld JSON: contains all Workflow (weld) configurations. Any changes to emails or buttons can be controlled at this level.
- Uploads JSON: controls the files uploaded via a file upload field.
- CSV JSON: defines the behavior of csv exports, allowing you to manually define all columns into a single row, or manually define the rows and columns. Only Webform field values may be used, expressions are not currently supported.
- Signers JSON: includes all signer details and associated variables such as routing order.
Getting started with the advanced JSON editor
We’ll cover best practices and tips and tricks to help you get the most out of our advanced editor.
Best practices
Assign field aliases to your Webform (forge) fields
Anvil will automatically assign unique field IDs to each of your fields, however these IDs aren’t very human readable. To streamline your JSON editor experience, take the extra time to assign human readable field aliases to your Webform fields.
"id": "forge1a23bb45c6777eeefgh890ij12kk3",
"aliasId": "customerName"
Use JSON formatting
The advanced editor is referred to as JSON editor because it uses JSON formatting. If you include incorrect formatting, your changes may not work and you could potentially break your Workflow.
Most information will be presented in string format, meaning your information will be placed between ”double quotation marks ”. Webform fields for example should always be referenced with string formatting.
"forgeId:webformFieldID"


// e.g.
"1234:customerName"
Unless you’re at the very end of your configuration file, always end a line with a comma mark. Even a single misplaced comma can prevent your Workflow from working properly.
If you are using parenthesis (), brackets [], or curly brackets {}, make sure you close them.
Helpful tips and tricks
The JSON editor can be intimidating, we completely understand and we’re here to help!
Green is for great job
A visual indicator that you’re formatting configuration changes correctly is if a majority of your text is green. There are very few exceptions to this rule which we have listed below:
- White: reserved for commas , and brackets (e.g curly brackets {}, square brackets [], etc.)
- Orange: reserved for numbers (e.g. 0, 5, etc.) and boolean data types (e.g true and false)
Use the UI to help figure out formatting
If you’re unsure how to format something, try to accomplish a similar task with the UI first. Changes made with the UI will automatically make changes to the configuration file, which you can then use as a base for any modifications. Some examples:
- Using a Google font to stylize a PDF (cast) field that isn’t supported via the UI:
- Select a font from the PDF field editor
- Click {} Field JSON
- Replace the existing font family information with your desired font name
{
 "fontFamily": "Lato"
 }
 // Replace Lato with the font family you want to use
 // and leave the existing formatting intact.
 {
 "fontFamily": "Libre Franklin"
 // Font names are case-sensitive and must be exact
 }
- Configuring PDF visibility with complex logic:
- Navigate to your PDF editor > click the Logic tab
- Add condition
- Enter a similar condition > Save
- Select Edit JSON
- Replace the existing ”condition” with your desired logic
In the example below, the logic of a PDF field is set to show if a designated Webform field is checked:
"condition": {
    // This is the "pdfFieldId": "forgeID:webformFieldId"
    "forge1a23bb45c6777eeefgh890ij12kk3": "12345:forge2a3bc44e5678ghijk889lm01nn2",
    // This states the PDF field is visible if the
    // designated Webform field is checked.
    "visible": "!!forge1a23bb45c6777eeefgh890ij12kk3"
}
The above example provides us with the general formatting of a condition. The logic is straightforward and doesn't factor in any nuances beyond what has been entered in the Webform field. We can modify the condition to include more complex logic by referencing a Webform (forge) expression within our PDF (cast) field condition.
"condition": {
    // This defines an object value as the result of a
    // Webform (forge) expression.
    "state": "12344:textContains",
    // This determines that the PDF field will only be
    // visible if the state selected in the Webform field
    // is California.
    "visible": "state === California"
}
The visibility of a field is now determined by complex logic and the dynamic selection of a field.
Test your Workflow before publishing any changes
Sometimes your configuration changes will look correct and save without issue. However, once you attempt to start a Workflow submission, the Workflow doesn’t open. Testing your Workflow before you publish your changes ensures that your customers won’t encounter a broken Workflow. Launching a test submission also allows you to preview logic changes that aren’t viewable through the Workflow editor. Learn more about how to test a Workflow here.
Use expression references to speed up testing
If you want to test a Webform (forge) expression but don’t want to go through your Workflow just to view the results in the output PDF, use expression references to help speed up your testing. By adding expression references to an explanation text field, you’ll instantly be able to see the result of your Webform expression directly on your Webform. Just be sure to use a test submission and remove your expression references before you publish your Workflow.
- Expression references should be formatted as
{{forgeID:ExpressionName}} - Please note that Webform (forge) expressions won’t work with the Workflow editor test mode.
Understanding expressions and conditions
Now we’re ready to get started with our first advanced editor changes! How do we actually make these changes? Some changes, like stylizing a PDF field with a different Google font, are as simple as swapping out the font name. Other changes like calculations, complex logic, and validation rely on JavaScript logic to complete the action.
Anvil refers to these JavaScript snippets as expressions, which can be used with all configuration files. Expressions can also be used with conditions to apply more complex logic.
- Expressions: JavaScript snippets that can be used in Anvil’s configuration files to encode custom rulesets, logic and validation.
- Conditions: can be used in combination with expressions to encode complex logic in Webform and PDF pages and fields.
Referencing fields
Whether you’re completing calculations, setting validation, adding logic, or stylizing your PDF, chances are you’ll need to reference a specific Webform (forge) field as part of your expression or condition.
Webform (forge) fields can be referenced through a couple of different formats.
A string
"forgeID:fieldAlias"
//E.g.
"1234:customerName"
// Returns the name input in the Webform.
An array of strings
["forgeID:fieldAlias", "forgeID:anotherFieldAlias", …]
// Anvil will automatically pick up the first value that
// isn’t null/undefined.
["1234:customerName", "1234:customerAddress", …]
// The customer name is returned rather than the address.
A template string. Template strings are useful when the data is a compound string such as a full name or address.
"variableName: {{forgeID:fieldAlias}}"
// Anvil will automatically convert the data to a string.
"clientDetails: {{1234:clientName}}"
// clientDetails returns the name input in the Webform.
Expressions
Expressions are basically a JavaScript function described by an object. These snippets of reusable code perform specific tasks such as calculating a value. Expressions are comprised of two basic parts:
- Object: defines the input (function arguments). Input keys are arbitrarily defined values that we sometimes refer to as a variable name. As a best practice, your variable name should be different from your field alias and cannot be
result. This helps prevent circular references that could break your Workflow. - E.g. Don’t use “email” as the variable name if your field alias is also “email”. Instead use something like “customerEmail”.
- Result: a special key that defines the output (return value) of your expression. The
resultkey must be used within your expression.
"expressions": {
  "dependentCredit": {
      // Defined objects will be available for use within
      // the result of your expression.
      "minorDeductible": "1234:minorClaim",
      "nonMinorDeductible": "1234:dependentClaim",
      // Run the string as a JavaScript expression,
      // use the return value as the resulting value.
     "result": "minorClaim + dependentClaim"
  }
}
Conditions
Conditions are a special case of expressions that determine whether or not Webform and PDF pages and fields are visible. Rather than using the result key like a standard expression, conditions support several output keys: visible and disabled. Expressions can be used with any of the output keys to encode complex logic.
"condition": {
   // Define your object key.
   // Avoid using a field alias or any of the special
   // output keys.
   "state": "1234:coveredState",
   "visible": "state === California"
}
Examples
As mentioned previously, expressions can be applied to different types of configuration files. We’ll provide example expressions that can help you get started with completing calculations, validate fields, set complex logic, and stylize emails with different types of configuration changes.
Calculations
We’ll show you three different expressions for calculating:
- An input value multiplied by another value
- Summing multiple dynamically calculated values
- Adding X days to an input date to determine a contract end date
Multiplying an amount to an input value
As a Webform (forge) expression, multiplying an amount to an input value would look like this:
"expressions": {
  "multiplyCalcInput1": {
     "result": "calcInput1 * 100",
     "calcInput1": "12344:calculationInputVal1"
   }
}
You can reference this expression in a PDF field by entering the following in the Select webform to connect area:
12345:multiplyCalcInput1
As a PDF (cast) field expression, you would click {} Connection JSON and enter the following:
 "submissionFieldId": {
   "result": "calcInput1 * 100",
   "calcInput1": "12345:calculationInputVal1"
 }
Sum two dynamically calculated values together
Assuming you’ve completed multiple calculation expressions already, you can sum the dynamically calculated values together.
As a Webform (forge) expression, summing dynamically calculated values would look like this:
"expressions": {
   "calculationSumValue": {
     "input1": "12345:multiplyCalcInput1",
     "input2": "12345:multiplyCalcInput2",
     "result": "input1+input2"
   },
}
You can reference this expression in a PDF field by entering the following in the Select webform to connect area:
12345:calculationSumValue
As a PDF (cast) field expression, you would click {} Connection JSON and enter the following:
 "submissionFieldId": {
   "input1": "12345:multiplyCalcInput1",
   "input2": "12345:multiplyCalcInput2",
   "result": "input1+input2"
 }
Adding x days on top of an input date value
The following expressions are useful if you want to calculate a contract end date based on an user input date value (e.g. contract start date). Keep in mind that the amount of time you want to add needs to be converted to milliseconds. For example, 30 days is 2592000000 milliseconds, a year is 31536000000 milliseconds, etc.
As a Webform (forge) expression, adding 30 days to an input value would look like this:
"expressions": {
  "calculate30DaysAfterContractStart": {
     "result": "(new Date(new Date(contractStartInput).getTime() + 2592000000 )).toLocaleDateString()",
     "contractStartInput": "12345:calculateContractInputVal"
   }
}
You can reference this expression in a PDF field by entering the following in the Select webform to connect area:
12345:calculate30DaysAfterContractStart
As a PDF (cast) field expression, you would click {} Connection JSON and enter the following:
 "submissionFieldId": {
   "result": "(new Date(new Date(contractStartInput).getTime() + 2592000000 )).toLocaleDateString()",
   "contractStartInput": "12345:calculateContractInputVal"
 }
Validation
Validation affects what users are allowed to input in submission fields and therefore validation expressions are applied directly to the specific Webform (forge) field configuration file. We’ll show you two different expressions that will:
- Add a minimum and maximum character limit to a field
- Restrict the range of dates users are allowed to select within a date picker
- Customize field types with error messages when input values don’t meet validation criteria
Add a minimum and maximum character limit to a field
Some field types like Numeric Text already allow you to set a minimum and maximum length through the UI. For other fields like Short and Long text field types, you’ll need to set min and max length with the advanced JSON editor. Permissible length must be defined as a character count, so you’ll need to determine how many characters you’d like to allow and enter that number in your validation.
Messages for character limit can’t be customized. If the user submission value doesn’t meet validation criteria, then either of the following messages will be displayed after the user exits the input field:
- “Should not be longer than _”
- “Should not be shorter than _”
As a Webform (forge) field expression, select the appropriate field, then click {} JSON and enter:
 "validation": {
   "minLength": 15,
   "maxLength": 100
 },
If you only want to set a maximum length, you can delete the "minLength” argument. The opposite is also true if you only want to set a minimum length.
Restrict the range of selectable dates within a date field
In an earlier example, we calculated a contract end date based on a user input start date. In this example, we will restrict the range of dates users are allowed to select as the contract start date to be within three days of the current date. We’ll also create a custom error message that will be displayed to users if their input values don’t meet validation criteria.
As a reminder, any date values need to be converted to milliseconds, so 3 days will be 259200000 milliseconds.
As a Webform (forge) field expression, select the appropriate field, then click {} JSON and enter:
 "validation": {
   "expressions": [
     {
       "valid": "(new Date().getTime()+259200000 >= (new Date(value).getTime())) && ((new Date(value).getTime()) >= new Date().getTime()-259200000)",
       "message": "Must be within 3 days of today"
     }
   ]
 },
Complex Logic
Complex logic can be applied to Webform (forge) and PDF (cast) pages and fields. We’ll specifically provide expressions that will:
- Map a list of keys to a return a specific preset value
- Compare multiple input values and only return one
- Prefix a specific value to an input value
Map a list of keys to input values to return a specific preset value
You’ll need two expressions to accomplish this, one expression that creates the map and another to encode the logic that will determine what is returned. In our example, we’ll be using a Dropdown field type, however you can also use this expression with other field types.
As a Webform (forge) expression, your map would look like this:
"expressions": {
   "logicDropdownMap": {
       "result": "{'Workflow': 'weld', 'Webform': 'forge', 'PDF':'cast'}"
   }
}
Once you’ve created your map you will add the following expression to your Webform (forge) expressions to compare your input field with your map keys and determine what is returned:
"expressions": {
     "logicDropdownReturn": {
     "ddv": "12345:dropdownInputVal.v",
     "map": "12345:logicDropdownMap",
     "result": "!!ddv ? map[ddv] : null"
   }
}
You can reference this expression in a PDF field by entering the following in the Select webform to connect area:
12345:logicDropdownReturn
You can also create your map at the Webform (forge) level and then write your secondary expression at the PDF (cast) field level. To do this you would click {} Connection JSON and enter the following:
 "submissionFieldId": {
   "ddv": "12345:dropdownInputVal.v",
   "map": "12345:logicDropdownMap",
   "result": "!!ddv ? map[ddv] : null"
 }
Compare multiple input values and only return one
In this example, we’ll be comparing two dates and returning only the earlier date.
As a Webform (forge) expression, comparing two input fields and returning only one would look like this:
"expressions": {
   "logicEarlierDate": {
     "date1": "12345:logicDateVal1",
     "date2": "12345:logicDateVal2",
     "result": "date1 < date2 ? date1 : date2"
   }
}
You can reference this expression in a PDF field by entering the following in the Select webform to connect area:
12345:logicEarlierDate
As a PDF (cast) field expression, you would click {} Connection JSON and enter the following:
 "submissionFieldId": {
   "date1": "12345:logicDateVal1",
   "date2": "12345:logicDateVal2",
   "result": "date1 < date2 ? date1 : date2"
 }
Prefix a specific value to an input value
In the example below, we’re collecting apartment numbers in our Numeric Input Webform field. However, we want to return “Apt# _”, so we’ll need to prefix “Apt#” to our input value.
As a Webform (forge) expression, prefixing a specific value to an input value would look like this:
"expressions": {
  "logicPrefixInputString": {
     "result": "!!aptNumVal ? ('Apt #' + ' ' + aptNumVal) : ('')",
     "aptNumVal": "12345:logicAptNumInputVal"
   },
}
You can reference this expression in a PDF field by entering the following in the Select webform to connect area:
12345:logiPrefixInputString
As a PDF (cast) field expression, you would click {} Connection JSON and enter the following:
 "submissionFieldId": {
   "result": "!!aptNumVal ? ('Apt #'+ ' ' + aptNumVal) : ('')",
   "aptNumVal": "12345:logicAptNumInputVal"
 }
Styling
Styling changes can be made at the PDF (cast) or Workflow (weld) levels. We’ll specifically explain provide examples on how to:
- Stylizine an output PDF field with fonts that aren’t available through the UI
- Edit copy on the Workflow signature page
Stylize an output PDF field with fonts that aren’t available through the UI
Anvil supports all Google fonts, which means you have over 1500 options! To use a font that isn’t available through the UI, navigate to your specific PDF field, click {} Field JSON and enter the following:
{
 "fontFamily": "Bebas Neue"
}
Note: Font family names are case-sensitive and must be exact. For example “Bebas Neue”, not “bebasneue”.
Edit the copy on the Workflow signature page
Practically all the text on the signature page can be customized. To customize the copy on your signature page, click on the three dots menu in the Workflow header, select “Edit Weld JSON”, and enter the following:
"signaturePage": {
   "pageTitle": "Some Org",
   "title": "Signature page copy customization",
   "description": "This is a customized Signature page.",
   "signatureLabel": "autograph",
   "initialLabel": "autograph lite",
   "acceptTitle": "Accept Your Autograph",
   "acceptDescription": "Below is how your autograph and autograph lite will appear everywhere you need to autograph on all things.",
   "acceptButtonText": "I Accept My Autograph And Autograph Lite",
   "drawSignatureTitle": "Draw Your Autograph",
   "drawSignatureDescription": "Your autograph will appear on all documents where you need to sign.",
   "drawSignatureButtonText": "I Accept My Autograph",
   "drawInitialsTitle": "Draw Your Autograph Lite",
   "drawInitialsDescription": "Your autograph lite will appear on all documents where you need to initial.",
   "drawInitialsButtonText": "I Accept My Signature Lite",
   "signTitle": "Sign All Things",
   "signDescription": "Click below to sign autograph date on all documents.",
   "signDescriptionCompleted": "Documents have been completed and autographed.",
   "signConsentText": "I have done a look-see of the documents and I'm chill with using electronic autographs.",
   "signEachDescription": "Review and sign the all the things below.",
   "signEachConsentText": "I consent to using electronic autographs.",
   "signButtonText": "Sign all the things",
   "signEachStartButtonText": "Start Autographing",
   "signEachFinishButtonText": "Finish Autographing",
   "completedButtonText": "That's all folks"
 }
Additional resources
If you need more help writing expressions, we highly recommend checking out the following resources:
- Advanced JSON editor tutorial: We walk you through writing a PDF (cast) field expression to calculate an submission field multiplied by another value.
- MDN Web Docs: an open-source guide covering various Web platform technologies. MDN Web Docs is particularly helpful in getting a high level understanding of JavaScript expressions.
- ChatGPT or other similar AI services: can be a great foundational resource for writing general JavaScript expressions and asking any questions that are harder to answer with a web search alone.